This document is a quick reference guide for the CLAAS 930/770 type 528 headers, providing information and basic field settings. It is designed to assist operators with familiarization and settings of CLAAS combine harvester cutterbars, but it is not a replacement for the comprehensive Operator's Manual.
Function Description
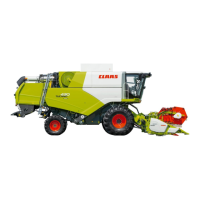
The CLAAS cutterbar is a critical component of a combine harvester, designed to efficiently cut and gather crops from the field. Its primary function is to feed the harvested material evenly, preferably headfirst, into the combine's drum for processing. The guide emphasizes that correct operation and maintenance are essential for achieving optimal output and efficiency from the cutterbar.
Important Technical Specifications
Header Type: 930/770 type 528 Headers.
Auger Size: The new header features an increased auger size of 660mm, which aids in achieving an even crop feed.
Table Extension: The new one-piece table can extend from its shortest to longest point in a single movement, eliminating the need for extension plates.
Side Knife Restriction: When a side knife is fitted, a sensor detects it and restricts the table's movement from a maximum of 600mm to 450mm. This prevents the reel from contacting the side knife.
Table Adjustment (Cerio Cutterbar): The Cerio cutterbar, while having a fixed length table similar to previous C-range CLAAS cutterbars, allows for manual adjustment of the table length. By undoing 10 bolts, the table can be extended or retracted into five different positions: 0mm, 50mm, 100mm, 150mm, and 200mm. The tightening torque for these bolts is 50 Nm.
Drive System: The cutterbar features a one-piece extending drive shaft. Unlike previous machines, it does not have a slip clutch on the auger; instead, a rattle-type clutch on the drive shaft provides overload protection. There is no traditional wobble box; a straight-through drive system (3) is used, powered by a rear-mounted gearbox (4).
Usage Features
Dividers:
- Types: Two types are available: long and short dividers.
- Setting: The height of the divider should be adjusted to prevent it from running on the ground. It is recommended that the shoe (base of the divider) be set to the same height as the stubble.
Lifters:
- Recommendation: Lifters are recommended for CLAAS cutterbars.
- Fitting: The first lifter should be placed on the fifth finger from the RHS of the cutterbar, with subsequent lifters on every fourth finger thereafter.
- Types: Standard lifters and low-cut lifters (for lower cutting heights, e.g., peas) are available.
Knife:
- Condition: The knife must be in good condition for effective operation. This includes replacing damaged or broken sections, eliminating vertical movement by adjusting the keeps, and ensuring fingers are not rounded or bent.
- Benefits: Regular checks and adjustments lead to cleaner cutting and reduced stress on the knife drive system.
Table Auger:
- Function: Crucial for transporting material to the front elevator.
- Retractable Fingers Adjustment: The timing of the retractable fingers can be adjusted for different crops. This is done by opening the guard on the RHS of the V770 & V930 and adjusting a lever with a spanner.
- Settings: Top holes for short crops, lower holes for tall crops.
- Standard Setting: The 3rd hole from the bottom is the standard setting.
Crop Wrapping Solutions:
If crop wrapping occurs around the table auger in difficult conditions, several procedures can be tried, one at a time:
- Stripper Plate Adjustment: Adjust the stripper plates behind the auger. This is made easier on this machine as it can be done from the back of the header.
- Retractable Finger Removal: Remove the intermediate retractable fingers along the auger's length, leaving only the middle ones.
- Auger Height Check: Ensure a minimum gap of 20mm between the trough and the auger flights.
- Auger Speed Reduction: The auger speed can be slowed by fitting optional sprockets on the chain drive shaft.
Skids:
- Setting: Skids underneath the cutterbar should be set according to local conditions (e.g., stones, loose soil).
- Recommendation: In abrasive conditions, it is recommended to lift them right up.
Side Knife Installation:
- Attachment: The side knife attaches easily with a simple twist-lock turnbuckle.
- Locking Mechanism: Both the side knife and divider use a new fork locating and locking device. Simply slide into the lock and turn the handle ¼ turn to secure it.
- Automatic Drive Engagement: Once the side knife is fitted and locked, two drive pipes connect to a valve block on the cutterbar. A sensor detects the secure lock, engaging a solenoid that allows oil to flow, thus eliminating the need for manual pipe linking or disengaging drives as on previous headers.
VARIO ONLY (Park Feature):
- Function: The new cutterbar has a park feature for transport, indicated by a sticker for manual placement, but it can also be done automatically.
- Automatic Parking: With the engine running and the multi-coupler connected, press and hold the auto contour button (1). The cutterbar will move the table and reel into the parked position.
- Return to Settings: When reconnecting, press the pre-set height button (2) and hold until three beeps are heard. The cutterbar will then return to its previously set auto settings.
Maintenance Features
General Maintenance:
- Routine Maintenance: Emphasized as vital to minimize downtime and maximize output. This includes servicing the machine according to the operator's manual and performing a thorough check.
- Worn Parts Replacement: It is considered false economy to delay replacing worn parts until they break. For example, changing a cracked knife section before work takes 5 minutes, but waiting until it breaks during operation can result in a minimum of 10 minutes of lost output.
Safety:
- Operator's Manual: Always read the Operator's Manual before operating the combine and any new machine.
- Familiarization: Be familiar with the machine's controls and operation.
- Guards: Ensure all guards are kept in place and in good condition, as the cutterbar has many moving parts.
- Maintenance Safety: When performing maintenance or adjustments outside the machine, switch off the engine and remove the battery isolator key, or ensure the cutterbar is on the trolley.
- Underneath Cutterbar: If working underneath the cutterbar while it's on the machine, ensure the cutterbar lift cylinder lock is in place.
- Awareness: Be aware of people, especially in farmyards, when operating the machine. Get help when maneuvering the cutterbar on or off the machine.
- Risk Assessment: Assess all risks to reduce the likelihood of accidents.
- Additional Safety Information: Consult the operator's manual for in-depth safety information and www.hse.gov.uk for other relevant information.
Gearbox Maintenance:
- Oil-filled Gearbox: The rear-mounted gearbox (4) is oil-filled and requires regular servicing as per the maintenance section of the operator's manual.
- Procedure: Observe the correct procedure for checking and changing the oil.
Lifters:
- Daily Check: Lifters should be checked daily for wear and fatigue and replaced if necessary.