4 5
English
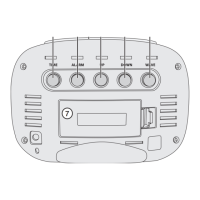
1. [ ▼ ] Reduce thevalue/volume, search for theprevious
radio channel
2. [ VOL ] Set thevolume
3. [ RADIO/SLEEP ] Switch theradio on
4. [
] Switch theradio off, snooze-function,
change thedisplay brightness
5. [ SET ] Press to view set alarm times, advance through
saved radio channels. Hold in to set thetime
6. [ AL1∙2 ] Activate thealarm, set thetime of alarms 1 and 2
7. [ ▲/Project ] Increase thevalue/volume, search for
thenext radio channel, activate theprojector
8. Projector
9. Display
10.
:Alarm 1 is activated
11.
:Alarm 2 is activated
12.
: Snooze
13.
Radio: The radio is switched on
14.
SLEEP: The sleep timer has been activated
15. Battery cover
16. Speaker
17. DC 5V: Power input socket
Installation
1. Remove thebattery cover on theback of theclock
radio and insert 1 × CR2032 battery (sold separately).
Make sure that thepositive terminal of thebattery is
facing upwards. The battery is just aback-up. If there
is apower cut theback-up battery will save thetime
and alarm settings until thepower comes back on.
Note: The alarm function of theclock radio will not
work if thepower supply has been disconnected (such
as in thecase of apower cut), theback-up battery
only provides enough power to save thesettings in
thememory.
2. Connect theUSB cable to theDC power in socket (17)
on theclock radio and to anavailable USB power
supply/charger.