10
ENGLISH
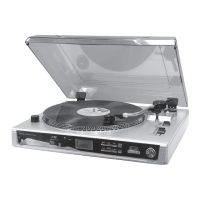
6.1 Recording from the record player
1. Insert a USB memory or memory card into the connections on the record player’s front.
. Set the function switch [13] to the
PHONO position.
3. Put on and prepare the record you want to record from (see the chapter
Use the record player).
4. Push
● REC (8) once.
“USB” ashes on the display to indicate that the recording will be made to the USB memory.
If, instead, you want to record on a memory card, use I◄◄ or ►►I to choose “SD” as the target.
5. Push on
● REC again to start playback (if ● REC is not pushed in within 10 seconds playback
starts automatically).
6. Start the playback of desired record track. When recording is in progress ashes
on the display.
7. When nished recording, push
● REC again.
N.B.
- The recorded les will be saved on the on the connected memory AUDIO folder.
- The recording quality is preset to 18 Kbps/44.1 KHz.
- No track name etc. is saved during recording, these have to be entered manually via a computer.
- Dividing the recording in to different MP3 les this has to be done manually, follow the instructions
above for each track you want to record.
- Push
● REC to abort the recording.
6.2 Recording via the AUX input
1. Insert a USB memory or memory card to the connections on the record player’s front.
. Set the switch (13) to the
AUX-IN position.
3. Prepare and connect the equipment that you want to record from.
4. Push
● REC (8) once.
“USB” ashes on the display to indicate that the recording will be made to the USB memory.
If you instead want to record on a memory card, use I◄◄ or ►►I to choose “SD” as target.
5. Push
● REC again to start playback (if ● REC is not pushed within 10 seconds playback starts
automatically).
6. Start playback on the connected equipment. When recording is in process
ashes
on the display.
7. When nished recording, push
● REC again.
N.B.
- The recorded les will be saved in the AUDIO folder on the connected memory.
- The recording quality is preset to 18 kbps/44.1 kHz.
- No song name etc. is saved during recording, these have to be entered manually via a computer.
- Dividing the recording to different MP3 les this has to be done manually, follow the instructions above
for each track you want to record.
- Push
● REC to abort the recording.
6.3 Choosing the recording quality
Choose recording quality for your MP3 recordings.
1. Set the switch in position
PHONO or AUX-IN.
. Push
INFO on the remote. The current recording quality will be shown on the display.
3. Push
I◄◄ or ►►I to select the desired recording quality. 3/64/96/18/19 or 56 kbps.
4. Push
INFO again to conrm your choice.