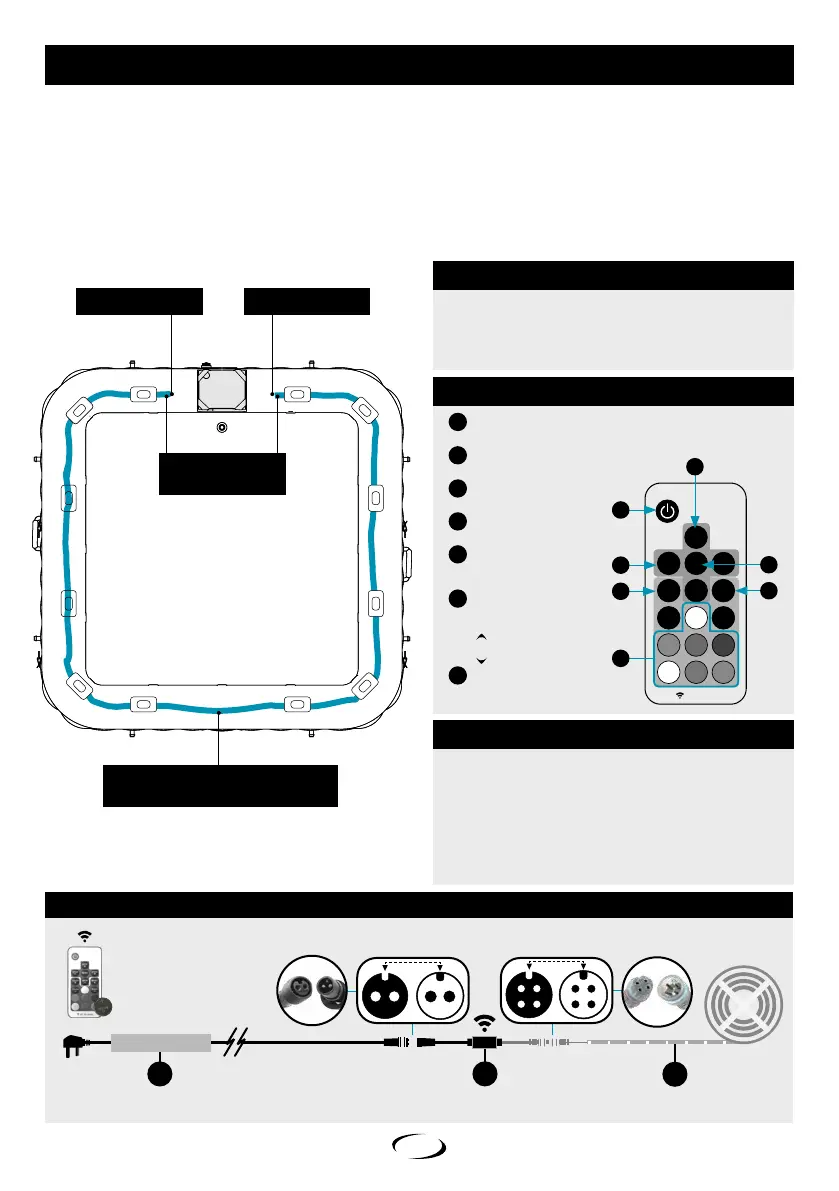
FIT THE LED LIGHTS LOOSELY TO ALLOW THE CLEVERSPA
®
TO EXPAND WHEN FILLED.
Correct installation of your LED lights is extremely important. Failure to follow instructions carefully
may result in failure.
Ensure lights are not installed too tightly. They must be fitted loosely, with freedom to move between
the retention loops on the base of the hot tub. Allow for some excess LED strip across each gap, this
will reduce stress on the lighting. This allows the lighting strip to expand when filled with water.
Failure to do this can reduce the lifespan of your lighting - please see FIG 1 below.
RF Wireless
Receiver
LED
Light Strip
2
3
1
Mains Power
Converter
RF REMOTE
CONTROL
& CR2025
3V BATTERY
IMPORTANT! Note the placement of alignment notches
HOW TO CONNECT THE LED LIGHTING KIT
LED LIGHTING SETUP - SELECTED MODELS ONLY
12
INITIAL LIGHTING SETUP
1. Connect lighting system together as shown in FIG 1.
2. Remove plastic tape from the battery compartment
on the remote.
3. Turn lights on with the power button.
INSTRUCTIONS
MODE
+
SPEED
+
SPEED
–
MODE
–
COLOR
+
COLOR
–
BRIGHT
–
BRIGHT
+
DEMO
RF Wireless
A
C
G
F
E
D
B
POWER
On / Standby
CHANGE MODE
Forwards / Backwards
CHANGE SPEED OF LIGHTS
‘+’ Faster / ‘–’ Slower
CHANGE COLOURS
Forwards / Backwards
PRE-SET COLOURS
Select from a range of
pre-set solid colours
BRIGHTNESS
Adjust Lighting
brightness (5 levels)
: Increase Brightness
: Decrease Brightness
DEMO MODE
Cycles through pre-set
colours & eects
A
B
C
D
E
F
G
+
–
LIGHTING DOES NOT CORRESPOND TO COLOUR SELECTED
1. Turn on the lights using the red power button.
2. Press the solid green button once.
3. Turn o the power at the mains for 5 seconds.
4. Turn back on and immediately press and hold
the solid green button.
5. Release the button when the colour changes to green.
6. Wait 5 seconds for the change to take eect.
N.B. Style of CleverSpa®
may dier from image shown
FIG 1
START/END LIGHTING
EQUALITY SPACED
ENSURE LIGHTING IS NOT TIGHT BETWEEN
LOOPS AND LEDS FACE THE BASE
FIRST LIGHTING LOOP LAST LIGHTING LOOP
N.B. When changing the battery in the remote control, replace with
a suitable CR2025 3V battery inserted with the + Symbol facing up.