R
R
GB
GB
AUTO-LEARNING PROCEDURE FOR NEW RADIO CONTROLSAUTO-LEARNING PROCEDURE FOR NEW RADIO CONTROLS
AUTO-LEARNING PROCEDURE FOR NEW RADIO CONTROLSAUTO-LEARNING PROCEDURE FOR NEW RADIO CONTROLS
AUTO-LEARNING PROCEDURE FOR NEW RADIO CONTROLS
If a radio control is lost or begins to operate badly, is possible to replace it in safe way.
In fact this procedure is only permitted by the using of your PIN code. Proceed in the
following way:
1.1.
1.1.
1. Disarm the system.
2.2.
2.2.
2. Prepare all radio controls to add/replace.
3.3.
3.3.
3. Turn the ignition key ON, press both buttons on the radio control (art. 7777 or
7727) until the transmitter LED will go off.
4.4.
4.4.
4. Release the buttons and make sure that the LED on the radio control comes on in a
fixed way. Repeat step 3 and 4 for all the remotes to add. Switch the ignition OFF.
5.5.
5.5.
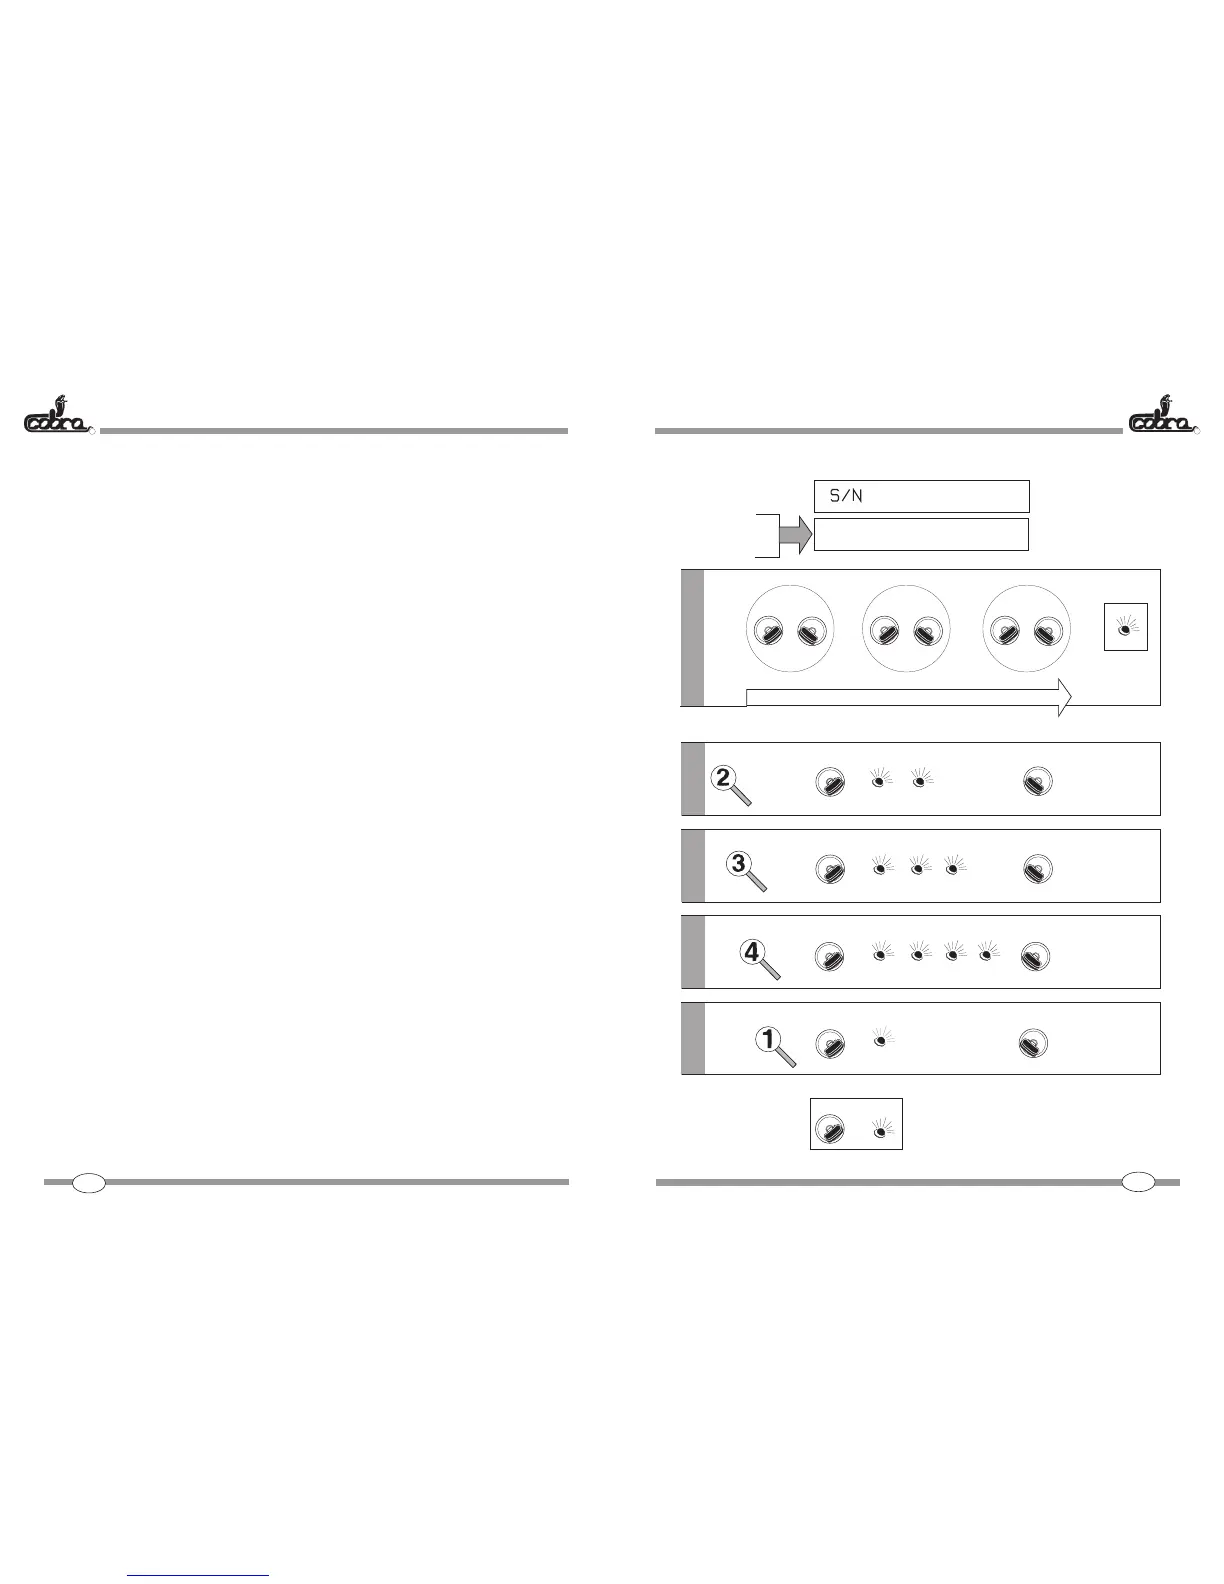
5. Turn the ignition key ON and then OFF for three times within 7 seconds.
6.6.
6.6.
6. The LED will blink once during 3 seconds signalling that you can insert the PIN code.
7.7.
7.7.
7. After the LED will go off turn the ignition ON and count the led blinks up to the
number which is the first digit of your PIN (referring to the example: 2 blinks=2 is
the first digit) then switch the ignition OFF.
Repeat the same procedure for all the digits.
In case of any mistake just wait for ten seconds with the ignition key OFF without
making any operation and then come back to step 5.
8.8.
8.8.
8. If the system has not already working electronic keys turn the ignition ON. The LED
will come on a fixed way signalling that the PIN is correct. Go to step 10.
9.9.
9.9.
9. If the system has already working electronic keys turn the ignition ON and then put
the key in connection with the emergency panel. The LED will come on a fixed way
signalling that the PIN is correct and that the electronic key has been identified.
10.10.
10.10.
10.Press one of the two buttons to make sure that the radio control LED blinks and that
the LED on the dash-board goes out for about 1 second.
11.11.
11.11.
11.Repeat the operation described in step 10 for all the remote controls you want to
add.
10.10.
10.10.
10.The auto-learning procedure can be interrupted at any moment by simply turning
the ignition key OFF.
Note:Note:
Note:Note:
Note:
As soon as a new rAs soon as a new r
As soon as a new rAs soon as a new r
As soon as a new r
emote contremote contr
emote contremote contr
emote contr
ol is added to the system it will automaticallyol is added to the system it will automatically
ol is added to the system it will automaticallyol is added to the system it will automatically
ol is added to the system it will automatically
put out of orput out of or
put out of orput out of or
put out of or
der the old TX setder the old TX set
der the old TX setder the old TX set
der the old TX set
..
..
.
If you want to keep them working you If you want to keep them working you
If you want to keep them working you If you want to keep them working you
If you want to keep them working you
must add the old TX again. The system works with 4 keys maximum.must add the old TX again. The system works with 4 keys maximum.
must add the old TX again. The system works with 4 keys maximum.must add the old TX again. The system works with 4 keys maximum.
must add the old TX again. The system works with 4 keys maximum.
ACTIVE ARMING (If activated)ACTIVE ARMING (If activated)
ACTIVE ARMING (If activated)ACTIVE ARMING (If activated)
ACTIVE ARMING (If activated)
When activated this function will cause the automatic arming of the system. This
happens after two minutes the system has been disarmed and any door has not been
opened.
The system will not operate the CDL.
16 17
3
4
1
4
12
123
2
3
4
ON
ON
OK
++=
MAX 7 SEC.
O
FF
OFF
ON
ON
PIN CODE
EXAMPLE
ON
ON
ON
ON
a
PIN CODE = 2341
ON 3 SEC.
ON
ON
OF
F
OFF
IGN
ON
ON
OFF
OFF
IGN
ON
ON
OFF
OFF
IGN
b
c
d
e
LED ON X 2
LED ON X 3
LED ON X 4
LED ON X 1
O
FF
OFF
OFF
OFF
O
FF
OFF
OK
ON
ON
 Loading...