Do you have a question about the Coleman 14'x14' and is the answer not in the manual?
Position tent with doors facing desired direction and stake down corners, keeping the floor taut.
Assemble poles by interlocking, insert longer black poles into center sleeves, forming an 'X'.
Insert shorter grey poles through sleeves located at the sides of the tent.
Insert one end of frame poles onto tent's pin & ring systems on door sides and back.
Apply pressure to poles to form arches, inserting the opposite end into the pole end pin.
Attach tent frame clips to the assembled poles.
Insert side frame poles onto pin & ring systems and attach frame clips.
Apply pressure to pole arches until they fit onto the pin.
Assemble rainfly poles and insert them into sleeves on the underside of the rainfly.
Drape rainfly over tent, insert ends into grommets, and secure with attachments and S-hooks.
Attach guylines to fabric loops on the rainfly and stake them out at an angle.
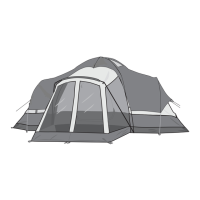
This document provides comprehensive instructions for setting up and maintaining a Coleman 14'x14' 3-Room Dome Tent, Part Number 9271-191. The tent is designed for outdoor camping, offering a spacious and multi-room layout suitable for various weather conditions, provided proper setup and care are followed.
The Coleman 14'x14' 3-Room Dome Tent serves as a temporary shelter for camping, designed to accommodate multiple occupants with its three-room configuration. Its primary function is to provide protection from the elements, including wind, rain, and sun, while offering a comfortable and organized living space outdoors. The dome structure, supported by a system of interconnected poles, ensures stability and maximizes interior volume. The tent features multiple doors for easy access and egress, enhancing convenience for campers. A key component is the rainfly, which provides an additional layer of weather protection, particularly against rain and strong winds, and helps manage condensation. The tent's design emphasizes ease of assembly and disassembly, making it practical for recreational use.
The setup process for the Coleman 14'x14' 3-Room Dome Tent is broken down into several logical steps, ensuring a straightforward experience for users.
1. Layout & Positioning of Tent, Pole Assembly: Before assembly, users are advised to select a level campsite free of rocks, branches, or other sharp objects to prevent damage to the tent floor. It's also recommended to avoid setting up under trees to minimize debris and potential sap accumulation. For optimal performance in windy conditions, the tent should be positioned with its end facing into the wind.
The initial step involves laying out the tent with its doors facing the desired direction. This allows campers to orient the tent for optimal views, privacy, or sun exposure. Once positioned, the tent corners are staked down using the integrated tent stake loops, ensuring the floor is taut. This tautness is crucial for the tent's structural integrity and to prevent pooling of water underneath.
The pole assembly begins by interlocking the shock-corded poles. The tent utilizes two types of main frame poles:
The rainfly also has its own set of poles:
2. Connect Frame to Tent: After assembling the main frame poles, the next step is to connect them to the tent body. This involves unzipping the tent doors to access the Pin & Ring Systems. These systems are strategically located on either side of the front doors and at the back of the tent.
One end of a frame pole is inserted onto a Pin & Ring System, which is typically integrated with a tent stake loop. The user then moves to the opposite end of the pole, diagonally across the tent. By gradually applying pressure, the pole is arched until its other end can be inserted into the corresponding Pin. This process is repeated for the second main frame pole. Once the poles are in place, the tent frame clips are attached to the poles, securing the tent fabric to the frame and giving the tent its final shape.
3. Raise Ends of Tent: This step focuses on securing the Side Frame Poles. One end of a Side Frame Pole is inserted onto a Pin & Ring System. The user then moves to the opposite end of this pole, applying gradual pressure to arch it until it can be fitted onto its corresponding pin. This process is repeated for the other Side Frame Pole. Finally, any remaining frame clips on the tent body are attached to these poles, further integrating the tent fabric with the frame.
4. Attach Rainfly: The rainfly is a critical component for weather protection. Its setup involves:
Proper maintenance is crucial for extending the lifespan of the Coleman 14'x14' 3-Room Dome Tent. The manual provides several key recommendations:
By following these detailed instructions for setup and maintenance, users can ensure a safe, comfortable, and long-lasting camping experience with their Coleman 14'x14' 3-Room Dome Tent.
| Water Resistance | WeatherTec System |
|---|---|
| Number of Doors | 1 |
| Warranty | 1-year limited warranty |
| Dimensions | 14 x 14 feet |
| Center Height | 6 feet 7 inches |
| Material | Polyester |
| Product Type | Tent |
| Rainfly | Yes |
| Frame Material | Steel |
| Electrical Access Port | Yes |