EasyManua.ls Logo

Coleman 2000008679 User Manual

Coleman 2000008679
2 pages
To Next Page IconTo Next Page
Page #1 background imageLoading...
Page #1 background image
STITCH LINE
Fig. 4
Fig. 5
Fig. 3
Fig. 6
Screenhouse
Stake
Webbing Loop
Lock Button
MODEL 2000008679
SCREENHOUSE SETUP INSTRUCTIONS
Before you begin
• Read all instructions before set up.
• Select a level site clear of rocks, branches, and other hard or
sharp objects, to install your screenhouse.
WARNING: Keep clear of overhead power lines.
• Do not set up your screenhouse under trees because of potential
lightning strikes or falling tree limbs in inclement weather.
• Secure with all stakes and guylines provided to prevent property
damage or personal injury.
• For best results in windy conditions, position narrow end of
screenhouse into the wind.
• Do not drop screenhouse.
• Do not bounce screenhouse bag on its end to remove
screenhouse, as these actions may damage the frame.
• THIS RECREATIONAL PRODUCT REQUIRES A MINIMUM OF TWO
PEOPLE TO ASSEMBLE.
• Under no circumstances should this product be used to cover
automobiles, marine products or similar items.
CAUTION: Avoid pinch points when opening and closing the
screenhouse frame.
(continued on other side)
Extend the Screenhouse
Frame
Raise the Screenhouse
• Stand the screenhouse upright with the hub assembly at
the top. (Fig. 1)
• Unfold the arms of the screenhouse downward until they
lay flat on the ground. (Fig. 2)
• Fully extend the arms of the screenhouse away from the
center hub till the telescoping pole sections are locked in
place. (Fig. 3 and Fig. 3A)
• Extend each of the telescoping leg poles until they snap
into place. The screenhouse will raise as the leg poles are
extended. (Fig. 4)
1
2
Stake the Screenhouse
• Secure screenhouse by driving stakes through the
webbing loops sewn to the screenhouse base.
(Fig. 5 and Fig. 6 )
• Keep the floor taut.
3
Description Description
Repair Kit
Repair Kit
Plastic Clip 16 mm
Plastic Clip 20 mm
Fabric Repair Kit
Plastic Corner Joint
Fabric Joint Cover
5010000845
5010000846
5010000852
5010000853
5010000855
Fig. 1 Fig. 2
Fig. 3A
Question and Answer IconNeed help?

Do you have a question about the Coleman 2000008679 and is the answer not in the manual?

Coleman 2000008679 Specifications

General IconGeneral
BrandColeman
Model2000008679
CategoryTent
Capacity6-person
MaterialPolyester
Setup Time10 minutes
Doors1
PolesFiberglass
Dimensions10 x 9 ft
Water ResistanceWeatherTec system
Pack Size24 x 8 x 8 in.

Summary

Before You Begin Setup

Extend the Screenhouse Frame

Stand and Unfold Frame

Stand screenhouse upright and unfold arms downward to lay flat on ground.

Extend Telescoping Poles

Fully extend screenhouse arms until telescoping pole sections lock into place.

Raise the Screenhouse

Extend Telescoping Legs

Extend telescoping leg poles until they snap into place to raise the screenhouse.

Stake the Screenhouse

Secure with Stakes

Drive stakes through webbing loops to secure screenhouse base and keep floor taut.

Secure the Guylines

Attach and Stake Guylines

Attach and stake out guylines, adjusting sliders to make them tight.

Disassembly Instructions

Remove Guylines and Stakes

Remove guylines and stakes as the first step in disassembly.

Collapse Frame Poles

Lower frame one leg pole at a time, collapsing telescoping poles via lock buttons.

Retract and Fold Arms

Retract screenhouse arms towards the center hub, then fold upward to stand upright.

Storage Preparation

Prepare Components for Storage

Place stakes in storage bag, ensure components are clean and dry before storing.

Store in Dry Area

Store the screenhouse in a clean, dry area to maintain its condition.

Important Usage and Safety Information

Condensation and Fabric Care

Understand condensation, avoid tree sap and bird droppings, dry thoroughly before storing.

Weather and Environmental Precautions

Avoid heavy rain/wind, UV damage, and gas/flame sources; take down in windy conditions.
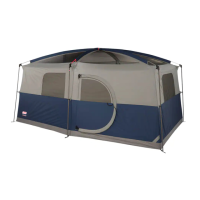
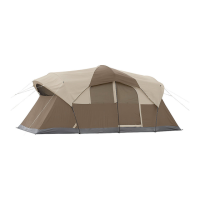
Related product manuals