EasyManua.ls Logo

Coleman Cimarron 4 10'x7' User Manual

Coleman Cimarron 4 10'x7'
2 pages
To Next Page IconTo Next Page
Page #1 background imageLoading...
Page #1 background image
Connect Frame to Tent
– Insert one end of main tent pole end
onto pin of pin & ring system, at tent
corner. (illus. 3)
– Go to opposite end of pole and
gradually apply pressure to the pole
forming an arch until you are able to
insert the pin into the pole.
– Repeat for second pole.
Cimarron
4 10’x7’plus Vestibule
1
Layout & Positioning
of Tent, Pole Assembly
– Layout and position tent with door
facing desired direction. (illus. 1)
– Unzip door.
– Stake down tent corners only, using the
rings at the end of the stake loops.
Keep the floor taut. (illus. 2)
Assemble frame poles by
interlocking shock-corded poles.
This will make two long poles.
– Insert the poles diagonally into pole
sleeves.The center of the poles should
cross forming an “X” in the middle of
tent. (illus. 1)
2
When You Are Ready
To Set Up Your Tent
– Select a level campsite clear of rocks,
branches and other hard or sharp objects.
– Do not set up your tent under trees.
For best results in windy conditions,
do not position the door of tent into
the wind.
(1) Rainfly
Pole
Rainfly
Part No. 9260B2111
(2) Main
Tent Poles
POLE ASSEMBLY PARTS
Assembled
poles
inserted
through
pole
sleeves
Instructions apply to Part Number 9260B107
illus. 1
illus. 2 Tent stake
through ring
illus. 3
Insert pole end onto
pin & ring
illus. 4
Tent frame
set-up
Part No. 9260B2121
Part No. 9260B2131
Question and Answer IconNeed help?

Do you have a question about the Coleman Cimarron 4 10'x7' and is the answer not in the manual?

Coleman Cimarron 4 10'x7' Specifications

General IconGeneral
BrandColeman
ModelCimarron 4
TypeDome Tent
Capacity4-person
Dimensions10' x 7'
Season3-season
Doors1
Windows2
Poles3
Pole MaterialFiberglass
Floor MaterialPolyethylene
Setup TypeConventional
RainflyIncluded

Summary

Pole Assembly Parts

Main Tent Poles

Parts for assembling the main tent poles, including part number.

Rainfly Pole

Part number for the rainfly pole assembly.

Layout and Positioning of Tent

Position Tent and Stake Corners

Instructions on selecting a campsite, positioning the tent, and staking corners taut.

Assemble and Insert Frame Poles

Guide to assembling shock-corded poles and inserting them diagonally to form an 'X'.

Connect Frame to Tent

Attach Tent Poles to Frame

Steps to connect tent poles to the pin & ring system at tent corners, forming an arch.

Attach Tent to Frame Using Frame Clips

Secure Tent with Frame Clips

Instructions for attaching frame clips along tent edges and adjusting corner stakes.

Attach Rainfly

Install Rainfly Pole

Assemble rainfly pole and insert through sleeve above vestibule door.

Drape and Secure Rainfly

Drape rainfly, connect poles, attach elastic loops with S-hooks, and secure with fly attachments.

Stake Out Tent and Vestibule

Instructions for staking out the tent with guylines and the vestibule front.

Important Tent Care and Safety

Condensation Management

Advice on managing condensation caused by humidity and breath inside the tent.

Storage and Maintenance

Guidelines for drying, cleaning, and storing the tent and its components.

Flame and Heat Source Warning

Caution to keep flame and heat sources away from tent fabric due to flammability.
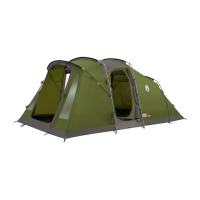
Related product manuals