EasyManua.ls Logo

Coleman Pro 5 Series - User Manual

Coleman Pro 5 Series
28 pages
Print Icon
To Next Page IconTo Next Page
Loading...
PRO SERIES SAFE USE & CARE MANUAL
STOP
DO NOT return this product to the store.
Assemble your barbecue immediately.
Missing or damaged parts must be claimed within 30 days of purchase.
FOR OUTDOOR USE ONLY
IF YOU NEED HELP OR PARTS, CALL THE COLEMAN HOTLINE:
1-800-275-4617
HOURS: 9AM-7PM EST Mon-Fri, CLOSED Saturday and Sunday
LAST UPDATE: SEP 15, 2021 - WZ
BARBECUE SAFETY CHECK-LIST
READ and UNDERSTAND the owner’s manual and safety instructions.
DO NOT position or operate barbecue under overhang or unprotected construction,
against a wall, near aluminum siding, windows, or fencing.
CHECK that the regulator nipple is centered into the LP tank valve. DO NOT cross
thread this connection. Cross threading may result in a fire, or explosion at the tank
connection.
PERFORM LEAK TEST on all connections as specified in this user manual. Leak
checks should be performed on all new barbecue’s even if assembled by an
assembler or gas technician. Leak checks should be performed frequently thereafter.
BEFORE OPENING THE GAS SUPPLY, ensure the lid is open, control knobs are in
“OFF” position, gas is turned o, and the regulator is attached to tank correctly.
Then follow the proper lighting procedure as shown in the manual. If above steps are
not followed, you may experience low flames, or other performance issues.
Beware HOT SURFACES including lid, lid handle, side tables, and control panel.
Wear protective gloves while barbecuing.
Remove and clean the grease channel, front grease cup, side grease cup, and the
heat distribution plates, to avoid grease fires and flare ups.
Remove and clean the burners to avoid flash fires caused by spider webs and
blockages.
Ensure that the barbecue is level.
FOR YOUR FAMILY’S SAFETY, PLEASE CHECK THE FOLLOWING:
Question and Answer IconNeed help?

Do you have a question about the Coleman Pro 5 Series and is the answer not in the manual?

Summary

Barbecue Safety Check-List

Installation

Additional Warnings

Important safety warnings regarding barbecue placement, clearances, and prohibited uses.

Gas Hook-Ups and Warnings

LP Gas Cylinder Requirements

Specifies requirements for LP gas cylinders, including valve type and capacity.

Installing the LP Gas Cylinder

LP Gas Cylinder Rubber Seal Inspection

Instructions on inspecting the LP tank valve rubber seal for damage before use.

Hose and Regulator

Details the Type 1 connection device features for the barbecue's hose and regulator.

Regulator Reset Procedure

Leak Test Procedure

LP Cylinder Removal, Transport and Storage

LP Cylinder Filling

Guidance on proper LP gas cylinder filling procedures and safety precautions.

Lighting Instructions

Match lighting the main burner

Step-by-step guide for lighting the main burners using a match and tool.

Lighting the infrared sear burner

Instructions for lighting the infrared sear burner using the ignition button or match.

Prevention

Blocked burner venturi

Explains how venturi blockages cause flashback fires and how to prevent them.

Characteristics of a flashback fire

Lists symptoms of a flashback fire, such as external flames and gas smell.

Tips and Best Practices - Grilling Tips

Food preparation

Guidelines for safe food preparation, including avoiding cross-contamination.

Preparing your barbecue

Steps for preheating, cleaning, and preparing the barbecue for grilling.

Grilling tips

Advice on cooking techniques, temperature adjustments, and food handling.

Using your infrared sear burner

Precautions and usage instructions for the high-intensity infrared sear burner.

Direct & Indirect Cooking

Direct cooking

Explains direct cooking, where food is cooked directly over the burner.

Indirect cooking

Describes indirect cooking, using circulating hot air to cook food offset from heat.

Control settings

Explains the intended use of HI, MED, and LOW control settings for grilling.

Grilling Guide

Safe Internal Cooking Temperatures

Lists minimum safe internal cooking temperatures for various types of meat and poultry.

Cleaning and Maintenance

Cleaning the heat plates

Instructions for removing, cleaning, and reinstalling heat plates.

Cleaning the burner

Steps to clean burners and venturi tubes to prevent blockages and ensure safe operation.

Cleaning the die-cast aluminum burner box

How to clean the interior of the burner box to reduce flare-ups and grease fires.

Cleaning the cooking grates

Procedures for brushing and washing cooking grates to remove debris and grease.

Cleaning the grease collection tray and grease cup

Instructions for cleaning the grease collection system to prevent fires.

Cleaning the inside of the lid

How to clean carbon deposits from the inside of the barbecue lid.

Cleaning the exterior painted, porcelain enamel surfaces

Method for cleaning the exterior surfaces using warm soapy water.

Storing your barbecue

Steps for storing the barbecue, including cleaning and battery removal.

Troubleshooting

Resolving Ignition Issues

Guide to resolving ignition problems, checking batteries, wires, and connections.

Battery Care, Use and Disposal

Guidelines for handling, using, and disposing of batteries for the ignition module.

Burners Will Not Light (with igniter or match)

Identifies causes for burners failing to light, such as connection issues or low gas.

Burners Will Not Light with Igniter, but Can Match Light (No Spark)

Troubleshooting steps when the igniter fails but match lighting works.

Fire at Control Knob; Control Panel- Flashback Fire

Addresses flashback fires at the control panel, caused by burner blockages.

Yellow Smokey Flames;Gas Odour Can Be Smelled

Explains that yellow flames and gas odor indicate obstructed burners or venturi.

Flame Blows Out on LOW

Reasons for flame blowing out on low setting, including wind and improper seating.

Low Heat

Identifies causes for low heat, such as regulator issues or blocked burners.

Low or Incomplete Flame (assuming burners and venturi tubes are free and clear of blockages)

Troubleshooting steps for low or incomplete flames when burners are clear.

Too Much Heat; Excessive Flare-ups

Addresses issues of too much heat and excessive flare-ups, linking them to grease buildup.

Paint Appears to Be Peeling Inside Lid

Explains that peeling inside the lid is carbon buildup and how to clean it.

Decreasing Heat, Burner Output on HI Setting Is Low, and Fluttering or Flame at Burner Surface

Diagnoses low heat and fluttering flames, pointing to gas supply issues or regulator problems.

Humming Noise From Regulator

Explains that a humming regulator is normal vibration, not a defect.

Melting Gas Supply Hose; Gas Leak

Addresses melting hoses and gas leaks, often caused by proximity to heat or improper ventilation.

Fire Within Cabinet

Discusses fires within the cabinet, caused by gas leaks or unclosed controls.

Warnings

Warning: Hot Surfaces

Warns that exterior surfaces become very hot and advises wearing protective mitts.

Caution

General cautions about keeping the appliance away from combustibles, children, and pets.

Warranty and Service

Before You Call For Service Have The Following Information Available

Lists essential information needed before contacting customer service for assistance.

If Your Product Is Damaged

Instructions on what to do if the product is damaged, including contacting customer care.

Limited Warranty

Details the limited warranty offered on the barbecue, covering defects in workmanship.

Limitation and Exclusions

Outlines limitations and exclusions to the product warranty, including misuse and lack of maintenance.

Winners Products Excludes From Its Warranty The Following

Lists specific conditions and damages excluded from the warranty coverage.

Overview

This document is a user manual for a Coleman Pro Series gas barbecue, providing comprehensive instructions for safe use, installation, operation, maintenance, and troubleshooting.

Function Description:

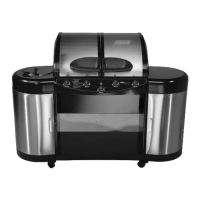
The Coleman Pro Series barbecue is designed for outdoor cooking using liquid petroleum (LP) gas. It features multiple burners, including a dedicated infrared sear burner, allowing for various cooking methods such as direct grilling, indirect cooking, baking, roasting, warming, and slow cooking. The barbecue is equipped with an electronic ignition system for easy lighting and a grease management system for efficient cleaning. Safety features include a regulator with a flow-limiting device and a thermal element to prevent gas leaks and overheating.

Important Technical Specifications:

  • Fuel Type: Liquid Petroleum (LP) gas.
  • LP Cylinder Capacity: Do not connect to a propane cylinder exceeding 9 kg (20 lb) capacity.
  • LP Cylinder Valve: Must have a shut-off valve with a Type 1 outlet, a safety relief valve, and a UL listed Overfill Protection Device (OPD) with a unique triangular hand wheel.
  • Minimum Clearance to Combustible Materials: 36 inches (91.44 cm) from the furthest protruding edge on all sides of the barbecue.
  • Regulator Flow Limiting Device: Restricts gas flow to 10 cubic feet per hour if activated.
  • Regulator Thermal Element: Shuts off gas flow between 240-300 °F (115.5-148.8 °C).
  • Burner Material: Stainless Steel (5-year limited warranty).
  • Casting Material: Aluminum castings (10-year limited warranty, excluding paint).
  • Cooking Grates: Porcelain-coated cast iron.
  • Ignition: Electronic ignition button (INSTASTART™ IGNITION) for main and sear burners.
  • Flame Height: Blue/yellow color, 1"-2" when burner is on "HI".

Usage Features:

  • Assembly: Requires immediate assembly upon purchase, with missing or damaged parts to be claimed within 30 days.
  • Outdoor Use Only: Strictly for outdoor use in a well-ventilated area, at least 36 inches from any dwelling or building. Not for use in enclosed spaces, on boats, or recreational vehicles.
  • Level Surface: Must be positioned on a level surface.
  • Preheating: Always preheat the barbecue on "HI" for 10 minutes (15 minutes in extreme cold) with the lid closed.
  • Cooking Settings:
    • HI: For preheating and searing meats.
    • MED: For most grilling, baking, and roasting (chops, chicken, burgers).
    • LOW: For warming, slow cooking, smoking, or delicate foods.
  • Direct Cooking: Food placed directly over a lit burner (steaks, burgers, chops, vegetables).
  • Indirect Cooking: Food placed on cooking grates offset from the heat source, cooked by circulating hot air (large cuts of meat, roasts, ribs, poultry). Lid should always be closed for indirect cooking.
  • Infrared Sear Burner: High-intensity burner for searing. Use "HI" for preheat and searing, adjust to lower settings to avoid overcooking. Keep lid closed when not in use.
  • Food Safety: Always observe safe food handling practices, use separate plates and utensils for raw and cooked food, wash vegetables, seafood, and poultry, and marinate meat in the refrigerator. Use a meat thermometer to check doneness, ensuring minimum internal cooking temperatures are met (e.g., ground meat 71°C/160°F, poultry 74°C/165°F).
  • Grilling Tips: Avoid piercing foods, turn foods once halfway through the cooking cycle, and baste with sauces only during the last few minutes of cooking.
  • LP Cylinder Connection: Connect the Type 1 regulator coupling to the cylinder valve by turning clockwise, hand-tighten only. Ensure burner control knobs are "OFF" and cylinder valve is closed before connecting/disconnecting.
  • Regulator Reset Procedure: If experiencing low heat, low flame, or lighting difficulties, the flow-limiting device may be activated. Follow specific steps to reset the regulator, including disconnecting, turning control knobs to "HI" to dissipate gas, turning knobs back to "OFF", reconnecting, and slowly opening the LP cylinder valve.
  • Lighting Instructions: Open lid, ensure all control knobs are "OFF", slowly open LP cylinder valve, push in and turn the far left burner control knob to "HI", then push and hold the INSTASTART™ IGNITION button. Repeat for other burners. Match lighting procedure is also provided.
  • Troubleshooting: Includes a detailed table for common issues like burners not lighting, flashback fires, yellow smoky flames, flame blowouts, low heat, excessive flare-ups, humming noise from regulator, melting gas supply hose, and fire within the cabinet, along with corresponding causes and solutions.

Maintenance Features:

  • Leak Test: Must be performed before first use, every time the LP cylinder is refilled/exchanged/moved, or if gas components are disconnected/replaced, and at least once per year. Use a 50% water and 50% liquid dishwashing soap mixture to check for bubbles at connections.
  • Grease Management System: Remove and clean the grease channel, front grease cup, side grease cup, and heat distribution plates regularly to avoid grease fires and flare-ups. The pull-out grease collection tray and grease cup are designed for easy removal and cleaning.
  • Burner Cleaning: Remove and clean burners to avoid flash fires caused by spider webs and blockages. Use a grill brush for the outside, a pipe cleaner or Venturi Brush for the interior, and a wire or paper clip for port holes. Clean spider/insect screens.
  • Heat Plate Cleaning: Remove heat plates and use a plastic paint scraper or grill brush to remove debris. For thorough cleaning, wash with mild soap and warm water.
  • Burner Box Cleaning: Use a plastic scraper to scrape debris off the interior surfaces of the die-cast aluminum burner box into the grease collection tray. For stubborn build-up, use a grill degreaser.
  • Lid Cleaning: Brush carbon build-up from the inside of the lid regularly to prevent flakes from falling onto food.
  • Exterior Surface Cleaning: Clean painted and porcelain-coated surfaces with warm soapy water, rinse thoroughly, and dry with a soft microfiber cloth. Do not use chemical cleaners.
  • Storage: Before storing, remove and clean all components. Season cooking grates with vegetable shortening and wrap in a towel. Remove the igniter battery for prolonged storage. Use a barbecue cover.
  • LP Cylinder Inspection: Inspect the propane tank valve rubber seal for cracks, wear, or deterioration prior to each use. Replace damaged seals at a qualified filling station.
  • LP Cylinder Handling: Always turn cylinder valve off when not in use. Handle tank valve with utmost care. Keep cylinder securely fastened in an upright position. Do not expose to direct sunlight or excessive heat. Do not store in enclosed spaces or where children play.

Coleman Pro 5 Series Specifications

General IconGeneral
BrandColeman
ModelPro 5 Series
CategoryGrill
LanguageEnglish

Related product manuals