28
COMUNELLO ®Copyright 2019 - All rights reserved
instead of once) and then press SET.
Repeat the procedure if you wish to restore the previous conguration.
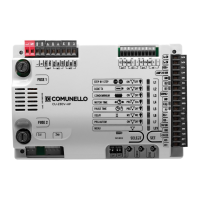
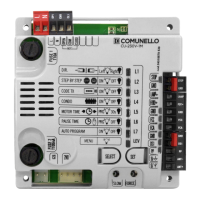
7.3 EXTENDED MENU 2
The control unit is factory set to allow direct selection exclusively of the main
menu functions. If you wish to enable the functions described in Extended Menu
2, proceed as follows:
• Select blinking LEV LED and press SET twice;
• The LED will start blinking (alternate ashing of LED LEV
);
In this way you have access to the setting of the following functions:
L1 SOFT STOP ON OFF
L2 SOFT START OFF ON
L3 DS1 IN OPEN ON OFF
L4 HOLD-TO-RUN ON OFF
L5 FOLLOW ME ON OFF
L6 LAMP. PAUSE ON OFF
L7 "ALWAYS CLOSE" ON OFF
LEV MENU
2 FLASHES
There will be 30 seconds to select the functions of the Extended Menu 2 using
the SELECT and SET keys; once an additional 30 seconds have elapsed the
control unit reverts to the main menu.
7.3.1 LED L1- SOFT STOP:
The control unit is supplied by factory with the Soft Start function disabled. With
this function enabled at the end of the movement the control unit will reduce
operator force to zero gradually in a 2 second interval.
Proceed as follows if you wish to enable the function:
• Make sure you have enabled the extended Menu 2 (as shown by the
alternate ashing 1 1 0 1 1 0 of LEV LED);
• By the key SELECT, position yourself on the blinking LED L1;
• Press the SET key;
• LED L1 becomes steady on and programming will be completed.
Repeat the procedure if you wish to restore the previous conguration.
Notes:
- Soft-stop is not operated when a limit switch is triggered, when the Stop button
is activated and in the case of an obstacle; it is operated when movement is
inverted and when a photocell is intercepted.
7.3.2 LED L2 - SOFT START:
The control unit is supplied by factory with the Soft Start function disabled. With
this function enabled at the beginning of the movement the speed gradually
increase from the minimum to the value set by the “FORCE” trimmer during the
rst 2 seconds of operation.
Proceed as follows if you wish to enable the function:
• Make sure you have enabled the extended Menu 2 (as shown by the
alternate ashing 1 1 0 1 1 0 of LEV LED);
• By the key SELECT, position yourself on the blinking LED L2;
• Press the SET key;
• LED L2 becomes steady on and programming will be completed.
Repeat the procedure if you wish to restore the previous conguration.
Notes:
- do not confuse the SOFT STOP with the SLOWDOWN; the rst one is activated
after reaching the limit switch, while the second is activated before it;
- Soft-stop does not act when a stop is intercepted, when the Stop button is
activated and in the event of an obstacle; it acts when there is a reversal of
motion and when a photocell is activated.
7.3.3 LED L3 - DS1 IN OPEN:
The control unit allows the operation of input DS1 to be modied. If you want
photocells DS1 operate also during opening (momentary stopping of the gate,
as soon as the safety is freed the control unit resumes the opening movement),
proceed as follows:
• Make sure you have enabled the extended Menu 2 (as shown by the
alternate ashing 1 1 0 1 1 0 of LEV LED);
• By the key SELECT, position yourself on the blinking LED L3;
• Press the SET key;
• LED L3 becomes steady on and programming will be completed.
Repeat the procedure if you wish to restore the previous conguration.
CAUTION: when this function is enabled, the FOLLOW ME function
is disabled
7.3.4. LED L4 - HOLD-TO-RUN:
The control unit provides the opportunity to set the “Hold-to-run” function.
With this function enabled using either the remotes or the Pushbuttons to
operate the gate, the following operation will be obtained: the command must be
kept maintained constantly to move the gate. When the command is released,
the movement will stop immediately.
Proceed as follows if you wish to enable the function:
• Make sure you have enabled the extended Menu 2 (as shown by the
alternate ashing 1 1 0 1 1 0 of LEV LED);
• By the key SELECT, position yourself on the blinking LED L4;
• Press the SET key;
• LED L4 becomes steady on and programming will be completed.
Repeat the procedure if you wish to restore the previous conguration.
7.3.5 LED L5 - FOLLOW ME
The control unit allows the “Follow me” function to be congured; programmable
only if a Pause Time has already been set, this function reduces the Pause Time
to 5 seconds after freeing the DS1 photocell, meaning the gate re-closes 5
seconds after transit of the user.
Note:
-this command is programmable only if a Pause Time has already
been programmed.
-if the DS1 function is enabled in opening, FOLLOW ME is never
enabled.
Proceed as follows if you wish to enable the function:
• Make sure you have enabled the extended Menu 2 (as shown by the
alternate ashing 1 1 0 1 1 0 of LEV LED);
• By the key SELECT, position yourself on the blinking LED L5;
• Press the SET key;
• LED L5 becomes steady on and programming will be completed.
Repeat the procedure if you wish to restore the previous conguration.
7.3.6. LED L6 - FLASHING IN PAUSE:
The control unit is factory set with Flashing Light during Pause Time disabled. If
you wish to enable this function, proceed as follows:
• Make sure you have enabled the extended Menu 2 (as shown by the
alternate ashing 1 1 0 1 1 0 of LEV LED);
• By the key SELECT, position yourself on the blinking LED L6;
• Press the SET key;
• LED L6 becomes steady on and programming will be completed.
Repeat the procedure if you wish to restore the previous conguration
7.3.7 LED L7 - “ALWAYS CLOSE”:
The control unit provides the facility to set “Always Close” operation: this function,
which is programmable only if a Pause Time has already been programmed, is
activated after a power failure; if the gate open condition is conrmed a closing
movement is started automatically, preceded by 5 seconds of pre-ashing. If you
wish to enable the function, proceed as follows:
• Make sure you have enabled the extended Menu 2 (as shown by the
alternate ashing 1 1 0 1 1 0 of LEV LED);
• By the key SELECT, position yourself on the blinking LED L7;
• Press the SET key;
• LED L7 becomes steady on and programming will be completed.
Repeat the procedure if you wish to restore the previous conguration.
8 RESET
If it becomes necessary to reset the control unit to restore the factory settings,
press the SELECT and SET keys together; this will cause all the RED indicator
 Loading...