Do you have a question about the Concourse SMART WHEELS and is the answer not in the manual?
Connect charger cables to wheels, then to power. Observe LED indicators for charging status.
Connect the remote to its USB charging cable and then to a USB power source.
Follow specific steps to safely disconnect the charger after full charge.
Safely remove original Clicgear wheels using a 19mm spanner.
Connect the Smart Wheel axles to the buggy where original wheels were removed.
Attach wheels to axles, ensuring they lock securely by rotating.
Remove original wheels and attach locking pins using provided Allen key.
Connect wheels to the CBM3 axle, ensuring proper left/right orientation and secure locking.
Safely remove the existing wheels from your buggy.
Connect the Smart Wheel axles to the buggy, ensuring they click securely.
Attach wheels to axles, ensuring proper orientation and a secure lock.
Locate and press the button on the wheel to release it from the axle.
Hold the release button and slide the wheel off the axle.
Attach the mount to the buggy handle using the Allen key and tighten screws.
Explains directional buttons (Up, Down, Left, Right) and the Stop button functions.
Details the function of the Lock button for initialization, shutdown, and locking.
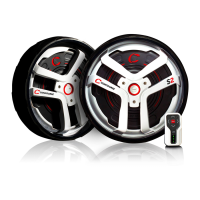
Describes the meaning of the LED indicators for wheel status and remote status.
Press and hold the lock button to initialize the system, observing LED sequence.
Understand LED indicators for full charge, low wheel charge, or low remote charge.
Hold the lock button to initiate the shutdown sequence with specific LED patterns.
Flashing LEDs indicate battery status: Green for charged, Red for low.
Lock prevents accidental operation. Unlock by holding the lock button until LED flashes green.
Wheels stop at ~50m. Return within range to resume operation.
Operate buggy manually with remote docked; steering functions disengage for manual control.
The brake auto-activates when stopped and releases when moving again via remote.
Avoid forcing the buggy when brake is applied. Park safely on inclines to prevent damage.
Configure turning for buggies with swivel front wheels via remote buttons.
Configure turning for buggies with fixed front wheels via remote buttons.
Select from 7 forward speeds by pressing or holding the forward button.
Download application and instructions from concoursegolf.com for software updates.
Remote range is 50m. Buggy stops if out of range or tips; keep within reach.
Convert to free wheeling by pressing the button and sliding wheel to '1st Position'.
Do not replace battery. Return for service or dispose at authorized centers.
Follow online process or call for warranty claims; repairs/replacements free if covered.
Warranty is transferable to subsequent owners within the country of purchase.
| Weight | 9.5kg |
|---|---|
| Range | Up to 36 holes |
| Foldable | Yes |
| Display | LCD |
| Material | Aluminum |
| Battery | Lithium-ion |