EasyManua.ls Logo

Control 4 C4-TW7C0-BL User Manual

Control 4 C4-TW7C0-BL
10 pages
To Next Page IconTo Next Page
Page #1 background imageLoading...
Page #1 background image
NOTE: Video Intercom using 802.11b is not
recommended or supported for Video
Intercom. Control4 recommends Wireless-N
for Video Intercom. See “Wireless Network
Limitations” and “Power and Network
Installation Options.
• Option1:EthernetwithPoE. The Ethernet
network connection is provided through the PoE
Injector. No additional wiring is needed.
• Option2:EthernetwithAC. Connect the Touch
Screen to one of the RJ-45 LAN ports on the
gateway/router using the RJ-45 Ethernet cable.
• Option3:WiFiwithAC. The internal WiFi will
communicate with the LAN’s WAP. If the LAN has
a WAP set up, no additional wiring is needed.
Supported Models
• C4-TW7C0-BL - 7 Inch Wall Mount Capacitive
Touch Screen with Camera, Ethernet/WiFi, PoE/
Universal Voltage, Black
• C4-TW7C0-WH - 7 Inch Wall Mount Capacitive
Touch Screen with Camera, Ethernet/WiFi, PoE/
Universal Voltage, White
Associated SKUs:
• C4-TSWMC5-EG-WH – 5” In-Wall Touch Screen,
White (no camera)
• C4-TSWMC7-EG-WH – 7” In-Wall Touch Screen,
White (no camera)
• C4-TSWMC5-EG-BL – 5” In-Wall Touch Screen,
Black (no camera)
• C4-TSWMC7-EG-BL – 7” In-Wall Touch Screen,
Black (no camera)
Box Contents
Carefully unpack the contents of the box, and make
sure the following items are included. If any item is
missing or damaged, please contact your Control4
Reseller.
• 7” In-Wall Touch Screen with Camera
• Power box (used to power the Touch Screen)
• Two (2) screws to attach the power box
• Warranty card
Introduction
The Control4® 7” In-Wall Touch Screen with Camera
oers complete system control in an elegant and
compact design. This Touch Screen is equipped
with a capacitive Touch Screen and four (4)
programmable shortcut buttons plus Audio and
Video Intercom (with a built-in camera) using SIP.
The available power options are AC power or Power-
over-Ethernet (PoE); the network options are WiFi
or Ethernet connections. This Touch Screen supports
new construction or retrofit installations.
• AC. AC power is used to power the Touch
Screen when using an Ethernet or WiFi network
connection.
• PoE. PoE is used to power the Touch Screen
when using an Ethernet or WiFi network
connection.
The following table shows the available network
options with power.
• Ethernet with PoE
• Ethernet with AC
• WiFi with AC
7” In-Wall Touch Screen
with Camera
Installation Guide
1
Question and Answer IconNeed help?

Do you have a question about the Control 4 C4-TW7C0-BL and is the answer not in the manual?

Control 4 C4-TW7C0-BL Specifications

General IconGeneral
Model NumberC4-TW7C0-BL
Display Size7 inches
Resolution1280 x 800
Touchscreen TypeCapacitive
ConnectivityWi-Fi, Ethernet
Power SupplyPoE (Power over Ethernet)
ColorBlack
Mounting OptionsWall Mount

Summary

Introduction

Power and Network Installation Options

Ethernet with PoE

Ethernet connection via PoE Injector, no additional wiring needed.

Ethernet with AC

Ethernet connection uses RJ-45 LAN port and AC power.

WiFi with AC

Internal WiFi communicates with LAN's WAP, requires AC power.

Supported Models

Box Contents

Accessories

PoE Injector

Control4 Power over Ethernet Injector, sold separately (AC-POE1-B).

Back Box Options

Four back box options available for new construction or retrofit installations.

Requirements

Home Controller and Back Box

Requires a fully installed Home Controller and a Control4 7" Touch Screen custom back box.

Ethernet with PoE Power Requirements

Requires Ethernet network, Control4 PoE Injector or equivalent, and two CAT5 cables.

Ethernet with AC Power Requirements

Requires Ethernet network, in-wall AC power, and one CAT5 cable.

Wireless with AC Power Requirements

Requires WiFi network, Wireless Access Point, and in-wall AC power.

Front and Rear Panel Descriptions

Front View Components

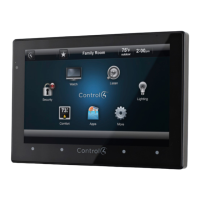
Identifies Display, Shortcut buttons (4), Green LED, and Camera on the front panel.

Rear View Connections

Details Wire Connection (Hot/Return) and RJ-45 port for Ethernet.

Touch Screen Placement

LED Indicator

Installation Warnings

Power and Network Installation Options

Ethernet Connection with PoE

Uses PoE Injector for power and network connection via Ethernet cable.

Ethernet Connection with AC Power

Connects Ethernet directly to switch, requires in-wall AC power.

Option 3: WiFi Connection with AC

Wireless Network Limitations

Power Installation

AC Power Connection

Steps for connecting AC power, including wiring to the source and terminal block.

Power Over Ethernet (PoE) Connection

Configuration

Configure for Wireless

Steps to connect to a WAP, set network name, security, and password.

Configure in Composer Pro

Troubleshooting

Boot Up Issues

Describes LED behavior during boot-up and expected screen display.

Restore to Factory Default

Procedure to restore the device to factory settings using a pin.

Warnings/Considerations

Electrical and Environmental Warnings

Covers circuit breaker, heat, sunlight, dry locations, residential use, and grounding requirements.

Usage and Handling Precautions

Warns against sharp objects, improper use, and advises fingertip use for touch screen.

Product Usage and Safety

Warranty and Electrical Codes

Covers warranty terms, installation according to national/local electrical codes.

Heat, Ventilation, and Dry Location Usage

Product generates heat, requires ventilation, use only in dry locations.

Magnet Safety Precautions

Caution for pacemakers, electronic devices, and magnetic media due to product magnets.

Third-Party Trademarks

Regulatory Information

Patent Information

Warranty

About this Document

Related product manuals