Do you have a question about the Craftsman 351.217680 and is the answer not in the manual?
Prepare yourself for operation by wearing appropriate apparel and being alert.
Ensure the work area is clean, well-lit, and properly equipped with safe electrical connections.
Keep the tool clean, lubricated, and all parts in working order for safe operation.
Understand the tool's operation, limitations, and safety precautions before use.
Attach the fence bracket to the fence using provided hardware and ensure proper alignment.
Mount the fence assembly to the jointer bed, ensuring it is square to the table.
Connect the tool to a properly grounded 3-prong receptacle for shock hazard protection.
Ensure proper equipment grounding for protection against electrical shock hazards.
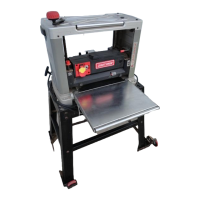
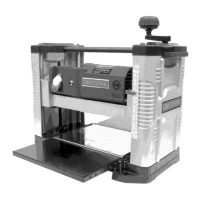
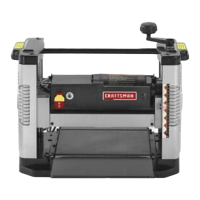
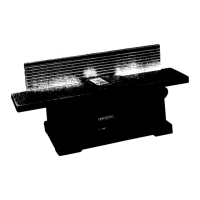
Overview of the Craftsman 6% jointer/planer features and capabilities.
Crucial safety guidelines and precautions to follow during tool operation.
How to adjust and check the depth of cut for jointing and planing operations.
Procedures for measuring the depth of cut using a straight edge.
Adjusting the fence angle and position for various cutting operations.
Ensure the blade guard is in place and functions properly for user safety.
Procedures for checking and adjusting blade height relative to the outfeed table.
Tips on using quality lumber and avoiding damage to jointer blades.
Instructions on operating the power switch and using the key lock feature.
Proper techniques for feeding material through the jointer/planer for consistent results.
Guidelines for using push blocks when working with narrow or thin workpieces.
Techniques for cutting bevels and chamfers on board edges.
Attaching a dust collection system for improved performance and cleaner operation.
How to identify worn or dull blades and their impact on cut quality.
Step-by-step instructions for honing and sharpening jointer blades.
Procedures for safely removing and installing new or resharpened jointer blades.
How to adjust or replace the spring for the blade guard to ensure proper coverage.
Steps for replacing the timing belt on the jointer/planer.
Routine maintenance practices for optimal tool performance and longevity.
Information on lubricating moving parts and bearing maintenance.
Keeping tables and fence clean and waxed for smooth workpiece feeding.
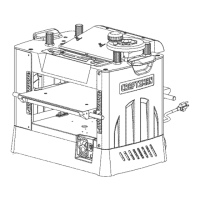
Illustrated list of replacement parts for the jointer/planer motor.
Illustrated list of replacement parts for the jointer/planer assembly.
List of optional accessories that can enhance the tool's functionality.