7
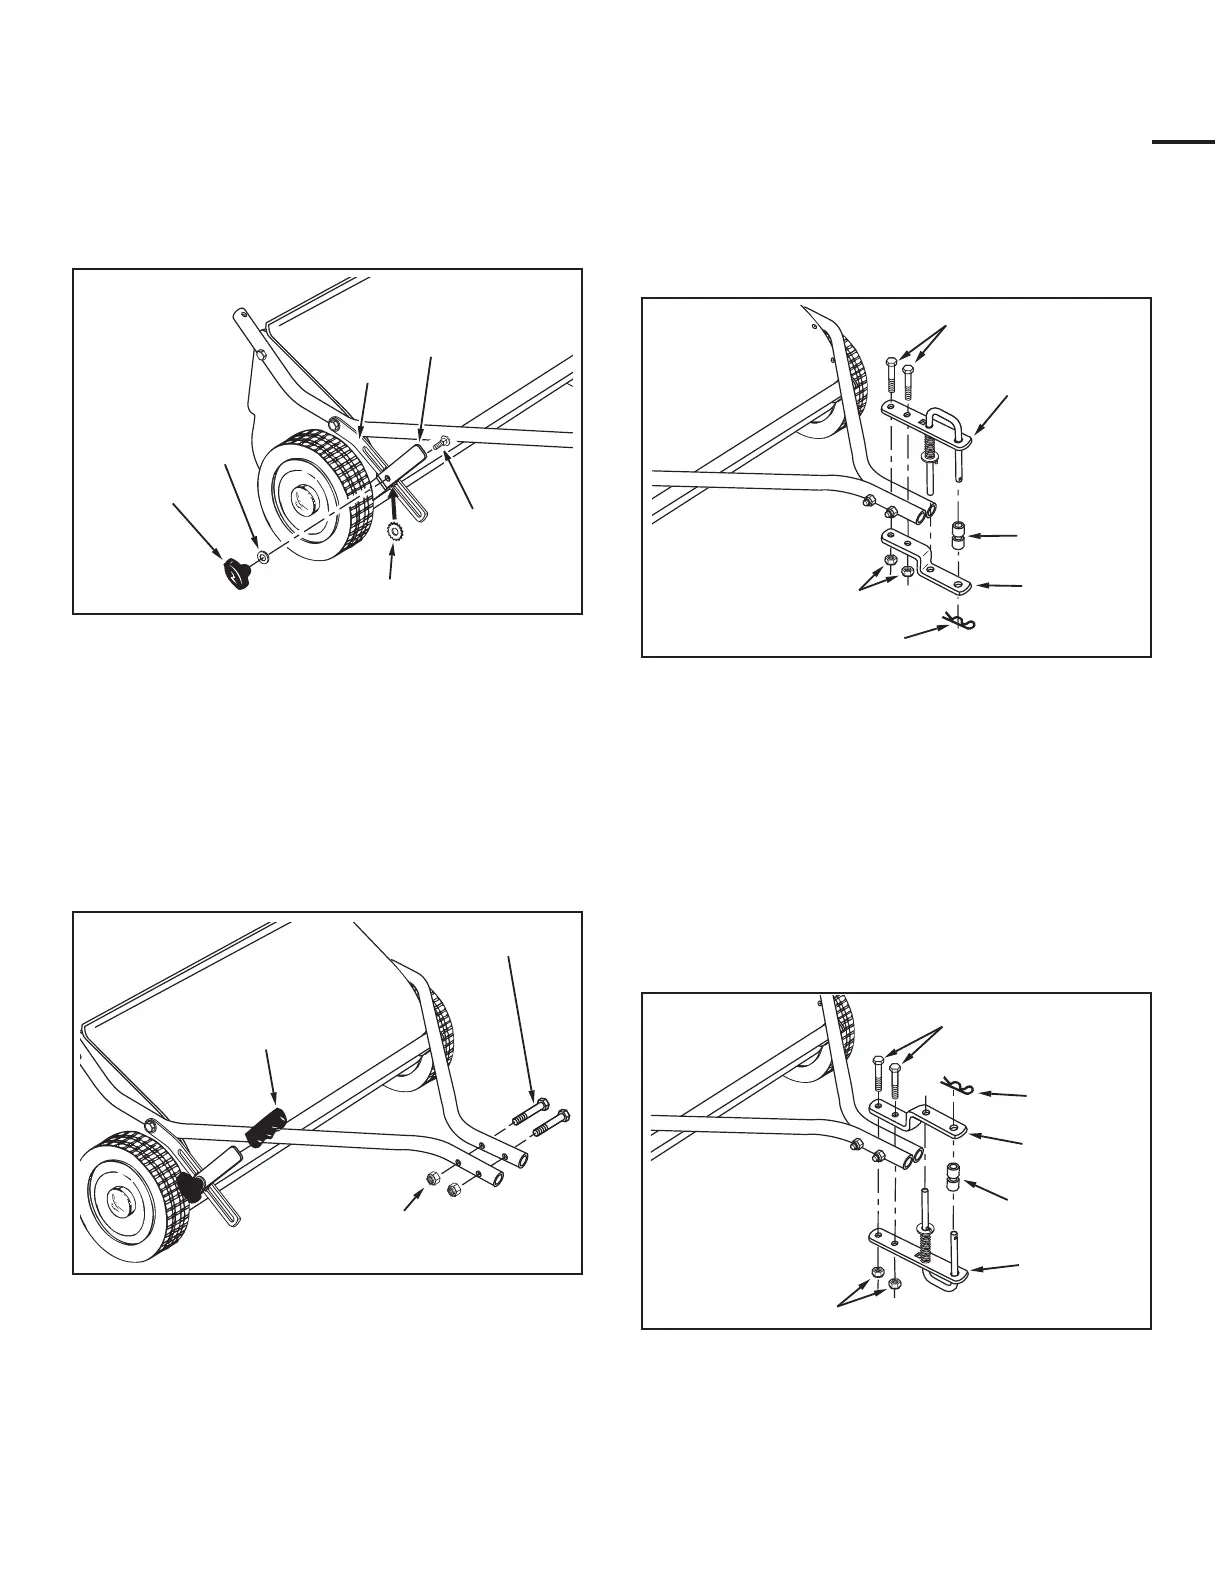
STEP 9 - FASTEN HITCH TUBES TOGETHER
• Fastenthehitchtubestogetherusingtwohexbolts(A)
andnylocknuts(I).Seegure8.Do not tighten yet.
STEP 10 - ASSEMBLE GRIP
• Assemble the grip (V) onto the end of the height
adjustmenthandleasshowningure8.
FIGURE 10
STEP 12b - ASSEMBLE HITCH BRACKETS
• Ifthetractorhitchis10"ormoreabovetheground,
assemblethehitchbracketsasshowningure10.
Inserttwohexbolts(B)throughthebrackets,with
therearhexboltbetweenthecrossboltsinthehitch
tubes.Securethehexbolts(B)withtwonylocknuts
(I).Do not tighten yet.Seegure10.
• Assemblethetwospacers(L)ontothehitchpinand
securethepinwiththehairpincotter(R).Seegure10.
NYLOCK NUTS (I)
BENT HITCH
BRACKET
HITCH
BRACKET
ASSEMBLY
HEX BOLTS (B)
SPACERS (L)
HAIRPIN
COTTER (R)
FIGURE 9
NYLOCK NUTS (I)
HITCH BRACKET
ASSEMBLY
BENT HITCH
BRACKET
HEX BOLTS (B)
HAIRPIN COTTER (R)
SPACERS (L)
STEP 12a - ASSEMBLE HITCH BRACKETS
• Ifthetractorhitchislessthan10"abovetheground,
assemblethehitchbracketsasshowningure9.
Inserttwohexbolts(B)throughthebrackets,with
therearhexboltbetweenthecrossboltsinthehitch
tubes.Securethehexbolts(B)withtwonylocknuts
(I).Do not tighten yet.Seegure9.
• Assemblethetwospacers(L)ontothehitchpinand
securethepinwiththehairpincotter(R).Seegure9.
STAR WASHER (J)
KNOB (W)
FLAT WASHER (K)
HEIGHT
ADJ.
STRAP
CARRIAGE
BOLT (E)
HEIGHT
ADJ.
HANDLE
STEP 8 - ASSEMBLE KNOB
• Placetheheightadjustmentstraptotheinside of the
heightadjustmenthandle.Placethestarwasher(J)
betweentheheightadjustmentstrapandtheheight
adjustmenthandle.Insertthecarriagebolt(E)through
thestrap,thestarwasherandthehandle.Assemble
theatwasher(K)andtheplasticknob(W)ontothe
endoftheboltandtighten.Seegure7.
STEP 11 - MEASURE TRACTOR HITCH HEIGHT
• Usethemarkalongthesideofthispagetomeasure
theheightofthetractorhitch.Themarkis10"from
thebottomofthepage.Ifthetractorhitchislessthan
10"abovetheground,gotoSTEP 12a. If the tractor
hitchis10"ormoreabovetheground,gotoSTEP 12b.
HEX BOLT (A)
NYLOCK NUT (I)
GRIP (V)
STEP 13 - TIGHTEN BOLTS
• Tightenthefourboltsassembledinsteps5,6and7.
Tightenthetwoboltsassembledinstep9.
Tightenthetwoboltsassembledinstep12aor12b.
FIGURE 7
FIGURE 8
10"