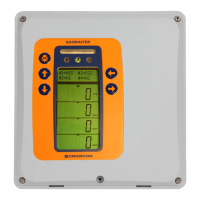
Crowcon Gasmaster Installation
15
2.12.2. Zero adjustment and
calibration
Calibration must be carried out separately on
individual gas detectors on Gasmaster. Follow
calibration instructions supplied with each detec-
tor. Ensure at all times the local legislation and
codes of practice are complied with.
Allow detectors to stabilise for at least one hour
before commencing calibration. Refer to detector
manual for more information.
Gasmaster provides Zero and Calibration Wizards
to enable you to carry out calibration easily. These
are accessed through the Operator Display Panel
and Menu System. Section III. Operation provides
detailed information on the menu structure and
operator buttons.
Zero adjustment
1. From the normal operating display, press
the Continue
button to enter the
menu system.
2. Use the Up
and Down buttons as
necessary to select Supervisor and
press Continue
.
3. You will be asked to enter a password,
press Continue
.
The default password is ZZZ (upper-
case), use the Up
and Down but-
tons to enter the first character of the
password.
Note: Double click the Up
or Down
button to move to the top or bottom
of the alphabet list. To enter numbers or
lower case characters, continue pressing
the Up
or Down button.
When you have selected the correct
character, press Continue
, the cursor
will move to the next character position.
Continue entering the rest of the pass-
word. When you have finished press the
Continue
button twice.
(See 3.7 in section III. Operation for
details of entering text strings).
4. The Zero Wizard offers temporary Inhibit
but you may wish to Inhibit all channels
during the calibration process.
How to set global inhibit:
From the Supervisor menu, scroll down
to Inhibit and press Continue
. Select
All and press Continue
. Use the Up
or Down button to set inhibit to
INHIBIT=ON, press Continue
to
accept. Use the Back
button to return
to the Supervisor menu. The Inhibit
icons will appear on the channel display.
How to set channel inhibit:
Channel inhibit can be selected from
the Inhibit menu or within the Zero or
Calibrate menu. Follow the instructions
provided above, selecting the Channel
#n (where n represents the channel
number) in place of All.
5. From the Supervisor menu, use the Up
and Down buttons to select Zero
by pressing the Continue
button.
6. Select the channel to apply zero. Press
the Continue
button to step through
the Zero Wizard.
7. Press Continue
when ‘…Only con-
tinue if in clean air!…’
is
displayed, ensure the detector has been
correctly zeroed first (i.e. 4 mA)
Press Continue
to apply Zero now.
Gasmaster will display
‘Pass’ when
zero is successful or
‘Fail’ if the
detector zero is out of range.
8. Use the Continue
button to Zero other
channels or Back
button to the
Supervisor menu to continue calibration.
Calibration
1. Follow points 1 to 3 above in Zero
adjustment to enter Supervisor mode.
2. Before you commence calibration, ensure
the channels are inhibited prior to apply-
ing gas. Channels can be inhibited glob-
ally or individually.
Follow the instructions given in step 4 in
Zero Adjustment.
3. From Supervisor menu, scroll down and
select Calibrate.
4. Select the channel to calibrate. Press the
Continue
button to step through the