Operation Crowcon Gasmaster
22
Note: Double click the Up or Down
button to move to the top or bottom
of the alphabet list. To enter numbers or
lower case characters, continue press-
ing the Up
or Down button.
When you have selected the correct
character, press Continue
, the cursor
will move to the next character position.
Note: The next character will start from
the last one selected.
If you are editing a current text string,
press Continue
to accept a character
you wish to keep.
To delete characters press the Back
button, all characters will be deleted to
the right of the cursor.
If a text string is deleted in error, dou-
ble-click the Back
button to exit the
menu item. The original text string will
be retained.
Continue entering the rest of the text
string. To finish press the Continue
button once more.
3.8 In the event of an alarm
In the event of an alarm the message display area
will display the channel in alarm and the detec-
tors location (if this information has been pre-set
in the configuration), the Alarm LED will flash,
the internal sounder and any dedicated audible
visual alarms will activate, and any external alarm
apparatus connected through the channel relays
will operate. If more then one channel goes into
alarm, the display will cycle through the channels
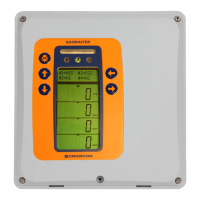
in alarm. Channel display area in the Figure 3.3
shows channel #2=CH4 (methane) in alarm con-
dition. The gas reading will cycle back and forth
between the channel type and the gas reading.
Gas detectors
The channel or channels in alarm will display an
alarm symbol and flash alternately with the type
of the detector in the channel display. Gasmaster
provides low and high alarm levels, these levels are
user configurable and can be set as rising or falling.
Fire detectors
Fire detectors in alarm will display FIRE in the
channel display. There is only one level of alarm
for fire channels.
Note: pressing the Accept/Reset button to clear
alarms from conventional fire detectors removes
power from the smoke/heat detector for 2 sec-
onds to reset the device (this ‘fire reset time’ is
adjustable; see page 33). A 2-second ‘stabilisation
time’ is also re-applied to provide time for the
detector to settle; the channel warning triangle
will show and alarms and relays will remain active
during this stabilisation period.
Environmental sampling Units (ESU)
ESU sampling devices that have slowed or
stopped will display ESU. Level 1 means slow,
level 2 means stopped
To mute the sounder
Press the Accept/Reset
button on the opera-
tor panel (or remote Accept/Reset switch if fitted).
The Alarm LED will stop flashing, but remain lit.
The channel display will show the gas reading.
When alarm conditions have cleared, press the
Accept/Reset
button to clear any latched alarms.
Figure 3.3
2
0
0
LEL
Example system in alarm
3.9 mV channels: Pellistor saver
mode
In order to protect pellistor-type sensors from
damage when exposed to high gas concentra-
tions, flammable gas detectors connected to a
mV pellistor input module are protected by a
‘Pellistor Saver’ mode. If the signal from the sen-
sor exceeds 95%LEL the system removes power
from the sensor. The channel will go into fault and
the message “Chan #n: pellistor saver mode” will
be shown in the Faults menu.
This state latches for 200 seconds, after which it
may be manually reset: power is restored to the
sensor and the pre-set stabilization period is re-
applied to allow the sensor to settle. Alarm relays
will remain active during this stabilisation period. It
is advisable to check that no flammable gas remains
in the area of the detector before re-setting.