CURTMFG.COM
•
NEED ASSISTANCE?
•
877.287.8 634
•
70001-INS-RA
•
PAGE 1
INSTALLATION MANUAL
70001
Level of Difficulty
Easy
NOTICE
Before you begin installation, read all instructions thoroughly.
Review and follow all state and federal towing laws.
Rear lighting is required on the towed vehicle.
Go to curtmfg.com for RV harnesses and other lighting options.
To help prevent damage to the product or vehicle, refer to the specified
torque specifications when securing hardware during the installation process.
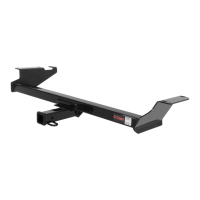
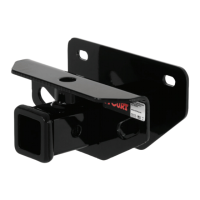
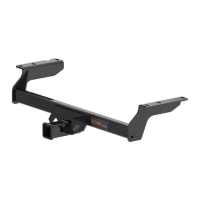
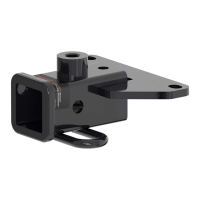
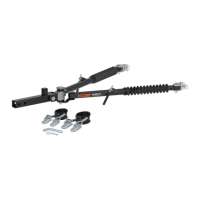
Product Photo
Weight Capacity
Gross vehicle weight rating 7,500 lbs.
Tools Required
None
Parts List
Item Qty Description
1 1 Tow bar
2 2 Safety cable, 7'
3 1 Hitch pin & clip
Maintenance
Check fasteners before each use. After
every 1,000 miles re-torque fasteners.
See 'Tow Bar Terminology' on page 2.
Check your towing system after any unusual
event and periodically on a long trip.
Clean the tow bar after each use with
warm soapy water and dry with towels. We
recommend the tow bar be removed from
the vehicle or covered when not in use.
If the arms become difficult to move in and
out, remove the zip tie securing the rubber
bellow and slide it back. Clean the inner
rods with a silicone spray or brake cleaner.
Apply a light coating of multipurpose grease
to each rod and actuate in and out until it
slides smoothly. Re-secure each bellow
with a UV-rated nylon zip tie. If the rubber
bellows are cracked or damaged replace
them immediately.
WARNING
Never exceed the vehicle manufacturer's recommended gross vehicle weight rating (GVWR).
Follow your vehicle's owner's manual for all flat towing steps and limitations.
When operating the tow bar ensure you are in a safe
position from vehicle movement and pinch points.
Verify adequate clearances between both vehicles
and your towing system in all maneuvering situations.
Always use safety cables when towing. Ensure the safety cables are long enough
to allow for turns without becoming entangled with the tow bar or latch handles.
Safety or electrical cables becoming entangled with the latch handles could
cause one or more arms to collapse, resulting in major damage, injury or death.
Damage may occur if cables come in contact with the ground, tow bar arms
or the latch handles. Never wrap cables around tow bar arms. Inspect safety
cables prior to towing. Never use damaged safety cables.
Ensure that your towing vehicle is of adequate size to properly control
your towed vehicle. Vehicle performance (braking, handling, acceleration,
turning radius) can be drastically affected by the towed vehicle. Allow for
additional time and space for stopping, changing lanes, passing and turning.
Be sure towing and towed vehicles are aligned with proper tire air pressure.
Low air pressure and misaligned vehicles may cause excessive wear,
poor vehicle tracking and extra stress on your towing system.
Never back up while flat towing a vehicle. Damage to both vehicles and towing system may occur.
Inspect the tow bar and towing system prior to every use. Check for cracked welds, loose,
worn or damaged parts. Do not tow with a damaged or worn tow bar or towing system.
Severe bumps can damage your towing system. Avoid rough terrain and sharp turns.
Never use towed vehicle for storage, this may cause you to
exceed the capacity of the tow bar or your towing system.