EasyManua.ls Logo

curt 13119 User Manual

curt 13119
5 pages
To Next Page IconTo Next Page
Page #1 background imageLoading...
Page #1 background image
PERIODICALLY CHECK THIS RECEIVER HITCH TO ENSURE ALL FASTENERS ARE TIGHT AND ALL STRUCTURAL COMPONENTS ARE SOUND
CURT Manufacturing LLC. warrants this product to be free of defects in material and/or workmanship at the time of retail purchase by the original purchaser. If the product is found to be defective, Curt Manufacturing LLC. may repair or replace
the product at their option, when the product is returned, prepaid, with proof of purchase. Alteration to, misuse of, or improper installation of this product voids the warranty. Curt Manufacturing LLC.'s liability is limited to repair or replacement
of products found to be defective, and specifically excludes liability for incidental or consequential loss or damage.
For more information log onto www.curtmfg.com, & for helpful towing tips log onto www.hitchinfo.com
MAKE: STYLE:
MIN.30
WARNING: NEVER EXCEED YOUR VEHICLE MANUFACTURER'S RECOMMENDED TOWING CAPACITY
WEIGHT CARRYING:
INSTALLATION TIPS: INSTALLATION TIME:
INSTALLATION REQUIRES:
VEHICLE PHOTO:
HITCH ILLUSTRATION:
REPRESENTATIVE PHOTO
MAKE SURE YOUR HITCH MATCHES
LEVEL OF DIFFICULTY:
MODERATE
EASY MODERATE CHALLENGING
THE INSTALL TIME LISTED IS FOR PROFESSIONAL
INSTALLERS. IF YOU ARE HESITANT TO UNDERTAKE
THIS TASK ON YOUR OWN, CONTACT AN AUTHORIZED
CURT INSTALLER FOR ADDITIONAL ASSISTANCE.
1. BEFORE YOU BEGIN INSTALLATION, READ ALL
INSTRUCTIONS THOROUGHLY.
2. TO EASE INSTALLATION, 2 PEOPLE MAY BE
REQUIRED.
3. USING PROPER TOOLS WILL GREATLY IMPROVE
THE QUALITY OF THE INSTALL AND REDUCE THE
TIME REQUIRED.
4. NEED HELP OR HAVE SOME QUESTIONS?
CALL TECHNICAL SUPPORT AT 800.798.0813
Safety glasses should be
worn at all times while
installing this product
.
YEARS:
2012-PRESENT HONDA MODEL:
CR-V
SUV
3,500
350
TRAILER WEIGHT:
TONGUE WEIGHT:
13119 INSTALLATION INSTRUCTIONS
LBS.
LBS.
1/28/2013
WARNING:
WE RECOMMEND THE USE OF 18050 STABILIZING STRAPS FOR ALL NON-TRAILER
(WHEEL-LESS) LOADS. PLEASE SEE THE CURT CATALOG OR VISIT US ONLINE AT
WWW.CURTMFG.COM FOR FURTHER INFORMATION.
RATCHET
TORQUE
WRENCH
SOCKET
EXTENSION
9"
SOCKET
10mm
17mm
11/16"
SCREW
DRIVER
ROTARY TOOL
SAFETY
GLASSES
- NO DRILLING REQUIRED
- UNDERBODY PANEL
TRIMMING REQUIRED
- LOWER EXHAUST
Question and Answer IconNeed help?

Do you have a question about the curt 13119 and is the answer not in the manual?

curt 13119 Specifications

General IconGeneral
BrandCURT
Part Number13119
CategoryAutomobile Accessories
Hitch ClassClass 3
Receiver Tube Size2 inches
Weight Carrying Capacity6, 000 lbs
Tongue Weight600 lbs
MaterialSteel
Ball Mount IncludedNo
Installation TypeBolt-On
FinishBlack

Summary

Product Information and Safety

Vehicle Compatibility and Capacity

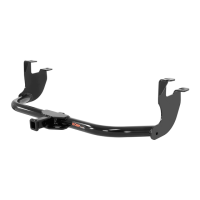
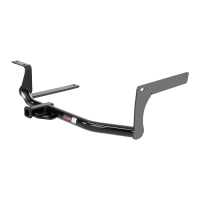
Details the towing capacity and vehicle model (Honda CR-V) for the hitch.

Installation Requirements and Tips

Covers estimated installation time, required tools, difficulty level, and helpful installation advice.

Installation Walkthrough: Initial Steps

Step 1: Remove Underbody Panel

Instructions for removing fasteners and lowering the vehicle's underbody panel.

Step 2: Lower Exhaust System

Guidance on detaching the exhaust system by removing rubber isolators from hangers.

Installation Walkthrough: Mounting and Finalizing

Step 3: Trim Underbody Panel

Details on marking and cutting the underbody panel for proper fitment.

Step 4: Mount Hitch to Frame

Process of securing the hitch using U-bolts and frame rail hardware.

Step 5: Torque Hardware

Specifies the required torque values for all fasteners during installation.

Step 6: Raise Exhaust

Instructions for re-installing the exhaust system into its original position.

Installation Summary and Components

Parts List and Diagram

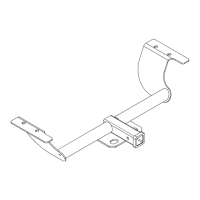
Lists all components included with the hitch and provides a visual diagram.

Tools Required Recap

A concise summary of the tools needed for the installation process.

Installation Notes Summary

Key installation notes, including no drilling required and underbody panel trimming.

Complete Installation Steps

Steps 1-2: Panel & Exhaust Preparation

Combines initial steps for underbody panel removal and exhaust system lowering.

Steps 3-4: Panel Trim & Hitch Mounting

Covers trimming the underbody panel and mounting the hitch to the vehicle frame.

Steps 5-7: Final Torque & Exhaust Reinstallation

Details final torque specifications and re-installing the exhaust system.

Related product manuals