Do you have a question about the CYBEX VR1 Lat Pull and is the answer not in the manual?
Guidelines for safe use, owner's responsibility, and user instructions.
Instructions and warnings for securely anchoring the equipment to prevent tipping.
Safety measures for the facility, including surface requirements and clearance.
Instructions for users on what to do and not do while operating the equipment.
Explanation of warning and caution labels and their meaning.
Shows the location of warning and caution labels on the machine.
Details on weight, dimensions, maximum user, and training weight.
Criteria for selecting and preparing a suitable location for the equipment.
Specifies recommended humidity and temperature ranges for operation and storage.
Lists the necessary tools for assembling the equipment.
Step-by-step instructions for assembling the machine.
Instructions and warnings for securely anchoring the equipment to prevent tipping.
Steps to verify correct assembly and component installation.
Instructions for correctly installing the weight plates onto the guide rods.
Process for applying decals to the weight plates for weight indication.
Instructions for correctly routing the cables through the machine's pulleys.
Steps for attaching the protective shroud to the machine.
Defines the purpose and target audience for the machine.
General instructions and tips for using the machine safely and effectively.
Steps for adjusting the machine for the user before starting exercise.
Describes the correct motion and muscles used during the exercise.
Important warnings related to maintenance procedures and equipment safety.
Routine tasks to be performed daily for equipment care.
Instructions for cleaning the upholstery based on the type of soiling.
Instructions for cleaning stubborn stains using alternative methods.
Method for restoring shine and finish to the equipment.
Guidelines for cleaning the machine's frames, avoiding damage.
Instructions for cleaning chrome components to prevent scratches.
Specific advice for cleaning the front panel of the machine.
Maintenance tasks to be performed on a weekly basis.
Procedure for checking and tightening all nuts and bolts for safety.
How to inspect cables for wear, damage, and proper tension.
Recommended maintenance tasks to be performed annually.
Tools and methods for adjusting the tension of the machine's cables.
Instructions on how to register the product for warranty and support.
Contact information and hours for customer and technical support.
Information and procedures for ordering replacement parts.
Process and requirements for returning items for placement, repair, or credit.
Procedures for handling and reporting damaged parts received during shipment.
Steps for identifying and reporting visible shipping damage upon receipt.
Process for reporting shipping damage that is not immediately visible.
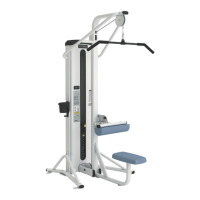
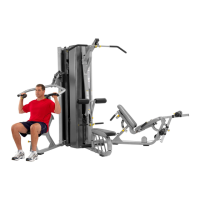
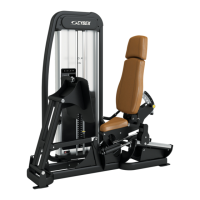
The Cybex VR1 Lat Pull is a strength training machine designed to target and develop the latissimus dorsi, teres major, lower trapezius, rhomboid, and biceps elbow extension muscles. It is intended for commercial use to aid in exercise and improve general physical fitness. The machine features a weight stack system that allows users to select their desired resistance for lat pull-down exercises.
The primary function of the VR1 Lat Pull is to facilitate a lat pull-down exercise, which involves pulling a bar downwards towards the body while seated. This movement engages the major muscles of the back and arms, contributing to upper body strength and development. The machine utilizes a cable and pulley system connected to a weight stack, providing smooth and consistent resistance throughout the exercise. Users adjust the resistance by inserting a pin into the desired weight plate in the stack.
The VR1 Lat Pull is designed with several features to enhance user experience and safety. Before use, it is crucial for users to obtain a medical exam and receive proper instruction on how to operate the equipment safely. All warning labels and instructional placards on the machine must be read and understood. Adjustment pins, such as those for the thigh pad, must be fully inserted before starting an exercise. The machine should be inspected for any damage or inoperable parts, and any issues should be reported to staff immediately.
During exercise, users are instructed to use the machine only as shown on the instructional placard. It is important not to use the machine for stretching or to attach unauthorized straps or devices. The unit should not be modified, and children 12 or younger should not be allowed on or near the unit. If the weight plate is raised without a user, it indicates a potential issue, and the machine should not be used. Users should stop exercising if they feel faint, dizzy, or experience pain, and consult a physician. For free weight equipment, a spotter is recommended.
For selectorized equipment like the VR1 Lat Pull, users must ensure the weight pin is completely inserted. It is critical not to pin weights in an elevated position or use the machine if found in this state. Resistance should not be increased by any means other than those provided by Cybex. Loose or dangling clothing or jewelry should be avoided to prevent entanglement with moving parts. Users should not lean or pull on the machine for support during stretching. The maximum specified user weight should not be exceeded. Guards must be in place and undamaged, and no labeling should be removed from the equipment. All adjustment points on the machine are highlighted with yellow handles or knobs for easy identification. To set up for the exercise, users adjust the thigh pad for stabilization and then grasp the bar, sitting with their thighs securely under the pad. The movement involves pulling the bar down until the elbows are by the sides and hands are approximately level with the shoulders.
Regular preventive maintenance is essential for safe and trouble-free operation of the Cybex VR1 Lat Pull. All maintenance and repair activities should be performed by trained service personnel using only Cybex International, Inc. replacement parts. A log of all maintenance and repair activities should be kept.
Daily procedures include inspecting the equipment for any loose or worn components such as belts, cables, grips, pulleys, or damaged labels/placards. Any deficiencies must be fixed before the equipment is used. The facility safety sign should be visible and prominent. For cleaning, strong agents like rubbing alcohol or bleach should be tested in an inconspicuous area first. Harsh solvents or industrial cleaners should be avoided. For stained or soiled upholstery, a soft white cloth is recommended. Protective gloves and eye protection should be worn when cleaning, and cleaning products should not be inhaled or swallowed. The surrounding area and clothing should be protected from exposure, and the area should be well-ventilated.
For light soiling of upholstery, a solution of 10% household liquid soap and warm water applied with a soft damp cloth is recommended, followed by wiping residue away with a clean soft cloth. For more difficult stains, a solution of 10% household bleach (sodium hypochlorite) and 90% water can be gently rubbed on the stained area with a soft white cloth, then rinsed. If stains persist, full-strength household bleach can be used, allowed to puddle for about 30 minutes, then rinsed thoroughly. An alternative method for difficult stains involves dampening a soft cloth with rubbing alcohol, gently rubbing the stained area, and then rinsing with a clean soft cloth. To restore luster to upholstery, a light coat of furniture wax can be applied for 30 seconds and then lightly rubbed with a clean white cloth.
Frames should be wiped down with a mild solution of warm water and car wash soap, then thoroughly dried. Acid or chlorine-based cleaners and abrasive cleaners should be avoided as they can scratch or damage the equipment. Chrome tubes should be cleaned with chrome polish, followed by a car wax seal. Neutral cleaners with a pH between 5.5 and 8.5 are recommended for chrome, ensuring thorough drying and avoiding acid, chlorine, or abrasive cleaners. For the front panel, clean soft cloths or sponges should be used for application and rinsing, followed by a warm water rinse. Abrasive or high alkaline cleaners, prolonged cleaner exposure, direct sunlight, elevated temperatures, scrapers, squeegees, razors, or gasoline should not be used. To minimize fine scratches, mild automotive polish applied and removed with a soft clean cloth can be used. Suggested polishes include Johnson Paste Wax, Mirror Glaze #10 Plastic Polish, and Novus Plastics Polish #1, #2.
Weekly procedures involve inspecting and tightening all loose nuts and bolts. Any worn or damaged components must be replaced immediately, and the equipment kept out of use until repaired. Cables should be inspected for wear, damage, and proper tension, paying particular attention to bends and attachment points. Conditions indicating a worn cable include tears or cracks in the cable sheath, kinks, curled sheaths, or necking (a stretched cable sheath).
Yearly procedures require replacing all cables and belts annually. Cable adjustment is crucial for maintaining proper function. There are four types of cable tension adjustment: Jam Nut Adjustment, Rod End Adjustment, Roll Pin Adjustment, and Cam End Adjustment. Jam Nut Adjustment uses a jam nut and a tension adjustment nut at the cable cam end. Rod End Adjustment uses a socket head cap screw (SHCS) securing a cable rod end bearing, with primary adjustment by turning the rod end bearing. Roll Pin Adjustment uses a roll pin and a series of holes in the weight stack top weight connector. Cam End Adjustment involves loosening a nut and rotating a cam bolt on the pulley bracket.
| Category | Fitness Equipment |
|---|---|
| Brand | CYBEX |
| Model | VR1 |
| Frame Material | Steel |
| Color | Various |