错误!使用“开始”选项卡将 Heading 1 应用于要在此处显示的文字。 29
Swipe the card that needs to be authorized, and then the "Issued card successfully”
notice is displayed.
6.3.3 Modifying IP Address
In the project mode, select IP Config.
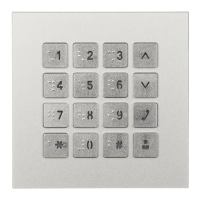
Press numeric keys of 2, 8, 4, and 6 to select the item you need to modify, and then
press # to start input. After inputting, press # to confirm.
After the modification is finished, press / to exit.
6.3.4 Modifying Volume
In the project mode, select Volume Config.
Press numeric keys of 4 or 6 to decrease or increase the key press volume and the ring
volume.
After the modification is finished, press / to exit.
6.3.5 Viewing WEB Port
In the project mode, select Web Port to view the web port, and press / to exit.
6.3.6 Modifying Project Password
In the project mode, select “Change Password.”
Enter the new project password, and then press # to confirm.
The “Modified succeeded” notice is displayed.
6.3.7 Adding Room No.
You can only add room number on the VTO that works as SIP server, and then you can configure
the added room number on the corresponding VTH to connect it in the network.
In the project mode, select “Add Number.”
Enter the room number you need to add, and then press # to confirm.
The “Add Success” notice is displayed.
After adding room number is finished, press / to exit, and you can view the
added room number in the contact.
 Loading...