7 Installation
Installer reference guide
32
ERLQ004~008CA + EHVH/X04+08S18+26CB
Daikin Altherma – Low temperature split
4P384973-1A – 2016.02
7.3.6 To prevent the outdoor unit from falling
over
In case the unit is installed in places where strong wind can tilt the
unit, take following measure:
1 Prepare 2 cables as indicated in the following illustration (field
supply).
2 Place the 2 cables over the outdoor unit.
3 Insert a rubber sheet between the cables and the outdoor unit
to prevent the cable from scratching the paint (field supply).
4 Attach the cable’s ends. Tighten those ends.
7.4 Mounting the indoor unit
7.4.1 About mounting the indoor unit
When
You have to mount the outdoor and indoor unit before you can
connect the refrigerant and water piping.
Typical workflow
Mounting the indoor unit typically consists of the following stages:
1 Installing the indoor unit.
7.4.2 Precautions when mounting the indoor
unit
INFORMATION
Also read the precautions and requirements in the
following chapters:
▪ General safety precautions
▪ Preparation
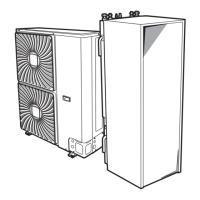
7.4.3 To install the indoor unit
1 Lift the indoor unit from the pallet and place it on the floor.
2 Slide the indoor unit into position.
3 Adjust the height of the leveling feet to compensate for floor
irregularities. The maximum allowed deviation is 1°.
NOTICE
Do NOT tilt the unit backwards:
7.5 Connecting the refrigerant piping
7.5.1 About connecting the refrigerant piping
Before connecting the refrigerant piping
Make sure the outdoor and indoor unit are mounted.

 Loading...