Fan Motor / Fan Rotor Si041265EC
10 Removal Procedure
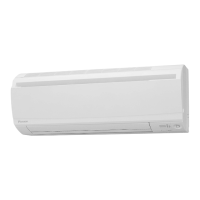
6. Fan Motor / Fan Rotor
Warning
Be sure to wait for 10 minutes or more after turning off all power supplies before
disassembling work.
Step Procedure Points
1 Remove the 3 screws
on the right side plate.
2 Unfasten the hook and
remove the right side
plate.
When reassembling the fan
motor and the fan rotor,
provide as much as 5 mm
(0.2 inch) of play between
the side face of the rotor and
the bottom frame.
(1) Insert the fan motor allowing
for approx. 5 mm (0.2 inch)
of play.
(2) Tighten the fan rotor screw
until it stops. Then give the
screw one more turn.
(3) If the fan rotor rotates
appropriately, tighten the
screw completely.
(4) If not, repeat the procedure
from (1).
3 Loosen the screw.
4 Remove the fan motor
and the fan rotor.
Right side
plate
(R18512)
(R18652)
Hook
5 mm (0.2 inch)
Side face of rotor
(R18879)
Side face of
bottom frame
(R9582)
(R18765)
Fan rotor Fan motor
(R2561)
 Loading...