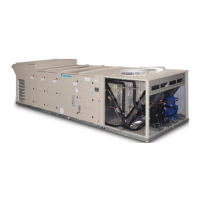
Damper Assemblies
The optional damper assemblies described in this section
are ordered with factory-installed actuators and linkages.
The following sections describe the operation and linkage
adjustment of the factory option.
Figure 13: Damper Assembly
Economizer Dampers
As the single actuator modulates, the outside air dampers
open, the return air dampers close, and the exhaust air exits
the unit through the gravity relief dampers.
The economizer comes with manually adjustable linkage
(Figure 13). The damper is set so that the crankarm moves
through a 90-degree angle to bring the economizer dampers
from full open to full close. Mechanical stops are placed in the
crankarm mounting bracket. Do not remove stops. Driving the
crankarm past the stops results in damage to the linkage or
damper.
Outdoor Air Dampers (0% to 30%)
These dampers are intended to remain at a xed position during
unit operation, providing fresh air quantities from 0 to 30% of the
total system airow, depending on the damper setting.
The damper position may be set at the unit controller keypad
(refer to OM 920 for further detail). During unit operation, the
damper is driven to the position set at the unit controller. During
the off cycle, the damper is automatically closed.
Cabinet Weather Protection
This unit ships from the factory with fully gasketed access
doors and cabinet caulking to provide weather resistant
operation. After the unit is set in place, inspect all door gaskets
for shipping damage and replace if necessary.
Protect the unit from overhead runoff from overhangs or other
such structures.
CAUTION
Transportation, rigging, or maintenance can damage the
unit’s weather seal. Periodically inspect the unit for leakage.
Standing moisture can promote microbial growth, disease, or
damage to the equipment and building
Installing Ductwork
On vertical-supply/vertical-return units, if a Daikin roof curb
is not used, the installing contractor should make an airtight
connection by attaching eld fabricated duct collars to the
bottom surface of the unit’s duct opening. Do not support
the total weight of the duct work from the unit. See roof curb
layouts in Figure 3 on page 7, Figure 4 on page 8 or
Figure 5 on page 9.
Table 13: Rated Airow
Unit Size (tons) AHRI Rated Airow
015 3750
017 4375
020 5000
026 6875
030 7500
035 8750
040 10000
050 12500
Use exible connections between the unit and ductwork to
avoid transmission of vibration from the unit to the structure.
To minimize losses and sound transmission, design duct work
per ASHRAE and SMACNA recommendations.
Where return air ducts are not required, connect a sound
absorbing T or L section to the unit return to reduce noise
transmission to the occupied space.
Ductwork exposed to outdoor conditions must be built in
accordance with ASHRAE and SMACNA recommendations
and local building codes.
WARNING
Mold can cause personal injury. Materials such as gypsum
wall board can promote mold growth when damp. Such
materials must be protected from moisture that can enter units
during maintenance or normal operation.
Linkage
Actuator
IM 1058-8 • MAVERICK II ROOFTOP SYSTEMS 16 www.DaikinApplied.com
meChanICal InsTallaTIon
 Loading...