7 HOMEDEPOT.COM
Please contact 1-866-308-3976 for further assistance.
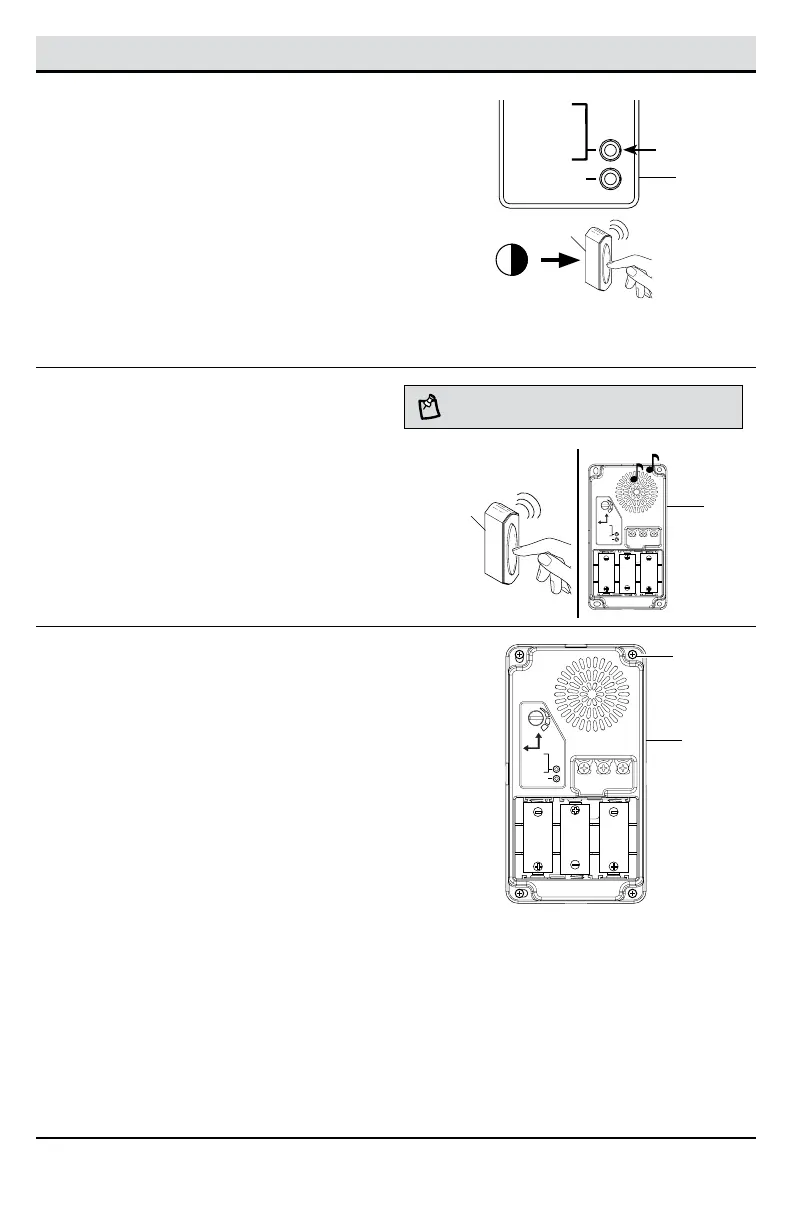
Installation - Wireless Application
2
Syncing the doorbell base and
push button (not included)
Refer to the manual included with the wireless push
button for additional information.
□ Press and release the “SYNC” button on the
doorbell base (B).
□ Press the push button (2) within 10 seconds.
□ The doorbell base (B) will play a “Beep-Beep” to
indicate the push button (2) is synced.
□ Press and release the push button (2) to verify
the doorbell base (B) and push button (2) are
synced.
10
SYNC – PRESS
AND RELEASE.
RESET – HOLD
10 SECONDS.
TUNE – HOLD
1 SECOND.
UP
FRONT TRANSREAR
TYPE “C”
TYPE “C”
TYPE “C”
Press the push button
within 10 seconds
3
Testing the doorbell base and
push button placement
□ Temporarily position the doorbell base (B) and
push button (2) where they will be mounted.
□ Press the push button (2) and listen for the
doorbell base (B) to ring.
□ If the doorbell base (B) does not sound, move
the doorbell base (B) closer to the push
button(2) and test again.
NOTE: Do not permanently mount the push button or
doorbell base until they are working properly.
SYNC – PRESS
AND RELEASE.
RESET – HOLD
10 SECONDS.
C
H
I
M
E
V
O
L
U
M
E
TUNE – HOLD
1 SECOND.
UP
FRONT TRANSREAR
TYPE “C”
TYPE “C”
TYPE “C”
4
Mounting the doorbell base
□ Using the “UP” arrow indicator, place the
doorbell base (B) against the wall and mark
the four screw hole locations.
□ Drill four 7/32 in. pilot holes and insert wall
anchors (BB).
□ Attach the doorbell base (B) to the mounting
surface using the four screws (AA) and tighten
securely.
□ Snap the doorbell cover (A) onto the doorbell
base (B).
SYNC – PRESS
AND RELEASE.
RESET – HOLD
10 SECONDS.
C
H
I
M
E
V
O
L
U
M
E
TUNE – HOLD
1 SECOND.
UP
FRONT TRANSREAR
TYPE “C”
TYPE “C”
TYPE “C”
B
2
B
B
AA
Installation - Wireless Application (continued)
2
 Loading...