6
Installation - Wired Application
4
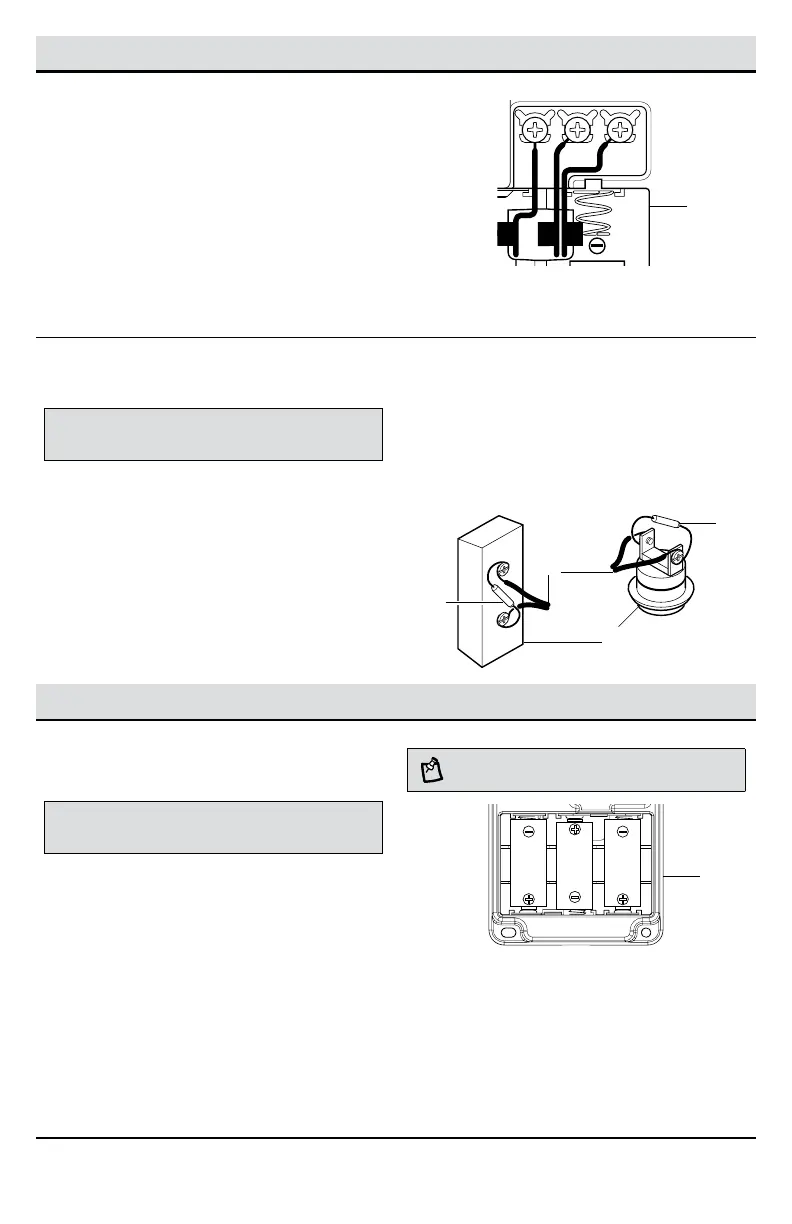
Wiring the doorbell base
□ Connect the doorbell wires to the doorbell
base (B):
□ Wire “F” to screw terminal “FRONT”
□ Wire “T” to screw terminal “TRANS”
□ Wire “R” to screw terminal “REAR” (if
applicable)
□ Snap the doorbell cover (A) onto the doorbell
base (B).
FRONT
TRANS REAR
F
T
R
5
Installing the diode on a non-
video “front” push button
IMPORTANT: The doorbell base will not play the entire musical
tune and the “TUNE” button will not work if a diode is not installed on
the main push button.
□ Two diodes (CC) are included in the hardware
package. Only one diode (CC) is needed. Keep
the second diode (CC) as a spare.
□ Check all existing wired push buttons (2) to
determine if a diode (CC) is already installed.
□ If a diode (CC) is not installed on a push
button(2), install one diode (CC) on the “front”
push button (2).
□ Loosen the two wiring screws on the back
of the existing “front” push button (2).
□ Wrap the house wires (3) and the
diode(CC) wires around each screw.
□ Tighten the screws onto the diode (CC)
and wiring.
Installation - Wireless Application
1
Installing the batteries, if not
wired to a transformer
NOTICE: When using this doorbell base with a transformer, batteries
are not needed and should not be installed even when using wireless
push buttons.
□ If the doorbell base (B) is not connected
to transformer wires, install 3 alkaline “C”
batteries (not included) into the doorbell base
(B).
□ Make sure batteries are installed according to
the diagram inside the chime.
NOTE: In typical use, alkaline batteries will last up to
one year.
SYNC – PRESS
AND RELEASE.
RESET – HOLD
10 SECONDS.
C
H
I
M
E
V
O
L
U
M
E
TUNE – HOLD
1 SECOND.
UP
FRONT TRANSREAR
TYPE “C”
TYPE “C”
TYPE “C”
B
3
2
CC
CC
Installation - Wired Application (continued)
B
Not included


 To Next Page