Installing the power supply unit (PSU)
1. Insert the PSU into the PSU slot and slide it toward the back of the computer until it clicks into place.
2. Tighten the screws to secure the PSU to the computer.
3. Route the PSU cables through the retention clips.
4. Connect the PSU cables to the connectors on the system board.
5. Install the cover.
6. Follow the procedure in After Working Inside Your Computer.
Removing the Input/Output (I/O) panel
1. Follow the procedure in Before Working Inside Your Computer.
2. Remove:
a. cover
b. front bezel
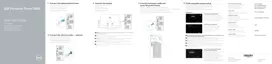
3. To remove the I/O panel:
a. Disconnect the I/O panel, and USB data cables from the system board [1,2,3,4].
b. Remove the screw that secures the I/O panel to the computer [5].
c. Slide the I/O panel toward the left of the computer to release it and pull the I/O panel along with
its cable out of the computer [6].
Installing the Input/Output (I/O) panel
1. Insert the I/O panel into the slot on the front of the chassis.
2. Slide the I/O panel toward the right of the computer to secure it to the chassis.
3. Tighten the screw to secure the I/O panel to the chassis.
4. Connect the I/O panel, and USB data cable to the system board.
5. Install :
16