Figure 9.
Installing the heat sink assembly
1. Place the heat sink assembly in the slot by aligning with the screw holders.
2. Tighten the screws to secure the heat sink assembly to the system board.
3. Connect the heat sink assembly cable to the system board.
4. Install:
a. optical drive
b. hard-drive assembly
c. front bezel
d. cover
5. Follow the procedures in After Working Inside Your Computer.
Removing the heat sink assembly
1. Follow the procedures in Before Working Inside Your Computer.
2. Remove:
a. cover
b. front bezel
c. hard drive assembly
d. optical drive
e. heat sink fan cover
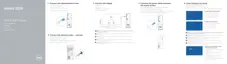
3. Follow the steps to remove the heatsink assembly:
a. Disconnect the heat sink assembly cable from the system board [1].
b. Remove the screws to loosen the processor fan and the heat sink [2].
c. Lift up the heat sink and remove it from the chassis [3].
13