EasyManua.ls Logo

DeLonghi EC860.M - User Manual

DeLonghi EC860.M
9 pages
Print Icon
To Next Page IconTo Next Page
Loading...
15
Before using the appliance, always read the safety warnings.
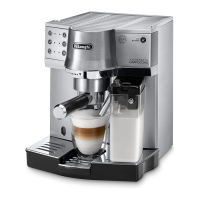
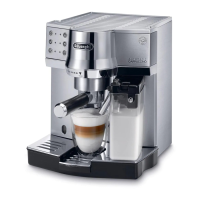
1. DESCRIPTION
1.1 Description of the appliance
(page 3 - A )
A1. Cup shelf/Cup warmer
A2. Milk container/water spout connector
A3. Main switch
A4. Power cord connector socket
A5. Boiler outlet/Infuser assembly
A6. Water tank housing
A7. Water tank lid
A8. Water tank with water lter housing
A9. "No water" indicator
A10. Drip tray
A11. Drip tray max. water level indicator
A12. Cup tray
A13. Sliding compartment for macchiato/caelatte glass
A14. Cup warmer button
1.2 Description of control panel
(page 3 - B )
B1. ON/Stand-by button
B2. ON/Stand-by light
B3. 1 cup button
B4. Temperature OK/1 cup light
B5. 2 cups button
B6. Temperature OK/2 cups light
B7. Hot water button
B8. Hot water light
B9. Cappuccino/hot milk button
B10. Temperature OK/cappuccino/hot milk light
B11. Macchiato/hot milk button
B12. Temperature OK/macchiato/hot milk light
1.3 Description of the accessories
(page 2 - C )
C1. Filter holder
C2. 1 coee froth lter
C3. 2 coee froth lter
C4. ESE pod froth lter
C5. Power cord (removable)
C6. Measure/pressure
C7. Removable hot water spout
C8. Water hardness indicator paper (Total Hardness test)
C9. Descaler
C10. Water softener lter
1.4 Description of the milk container
(page 2 - D )
D1. Milk frother lid
D2. CLEAN button
D3. Milk spout
D4. Milk intake tube
D5. Milk container
2. FILLING THE WATER TANK
1. Extract the water tank (A8) and ll with fresh clean water,
taking care not to exceed the MAX level (g. 1).
2. Then put the tank back in the machine (g. 2).
Important: never operate the appliance without water in the tank or
without the tank.
3. SETTING UP THE APPLIANCE
1. Plug the power cord connector into the socket at the back
of the appliance (g. 3), then plug the plug into the mains
socket.
2. Attach the lter holder to the appliance. To attach correctly,
align the lter holder handle with the OPEN symbol
(g. 4), then rotate the handle to the right until it is aligned
with the CLOSE symbol (g. 5);
3. Place the main switch on the back of the appliance in the
I position;
4. At the end of the self-diagnosis cycle, the "hot water" light
(B8) ashes and the other lights go o. The appliance indi-
cates that the hot water spout must be inserted (C7) (g.
6);
5. Place a container with a minimum capacity of 100 ml under
the spout (g. 7);
6. Press the "hot water" button (B7). Delivery begins,
then stops automatically;
Please note: if the (B2) and (B8) lights ash, press the
button again.
7. To rinse the internal circuits of the appliance, place a recipi-
ent under the coee spout and press the button (B5).
Repeat ve times;
8. Now rinse the "steam" circuit. Place a recipient under the
hot water spout (g. 7) and press the button. Repeat
ve times. (If necessary, rell the tank).
Please note: we also recommend rinsing the internal circuits through if
the appliance is not used for a long period.
4. ACTIVATING THE WATER SOFTENER FILTER
Certain models are tted with a water softener lter (C10). If
this is not the case with your model, you are recommended to
purchase one from De’Longhi Customer Services.
To use the lter correctly, follow the instructions below.
1. Remove the lter from the packaging;

Questions and Answers

DeLonghi EC860.M Specifications

General IconGeneral
TypeEspresso Machine
ModelEC860.M
Power1450 W
Pump Pressure15 bar
MaterialStainless Steel
Milk FrotherYes
ColorSilver
Voltage220-240 V

Summary

Description of the Coffee Machine

Appliance Components

Details the various parts of the coffee machine, identified by labels A1-A14.

Milk Container Components

Lists the individual parts of the milk container, labeled D1-D5.

Water Tank Operations

Filling the Water Tank

Instructions for filling the water tank with fresh water up to the MAX level.

Appliance Setup and Configuration

Initial Setup Procedure

Steps for initial setup, including plugging in, attaching filter holder, and initial rinse cycles.

Adjusting Water Temperature

Procedure to change the brewing water temperature for coffee.

Configuring Stand-by Interval

How to set the automatic shut-off time for energy saving.

Setting Water Hardness Level (Part 1)

Instructions for measuring and beginning the water hardness setting process.

Setting Water Hardness Level (Part 2)

Completing the water hardness setting based on test strip results.

Basic Operation and Features

Appliance Stand-by Mode

How to turn the appliance on/off or put it into stand-by mode.

Brewing Espresso with Ground Coffee

Step-by-step guide for preparing espresso using pre-ground coffee.

Brewing Espresso with Coffee Pods

Instructions for preparing espresso using ESE standard coffee pods.

Customizing Coffee Volume

How to program the desired coffee quantity for single or double servings.

Using the Cup Warmer

Instructions on how to activate and use the cup warming function.

Milk-Based Drinks Preparation

Milk Container Handling

Steps for filling and correctly attaching the milk container.

Making Cappuccino and Macchiato

Detailed instructions for preparing milk-based coffee drinks.

Cleaning the Milk Frother

Procedure to clean milk frother circuits using the dedicated CLEAN button.

Programming Milk;Coffee Quantities

How to set custom milk and coffee volumes for milk drinks.

Hot Water and Steam Functions

Dispensing Hot Water

Steps for dispensing hot water from the dedicated spout.

Adjusting Hot Water Volume

How to modify the default quantity of automatically delivered hot water.

Using the Steam Function

Instructions for using the steam function to heat or froth liquids.

Cleaning Steam;Hot Water Spout

Procedure for cleaning the steam and hot water spout after use.

Machine Cleaning and Maintenance

Regular Cleaning Schedule

Lists the machine parts requiring regular cleaning.

Internal Circuit Rinsing

How to rinse internal circuits after periods of inactivity.

Drip Tray Cleaning

Steps for emptying and cleaning the drip tray.

Coffee Filter Cleaning

Weekly cleaning procedure for 1/2 cup and pod coffee filters.

Boiler Outlet Cleaning

Instructions to rinse the boiler outlet after approximately 200 coffees.

Water Tank Cleaning

Monthly cleaning of the water tank, including filter rinsing.

Milk Container Cleaning

Detailed steps for cleaning the milk container and its components.

Connector Cleaning

How to clean the milk container/water spout connector.

Descaling Procedure

When and How to Descale

Procedure for descaling the appliance when indicated by the control panel light.

Technical Specifications and Lights

Technical Data Summary

Key specifications including voltage, power, dimensions, and weight.

Indicator Light Explanations

Explanation of various indicator lights and their meanings during operation.

Indicator Light Explanations (Continued)

Further explanation of indicator lights for different states and accessories.

Troubleshooting Common Issues

Troubleshooting Guide (Part 1)

Lists common problems like appliance not powering on or no espresso delivery.

Troubleshooting Guide (Part 2)

Addresses issues with coffee temperature, noise, froth quality, and taste.

Related product manuals