17
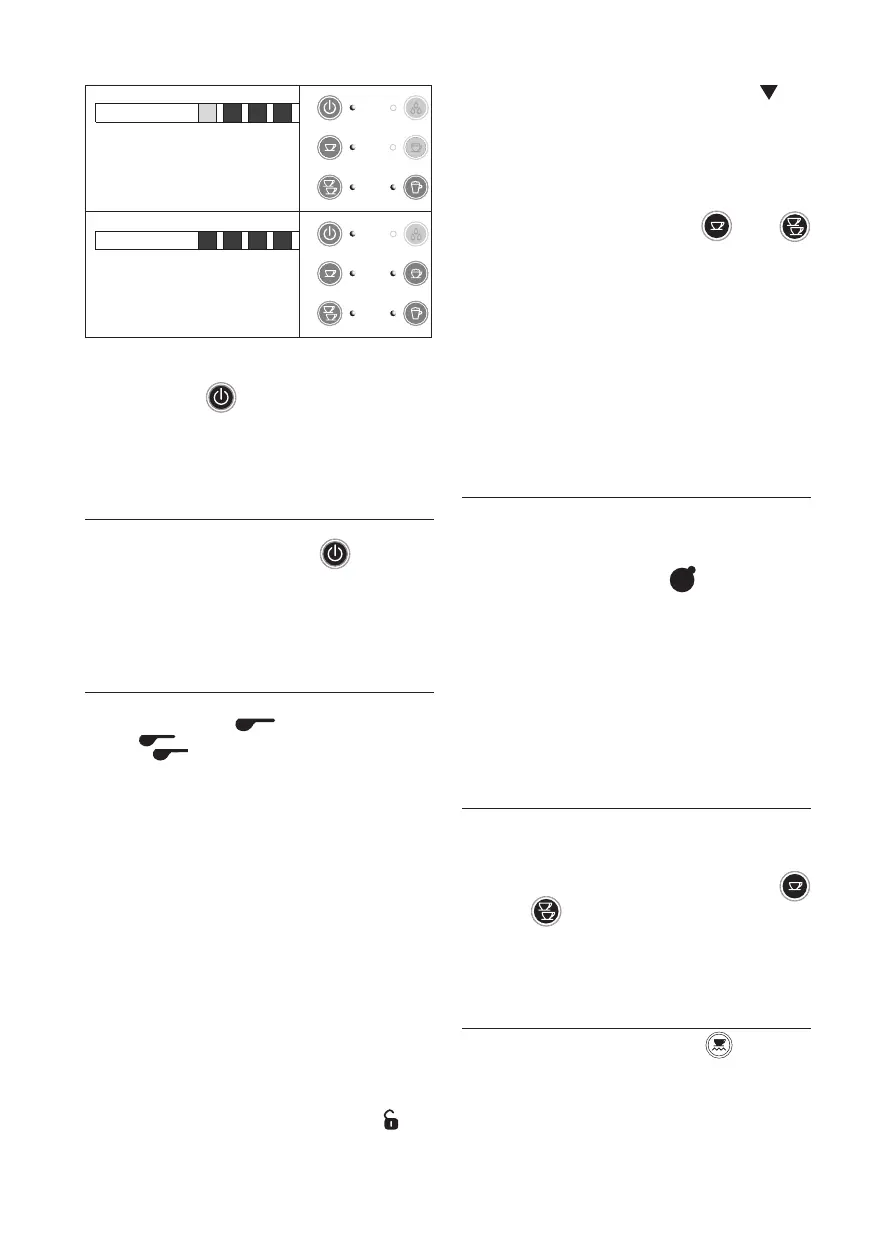
6. When the lights corresponding to the water hardness
measured come on, release the button;
7. Then press the button to turn the appliance o
(stand-by).
Please note: If the water softener lter is being used correctly, set the
appliance to a lower hardness level than that measured on the indicator
paper.
6. ON/STANDBY
When the main switch (A3) is in the I position, turn the appli-
ance on and o (stand-by) by pressing the button (B1).
The appliance goes o (stand-by) automatically after a certain
period of time (see section “5.2 ADJUSTING THE STANDBY
INTERVAL”).
7. HOW TO MAKE ESPRESSO COFFEE USING PRE
GROUND COFFEE.
1. Place the ground coee lter (C2) or (C3) in the lter holder
(C1)
(g. 12)
. Use the lter to make one coee or
the lter to make two coees;
2. To make just one coee, place one level measure of pre-
ground coee (about 7 g) in the lter. (g. 12). To make two
coees, place two loosely lled measures (about 6+6 g) of
pre-ground coee in the lter. Fill the lter a little at a time to
prevent the pre-ground coee from overowing;
Important: for correct operation, before lling with pre-ground coee,
make sure there are no coee residues left in the lter from the last time
you made coee.
3. Distribute the ground coee evenly and press gently
down with the presser (g. 13). Correct pressing of the
pre-ground coee is essential to obtain a good espresso.
If pressing is excessive, coee delivery will be slow and the
froth will be dark. If pressing is too light, coee delivery
will be too rapid and the froth will be skimpy and light
coloured;
4. Remove any excess coee from the rim of the lter holder
and attach the lter holder to the appliance. To attach
correctly, align the lter holder handle with the OPEN
symbol (g. 4), attach the lter holder and rotate the
handle towards the right until aligned with the CLOSE
symbol (g. 5);
5. Place the cup or cups under the lter holder spouts (g.
14). You are recommended to warm the cups before
making coee by rinsing them with a little hot water;
6. Make sure the lights corresponding to the coee buttons
are on, then press the coee button ( (B3) or
(B5)). The appliance makes the coee and delivery stops
automatically.
Please note:
• While the appliance is making coee, delivery can be interrupted at any
moment by pressing the coee button pressed previously.
• At the end of delivery, to increase the quantity of coee in the cup, just
press and hold (within 3 seconds) the coee button pressed previously.
• To remove the lter holder, turn the handle from right to left.
Danger of scalding To avoid splashes, never remove the lter holder while the
appliance is delivering coee. Wait for a few seconds after delivery.
8. HOW TO PREPARE ESPRESSO COFFEE USING
PODS
Please note: use pods conforming to the ESE standard, indicated on the
pack by the following symbol. The ESE standard is a system accepted by
leading pod producers and enables espresso coee to be prepared simply
and cleanly.
1. Place the pod coee lter (C4) ( ) in the lter holder
(C1);
2. Insert a pod, centring it as far as possible in the lter (g.
15). Always follow the instructions on the pod pack to po-
sition the pod on the lter correctly;
3. Attach the lter holder to the appliance. Always turn as far
as it will go (g. 5);
4. Proceed as in points 5 and 6 in the previous section.
9. PROGRAMMING THE QUANTITIES OF COFFEE
IN THE CUP
The appliance is set by default to automatically deliver standard
quantities. To change these quantities, proceed as follows:
1. Place a cup under the coee spouts (A5);
2. Press and hold the button you want to programme (
(B3) or (B5)). The appliance starts delivering coee;
3. Once the required quantity of coee has been delivered
into the cup, release the button. Delivery stops.
The machine is now reprogrammed with the new quantities.
10. CUP WARMER (g. 16)
The cup warmer is activated by pressing the button. Leave
the cups on the cup warmer until they are warm. This helps to
make hot coee.
You should not deliver hot water
for more than 60 seconds.