EasyManua.ls Logo

Delta MULTICHOICE R22000 User Manual

Delta MULTICHOICE R22000
8 pages
To Next Page IconTo Next Page
Page #1 background imageLoading...
Page #1 background image
1
4/13/18 Rev. C
MULTICHOICE
®
UNIVERSAL WITH
INTERGRATED DIVERTER ROUGH
Multichoice
®
Universal con DESVIADOR
INTERGRADO INTERNO
ROBINETTERIE BRUTE MULTICHOICE
®
UNIVERSELLE AVEC INVERSEUR INTÉGRÉ
Model/Modelo/Modèle
R22000 and R22000-WS
Series/Series/Seria
Write purchased model number here.
Escriba aquí el número del modelo comprado.
Inscrivez le numéro de modèle ici.
You may need/Usted puede necesitar/Articles dont vous pouvez avoir besoin:
For easy installation of your Delta
®
faucet
you will need:
• To READ ALL the instructions completely
before beginning.
• To READ ALL
maintenance information.
Para instalación fácil de su llave Delta
®
usted necesitará:
LEER TODAS las instrucciones comple-

LEER TODOS los avisos, cuidados, e
información de mantenimiento.
Pour installer votre robinet Delta
®
fac-
ilement, vous devez:
LIRE TOUTES les instructions avant de
débuter;
LIRE TOUS les avertissements ainsi que
toutes les instructions de nettoyage et
d’entretien;
91557
NOTICE TO THE INSTALLER: Failure to properly install
this product may result in product or property damage
and may void the warranty.
As the installer of this rough-in body, it is your
responsibility to:
1. Properly INSTALL this rough-in body per the instructions
given.
• 
install this rough-in body, please refer to the
instructions supplied and if still uncertain, call us at
1-800-345-DELTA.
2. 
reference.
AVISO AL INSTALADOR: Si no se instala este producto
correctamente, pudiera resultar en daños al producto
o a la propiedad y puede anular la garantía. Como
instalador de esta pieza de tubería interna, es su
responsabilidad:
1. 

Si usted o el propietario/usuario no están seguros

las instrucciones suministradas y si todavía no está
seguro, llámenos al 1-800-345-DELTA.
2. 
propietario/usuario.
AVIS À L’INSTALLATEUR : L’omission d’installer
ce produit correctement peut occasionner
l’endommagement de celui-ci ou des dommages
matériels et entraîner l’annulation de la garantie.
En qualité d’installateur de ce corps de soupape, vous
avez la responsabilité de :
1. 
qui vous sont fournies.
• 
doutes quant à la marche à suivre pour bien

les instructions fournies et si vos doutes persistent,

2. 
que le propriétaire ou l’utilisateur puisse le consulter au
besoin.
Question and Answer IconNeed help?

Do you have a question about the Delta MULTICHOICE R22000 and is the answer not in the manual?

Delta MULTICHOICE R22000 Specifications

General IconGeneral
BrandDelta
ModelMULTICHOICE R22000
CategoryControl Unit
LanguageEnglish

Summary

Notice to the Installer

Proper Installation of Rough-in Body

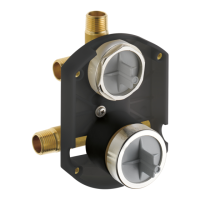
Ensure the rough-in body is installed correctly per provided instructions.

Leave Instructions for User Reference

Keep this instruction sheet available for the owner or user.

Standard Installation

Shut Off Water Supplies

Turn off water supplies before proceeding with installation.

Standard Installation Measurements

Details specific distances for stringer, rough-in box, and bonnet for standard installation.

Thick Wall Installation

Thick Wall Installation Details

Specific measurements for installing in walls thicker than 1 1/8 inches.

Connect Valve Body to Water Supplies

PEX Fitting and Expansion Tool

Use correct fitting and tool for PEX crimping and cold expansion.

Seal Unused Outlet Ports

Plug any unused outlet ports to prevent water flow.

Identify Inlet Ports

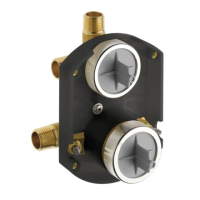
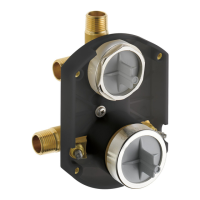
Locate cold (C) and hot (H) inlet ports on the rough-in box.

Plug Diverter Port for 3-Function Diverter

Plug port (3) if using a 3-function diverter.

Reverse Installation Considerations

Water supply lines are reversed for back-to-back or reverse installations.

Inlet Port Identification Clarification

Clarifies that (C) is the hot inlet and (H) is the cold inlet.

Preparation for Soldering

Connect Top Outlet Port

Pressure Testing and Flushing

Testing Preparation

Remove bonnets and caps, check O-rings, and plug outlets with test plugs.

Post-Testing System Flush

Remove outlet plugs after testing and flush the system.

Install and Set Stops

Install stops in the w/stops version and set them to fully open.

Detailed Stop Installation

Step-by-step guide for threading nut onto stem and inserting into the body.

Wall Finish Template Guide

Template Usage for Wall Finishing

Use template for locating and sizing openings and adjusting cover thickness.

Aligning Template for Positioning

Align screw holes on template with plaster guard for proper positioning.

Diverter Water Flow Configurations

3-Function Diverter Flow

Illustrates water flow patterns for a 3-function diverter.

6-Function Diverter Flow

Illustrates water flow patterns for a 6-function diverter.

Replacement Parts and Accessories

Available Replacement Parts

Lists part numbers for rough-in box, bonnets, covers, and test caps.

Useful Optional Accessories

Highlights useful accessories like test plugs and removal tools.

Limited Warranty Information

Warranty Coverage Details

Explains warranty periods for parts, finishes, and electronic components.

Exclusions and Limitations

Details what is not covered, including misuse and improper installation.

Obtaining Replacement Parts

Provides contact information for obtaining replacement parts.

Related product manuals