Do you have a question about the Delta ShopMaster MS250 and is the answer not in the manual?
Explains safety symbols and definitions used in the manual.
Warns about chemicals in dust and recommends exposure reduction measures.
Details electrical specifications for the machine's motor.
Explains the importance and methods of proper electrical grounding.
Guides on connecting the saw arm to the base unit.
Instructions for installing the bevel pointer mechanism.
Steps to secure the table lock handle.
Procedure for orienting the table to a 90-degree position.
How to move the cutting head to its upper position.
Steps for mounting the included dust collection bag.
Guidance on securely mounting the saw to a workbench.
Overview of the saw's controls and adjustment procedures.
Identifies and warns about the dangerous zone on the saw's table.
Instructions for using an optional clamp for workpiece security.
Procedures for operating the power switch and blade brake.
Method to secure the saw's switch to prevent unauthorized use.
How to adjust the table for various miter angles.
Explanation of how the angle indicator and scale work.
Steps to calibrate the angle pointer.
Securing the cutting head for safe transport.
How to adjust the cutting head for bevel angles.
Information on the rear support bar for stability and carrying.
Procedure for aligning the blade with the table slot.
How to ensure the fence is perpendicular to the blade.
Limiting the blade's depth to prevent contact with machine parts.
Calibrating the preset bevel angle stops.
How to adjust the spring that returns the cutting head to its upper position.
General advice and best practices for operating the saw.
Guidance on using an auxiliary fence for specific cuts.
Specific settings for 45-degree wall angle crown moulding cuts.
Advice for cutting crown moulding with non-90 degree wall angles.
Step-by-step guide for safely replacing the saw blade.
How to inspect and replace motor brushes.
Recommended procedures for maintaining the cleanliness of the machine.
Basic troubleshooting steps if the machine does not start.
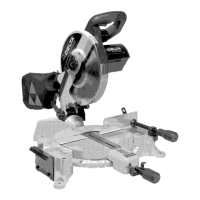
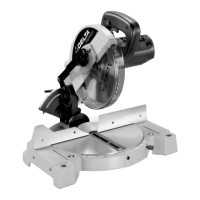
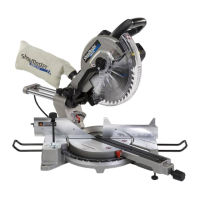
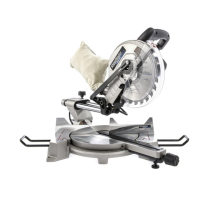
The DELTA ShopMaster Model MS250 is a 10" Compound Power Miter Saw designed for precision cutting of various materials, including wood, plastic, and aluminum. This versatile tool excels at compound angle and bevel cutting, making it suitable for a wide range of woodworking and construction tasks. Its design prioritizes ease of use and accuracy, allowing users to achieve precise cuts for both simple and complex projects.
The primary function of the DELTA ShopMaster MS250 is to perform miter, bevel, and compound cuts. It can crosscut materials up to 5-3/4" x 2-3/8" and miter at 45° both left and right, handling dimensions up to 4-1/8" x 2-3/8". For bevel cuts, the saw can tilt 45° to the left, accommodating materials up to 5-7/8" x 1-9/16". Compound cuts at 45° x 45° are also possible, with a capacity of 4-1/8" x 1-9/16". The saw features positive miter stops at 0°, 22.5°, 31.62°, and 45° for both left and right angles, ensuring quick and accurate adjustments. Adjustable bevel stops are provided at 0° and 45°.
The saw's cutting head is designed to be moved to an up position for operation and can be locked in a down position for transport or storage. The table can be rotated to various miter angles, with an index lever to release positive stops for smooth adjustment. A pointer and scale system allows for precise angle selection, with each line on the scale representing 1 degree. For specialized tasks like cutting crown molding, the saw includes triangle indicators on both the miter and bevel scales at specific angles (31.62° miter and 33.86° bevel) to simplify complex setups.
Starting the miter saw involves depressing a switch trigger. Upon release, an automatic electric blade brake activates, stopping the blade within seconds, a crucial safety feature. For enhanced safety, the switch can be locked in the "OFF" position using a padlock, preventing unauthorized use.
The saw is equipped with a dust bag to collect fine dust and wood chips, helping to maintain a cleaner work environment. An optional work clamp is available to secure workpieces, especially smaller ones, and can be mounted on either the right or left side of the saw blade. This is particularly important for keeping hands out of the "Hazard Zone" during operation.
Operating the DELTA ShopMaster MS250 requires careful attention to safety and proper setup. Before any cut, it is essential to ensure that the cutting arm and table are firmly locked at their correct settings. Workpieces should always be placed on the table and held or clamped securely against the fence. For optimal results, cuts should be made at a slow, even rate, and freehand cutting is strictly prohibited.
When performing multiple or repetitive operations that generate small cut-off pieces (one inch or less), an auxiliary wood fence is recommended. This fence, constructed from straight wood (approximately 1/2" thick by 3" high by 20" long), helps prevent small cut-offs from being caught by the saw blade and projected out of the machine or into the blade guard. It's important to note that the auxiliary fence should only be used when the saw blade is in the 0° bevel position (90° to the table) and must be removed for bevel cuts.
The saw's capacity allows for cutting standard 2x4s flat or on edge at 45° miter angles, and 2x6s in a 90° straight cut-off position in one pass. It can also handle 4x4s in a single pass. For cutting aluminum extrusions, the material should be positioned so the blade cuts through the smallest cross-section. Applying a stick wax to the blade before cutting aluminum stock is recommended for proper lubrication and to prevent chips from adhering to the blade.
For supporting long workpieces, users can construct work support extensions. These extensions, typically made from 2x4s, should be leveled with the miter saw table to ensure consistent support and prevent loss of control during cutting.
Crown molding cutting is a key feature, with specific procedures outlined for both inside and outside corners on 52°/38° wall angle crown molding. This involves setting precise miter and bevel angles, utilizing the dedicated triangle indicators, and positioning the crown molding with either the "CEILING EDGE" or "WALL EDGE" against the fence, depending on the type of cut. For 45°-45° crown molding, specific miter and bevel angles are also provided.
Regular maintenance is crucial for ensuring the longevity and safe operation of the DELTA ShopMaster MS250. Before performing any maintenance, it is imperative to disconnect the machine from the power source.
Changing the saw blade requires specific steps: removing a cover, inserting a hex wrench into the motor shaft to prevent turning, loosening the arbor screw with a wrench, and then removing the old blade and outside blade flange. When installing a new blade, it is critical to ensure that the teeth are pointing downwards. The outside blade flange and arbor screw are then reattached and tightened, with the hex wrench still holding the shaft. All wrenches must be removed before operating the machine. Only cross-cutting saw blades of 10" diameter, rated for 5200 rpm or higher, and with 5/8" arbor holes should be used. Carbide-tipped blades should not have deep gullets to avoid deflection and contact with the guard.
Adjustments are also part of routine maintenance. The fence can be adjusted to be 90° to the blade by loosening four screws and using a square for alignment. The downward travel of the saw blade can be limited by adjusting a screw and locknut to prevent contact with metal surfaces. Bevel stops at 90° and 45° can be adjusted by loosening the bevel lock handle, positioning the cutting arm, and then adjusting a screw and locknut to ensure the blade is at the correct angle relative to the table. The tension of the cutting head return spring can also be adjusted by loosening a locknut and turning a screw to increase or decrease tension, ensuring the cutting head returns to the "up" position after cutting.
Brush inspection and replacement are necessary maintenance tasks. Brush life varies depending on motor load, with initial checks recommended after 50 hours of use for new brushes, and subsequent checks every 10 hours until replacement is needed. This involves removing the motor cover, pulling out the brush holders, and inspecting the carbon brushes. If a brush is worn to 3/16" in length, or if the spring or shunt wire is damaged, both brushes should be replaced.
Keeping the machine clean is also important. Periodically blowing out all air passages with dry compressed air helps remove chips and sawdust. Plastic parts should be cleaned with a soft damp cloth, avoiding solvents that could damage the material. If the machine fails to start, checking the cord plug for good contact and inspecting for blown fuses or open circuit breakers in the line are recommended troubleshooting steps.
| Type | Miter Saw |
|---|---|
| Motor | 15 Amp |
| Blade Diameter | 10 inches |
| Arbor Size | 5/8 inches |
| Max Cut Depth at 45° | 2 inches |