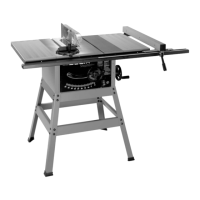
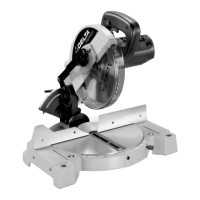
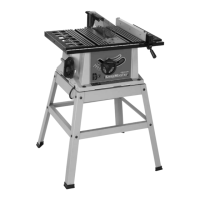
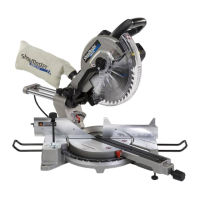
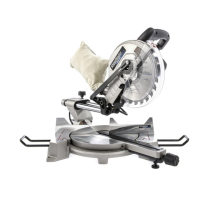
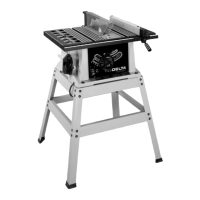
The device is a 10" Motorized Bench Saw, available in two models: TS200 and TS200LS. The TS200LS model includes a metal stand, while the TS200 model is the same saw without the stand. This table saw is designed for high-quality performance, offering a depth of cut capacity up to 3" (76mm) at 90° and 2" (51mm) at 45° for clean cutting of standard stock sizes. It comes equipped with a 13 amp 120V motor, a rip fence, a miter gauge, a see-through blade guard with splitter and anti-kickback fingers, a 10" carbide-tipped saw blade, a table insert, and blade wrenches.
Function Description
The primary function of this motorized bench saw is to perform various sawing operations, including ripping and cross-cutting, as well as other standard woodworking tasks. The saw's design emphasizes precision and safety during operation.
Ripping: This involves cutting lengthwise through a board. The rip fence is crucial for positioning and guiding the workpiece. One edge of the workpiece rests against the rip fence, while the flat side of the board is on the table. It is essential to have a straight edge on the workpiece for solid contact with the table. The saw blade guard, splitter, and anti-kickback fingers are vital safety components during ripping to prevent kickback and blade binding. For narrower pieces (less than 6 inches wide), a push stick is always recommended to complete the feed. For material under 2 inches in width, a pushboard should be used to avoid interference with the blade guard. When ripping boards longer than three feet, a work support at the rear of the saw table is necessary to prevent the workpiece from falling off.
Cross-Cutting: This operation involves cutting across the grain of a board. The miter gauge is used to position and guide the workpiece. The miter gauge can be used in either table slot. For bevel cross-cutting (with the blade tilted), it is recommended to use the right table slot to ensure the blade tilts away from the miter gauge and the operator's hands. An auxiliary wood-facing can be attached to the miter gauge for added safety and convenience, especially when cutting multiple pieces to the same length. This block should be positioned in front of the saw blade to allow the cut-off piece to move freely, reducing the risk of binding and kickback.
Dadoing: This involves cutting a rabbet or wide groove into the workpiece. Dado head sets, typically comprising two outside saws and four or five inside cutters, are used to create grooves of various widths. The cutters must be arranged so that the heavy portion falls into the gullets of the outside saws. The accessory dado head set table insert must be used in place of the standard table insert during dadoing. It is important to note that the blade guard and splitter assembly cannot be used when dadoing and must be removed or swung to the rear of the saw. Auxiliary jigs, fixtures, push sticks, and feather boards are recommended for use during dadoing. The maximum dado cut width for this saw is 1/2 inch, and dado heads should never be used in a bevel position.
Usage Features
Assembly and Setup:
- Stand Assembly (TS200LS Only): The metal stand is assembled using carriage head bolts, flat washers, and hex nuts. Hardware should be loosely tightened initially for adjustment, then securely fastened once the stand legs are adjusted to the floor surface. Rubber feet are attached to the bottom of each leg.
- Saw to Stand Mounting (TS200LS Only): The saw table is turned face down, and the stand is placed upside down onto the saw. Hex head screws, flat washers, and hex nuts are used to secure the saw to the stand.
- Elevating and Supporting (TS200 Only): For the TS200 model without a stand, the saw must be properly secured to a stable supporting surface capable of supporting 300 pounds. A sawdust fall-through and removal hole is essential to prevent sawdust buildup around the motor, which can cause fire hazards or motor damage. A minimum 3/4" thick plywood board is recommended for the mounting surface, with at least 3" clearance on all four sides of the saw base.
- Blade Height Adjusting Handwheel: The handwheel is attached to the shaft, aligning the flat on the inside of the handwheel with the flat on the shaft, and secured with a flat head screw.
- Blade Guard and Splitter Assembly: This assembly is crucial for safety and must be properly aligned with the saw blade to prevent kickback. It is fastened using hex head screws and external tooth lockwashers, with loose tightening initially for adjustment. The splitter should be aligned with the saw blade using a straight edge, and a gap of at least 1/8" should be maintained between the bottom edge of the splitter and the table surface.
- Miter Gauge Holder: A spring clip is attached to the miter gauge holder with a pan head screw, external tooth lockwasher, and hex nut. The miter gauge holder is then attached to the left side of the saw cabinet using screws and flat washers.
- Rip Fence Assembly: The rip fence handle is threaded onto a stud, and a hex nut is tightened against the cam. The rip fence is typically used on the right side of the saw table and is locked in place by pushing down on the handle.
- Table Insert Adjustment: The table insert should be flush with or slightly below the table surface. Adjustment screws are provided to lower the insert if it is above the surface.
Operational Controls and Adjustments:
- Starting and Stopping: The on/off switch is located on the front of the saw cabinet. The switch should always be in the "OFF" position before plugging in the power cord.
- Locking Switch: The switch can be locked in the "OFF" position by removing the switch toggle to prevent unauthorized use.
- Overload Protection: The saw is equipped with a reset button. If the motor stops due to overloading, it can be reset after cooling for a few minutes.
- Blade Height Adjustment: The blade height is adjusted by turning the handwheel. Clockwise rotation lowers the blade, and counter-clockwise rotation raises it.
- Blade Tilt Adjustment: The saw blade can be tilted to a desired angle by loosening the lock handle and moving the handwheel. The lock handle is spring-loaded and must be locked during all cutting operations.
- 90 and 45 Degree Positive Stop Adjustments: The saw has positive stops for rapid and accurate positioning of the blade at 90 and 45 degrees. These stops can be adjusted using a square and screws to ensure precision.
- Rip Fence Operation and Adjustment: The rip fence is moved by lifting a locking lever, sliding the fence, and pushing the lever down to clamp it. The pointer indicates the distance from the fence to the saw blade, and an adjustment screw is provided for calibration. It is critical that the rip fence is parallel to the miter gauge slot to prevent kickback. The clamping action of the fence can also be adjusted.
- Miter Gauge Operation and Adjustment: The miter gauge is operated by loosening a lock knob and rotating it to the desired angle. The T-slot bar prevents the miter gauge from falling when extended.
- Adjusting Blade Parallel to Miter Gauge Slots: The blade's parallelism to the miter gauge slots is factory-set but should be checked for accurate cuts and kickback prevention. Adjustment involves loosening nuts and screws under the table and carefully moving the blade.
Safety Precautions:
- Always read and understand all warnings and operating instructions.
- Wear eye and hearing protection, and proper apparel (no loose clothing or jewelry).
- Do not operate in dangerous environments (damp/wet locations).
- Maintain tools in peak condition; keep blades sharp and clean.
- Check for damaged parts before use.
- Keep the work area clean and clear of children and visitors.
- Reduce the risk of unintentional starting by ensuring the switch is "OFF" before plugging in.
- Use all guards, splitter, and anti-kickback fingers whenever possible.
- Remove adjusting keys and wrenches before starting.
- Use the right machine for the job; do not force it.
- Use recommended accessories only.
- Use proper extension cords of adequate gauge.
- Secure the workpiece with clamps or a vise.
- Feed the workpiece against the direction of blade rotation.
- Do not force the workpiece.
- Avoid overreaching and never stand on the machine.
- Never leave the machine running unattended.
- Turn the machine "OFF" and disconnect from power before installing/removing accessories, adjusting, or repairing.
- Make the workshop childproof.
- Stay alert and use common sense; do not operate while tired or under the influence.
- Be aware of dust generation; operate in well-ventilated areas with dust collection, and wear NIOSH/OSHA approved respiratory protection.
- Never perform "free-hand" cutting; always use the fence or miter gauge.
- Hold the workpiece firmly.
- Keep arms, hands, and fingers away from the blade.
- Never have any part of your body in line with the saw blade's path.
- Never reach around or over the saw blade.
- Never attempt to free a stalled blade without turning the machine "OFF."
- Properly support long or wide workpieces.
- Never perform layout, assembly, or set-up work when the machine is running.
- Construct and use push sticks and featherboards for specific operations to enhance safety and control.
Maintenance Features
General Maintenance:
- Keep Machine Clean: Periodically blow out all air passages with dry compressed air. Clean plastic parts with a soft damp cloth; avoid solvents.
- Lubrication: Apply household floor paste wax to the machine table and extension table weekly.
- Protecting Cast Iron from Rust: To clean and protect cast iron tables from rust, use a pushblock, a medium Scotch-Brite™ Blending Hand Pad, WD-40®, degreaser, and TopCote® Aerosol. Apply WD-40 and polish with the Scotch-Brite pad, then degrease the table, and finally apply TopCote®.
Troubleshooting:
- Failure to Start: Check the cord plug for good contact in the outlet and inspect for blown fuses or open circuit breakers.
- Overload: If the motor stops due to overloading, turn the switch "OFF," allow the motor to cool, and then push the reset button.
Service and Warranty:
- Delta Machinery products are manufactured to high quality standards and are serviced by a network of Porter-Cable Delta Factory Service Centers and Delta Authorized Service Stations.
- For parts, service, warranty assistance, or to locate the nearest service outlet, contact the provided helpline numbers.
- A complete line of accessories is available from Delta suppliers, service centers, and authorized service stations. Only Delta recommended accessories should be used for safest operation.
- The product comes with a Two Year Limited New Product Warranty, covering defects in workmanship or material under normal use. Refurbished products have a 180-day warranty. The warranty excludes normal wear, misuse, abuse, or unauthorized repairs/alterations.