Do you have a question about the Denon DJ-VL12 and is the answer not in the manual?
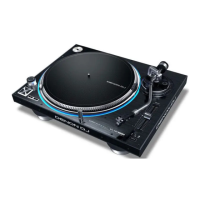
This document describes the Denon DJ VL12 Prime, a professional DJ turntable designed for high-performance audio playback and control.
The Denon DJ VL12 Prime is a direct-drive turntable primarily used by DJs for mixing, scratching, and playing vinyl records. It features a quartz-direct-drive motor, ensuring precise and stable platter rotation. The device is designed to be connected to a DJ mixer via RCA phono outputs, allowing the audio signal from the turntable to be integrated into a larger sound system. It also includes an IEC power input for connecting to a power outlet.
Motor:
Platter:
Tonearm:
Speeds:
Output:
Pitch Range:
Connections:
Power:
Dimensions (width x depth x height):
Weight:
The VL12 Prime offers a range of features for precise control and enhanced performance:
Power Switch & Strobe Light: A rotary knob controls the power to the VL12 Prime and the strobe light. The strobe light illuminates the edge of the platter, indicating the rotation phase. Vertical lines on the platter's edge appear to move or "drift" if the phase is not constant, ensuring visual feedback on platter speed.
Start/Stop Button: This button initiates or stops the platter motor. For proper functionality, ensure the platter is securely seated.
33 & 45 RPM Buttons: These buttons adjust the platter's rotation speed (RPM). The illuminated button indicates the current selection.
45 RPM Adapter Holder: A dedicated spindle is provided for holding the 45 RPM adapter when not in use.
Platter: The platter is placed directly onto the motor.
Target Light: This light illuminates the grooves on the record, making it easier to visually track the stylus in dark environments. It can be turned on, secured to its connector, and removed from the connector.
Pitch Fader: This fader adjusts the platter's speed, increasing or decreasing it. The center position of the fader sets the pitch at 0%. The Pitch Range button sets the full range of the pitch fader.
Pitch Range Buttons: These buttons cycle through available pitch fader ranges: ±8%, ±16%, and ±50%. The illuminated buttons indicate the current selection.
Pitch Reset Button: This button resets the platter speed to 0% pitch adjustment immediately, regardless of the pitch fader's position.
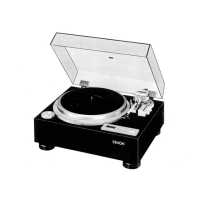
Tonearm: The tonearm is moved to the "raised" position to gently move it over the record. To play a record, move the tonearm lever to the "lowered" position, which will lower the tonearm onto the record.
Tonearm Lock Nut: This nut secures the headshell and cartridge assembly to the tonearm. Turning the cartridge clockwise loosens it, and counter-clockwise tightens it. Avoid over-tightening.
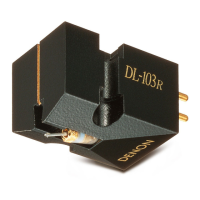
Headshell: The cartridge is mounted on the headshell. To remove the plastic cover from the cartridge before use, it is recommended to use user-replaceable and compatible standard cartridges.
Tonearm Clip: This clip secures the tonearm when not in use. When not using the tonearm, place it in this clip. The "outer" notch of the tonearm clip is for temporarily resting the tonearm (you can still move, raise, or lower it), while the "inner" notch is for securing it.
Tonearm Lever: This lever moves the tonearm between its two positions to raise or lower it. To raise the tonearm before moving it toward or away from the record, and lower it once it is in place.
Anti-Skate Dial: This dial compensates for inward tracking forces that occur with certain cartridges as the stylus nears the record's center. In most cases, set this to 0. If excessive skipping occurs during back-cueing or scratching while nearing the record's center, increase this dial's setting in small increments and test its performance.
Counterweight & Scale Ring: The counterweight balances the headshell and cartridge assembly so the tonearm can apply the proper amount of stylus pressure to the record. Use the setup instructions to learn how to properly balance the tonearm. If the headshell is heavier than expected, an additional counterweight is included, which can be used to balance the tonearm properly.
Height Adjustment & Lock Lever: This large dial sets the height of the tonearm. Move the small lock lever (above the Anti-Skate Dial) counterclockwise or clockwise to unlock or lock the height adjustment, respectively.
Torque: A switch to set the torque of the platter. The "Hi" setting provides a heavier, stronger feel, while the "Lo" setting offers a lighter and more graceful feel.
Platter Color: A knob to select the color of the light around the platter.
Platter Brightness: A switch to set the brightness of the light around the platter.
Platter Setup:
Tonearm Setup:
General Maintenance: