DE
NON
SPEAKER
SC-M39
Owner's
Manual
Manuel
de
I'Utilisateur
Manuale delle
istruzioni
llllllilltiiJI.
Bedienungsanleitung
Manual del
usuario
Gebruiksaanwijzing
Bruksanvisning
Py
KOBOACTBO
nOnb3088TenR
lnst
rukcja
obslugi
A
c
"-"side
terminal: Black
Borne"
- ":
Nair
T erminale Ia
to
"-
":Nero
- ii!H
iil
i'l'
lOi
"- "-Anschluss: Schwarz
T
erm
i
na
l del lado "- " :
N
egro
"- "-aansluiting
:Zwart
"
-"
anslutning: Svart
60KOBOI71
pa3b€M
"-"·
LlepHb
l
~
..
_
..
zacisk
boczny· Czarny
Foam
plug
Prise
mousse
Tappe di spugna
q&
jp
,
;j(y,:J
Schaums
toffstopfen
Tap6n
de
espuma
Schuimpl
ug
Skumgummiplugg
n
opOI10HOB8A
n
oay
w
e4
Ka
Zatyczka
piankowa
B
"+
"side
terminal:
Red
Borne"
+": Rouge
Terminate
l
ata
"+": Rosso
H !H
IH
- :
;;F
"+"-Ansch
luss: Rot
Termi
nal del lado
"+"·
Rojo
"+"
-aansluiting: Rood
"+"
ansl
utning:
ROd
6oKoeo~
paJbeM
"+"·
KpaCHbllil
"+"
zacisk boczny:
Czerwony
Connect
to amplifie
r'
s
"+
"side:
Striped
core
p
b
Connectez
au
cOte "+"
de
l
'amp
li
ficateur.
Arne
cannel8e
~o
~
'ij~ffi~~~;~·
:
~~~~~m-f~E'b~~;;eV
Anima
fi
l
ett
ata
An die
"+"·Seite
des Verst8rkers anschlief1en:
Gestreifte
Ader
Conecte
allado
"+" del
amp
lificador: NUcleo rayado
Aansluiten
op
de "+"
van
de
versterker: Gestreepte draad
Anslut ti
ll
fbrstarkarens
"+"·sida: Kabel
med rand
noAK11104
L
iiT€
K
yClll.m1Te
11
10
CO
CTOpOHbl
"+":
CepAe4HliiK
c
no
.no
cKaM&.-~
Podtz,cz
po
s
tr
onie
"+"
wz
macniacza :
Rdzen
w paski
Connect
to
amplifier's
..
_
..
side:
Plain
core
Connectez
au
cOte"- "
de l'amplificateur
: Arne
lisse
_::ffi];~ffl~
l
~;;~
"
d:
:
~~~i~c~~;ttn
i
ma
liscia
An die
"- "·Seite des Verstarkers
ansch
l
ie~en
:
Einfarbige
Ader
Conecte allado "-
"del
amplificador: Nucleo simple
Aansluiten op
de"
- "
van deversterker: Etten draad
Anslut ti
ll
fOrstarkarens
"-"
.sida:
Ka
bel
utan rand
noAK1110
4
lii
Te
K
YC&.111l11
T
e.nl0
CO
CTOpOHbl
"-":
f
.naAK1<1H
cepAe4HliiK
Podtz,cz
po stronie
,- "
wzmacniacza: Rdzen
gtadki
@
D
~
~
~
Cl
"'-.
Anti-slip pads
Ronde
ll
es
anti
de
rapantes
Tappa di spugna
~"(Vll:
ll:l
Antirutschunter
lagen
Almohadil
las
an
tidesli
zantes
Antislipkussentjes
Halkskydd
HecK011
b
3Autltle
npoK.naAKlll
Podktadki
an
t
yposlizgowe
Sheath
Gaine
Guai
na
l&ll
lsolierung
Funda
Bekleding
Mantel
06on04Ka
Ostona
przewodu
0
X
~r
'IS"'Wi'
Thank you
for
purchasing this
DENON product. To ensure proper
operation,
please
read this
owner's
manual carefully
before using
the product.
After
reading
them,
be sure
to
keep
them
for future reference.
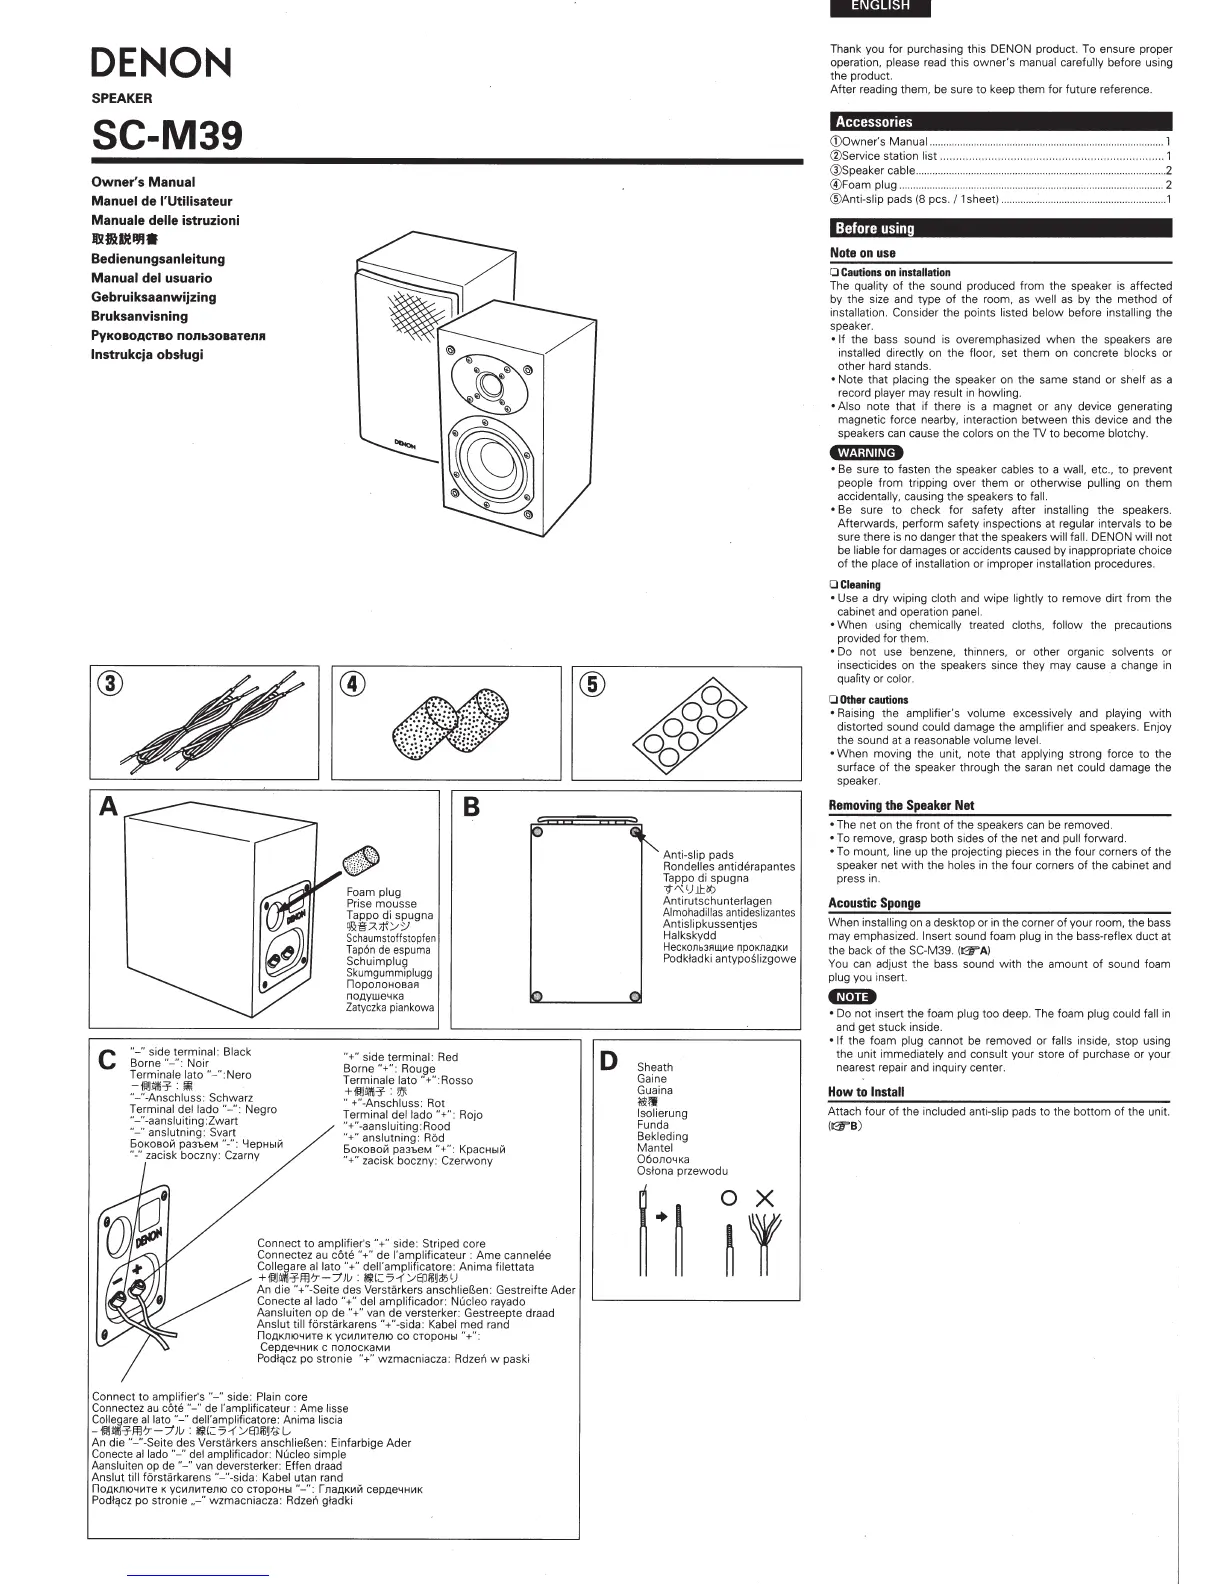
Accessories
<DOwner's Manual
..
® Service
station
list
..
@Speaker cable
..
.
®Foam
plug
...
®Anti-slip
pads
(8
pes. / 1 sheet)
__
Before using
Note
on
use
0
Ca
ut
ions
on
i
nst
a
llation
. .............
...
..
..
.
...
1
.
...
..
.. ..
1
.
..
-·
....
....
..........
2
-
..
......
..
..........
...
..
......
2
....
..
..
..
.
1
The
quali
ty
of
the
sound produced from the speaker is affected
by the si
ze
and type
of
the room,
as
well
as by the
method
of
installation. Consider
the points
listed
below
before
install
ing
the
speaker.
• If
the bass sound is overemphasized
when
the speakers are
installed di
rectly
on the
floor.
set
them
on concrete
blocks
or
ot
h
er
hard stands.
•
Note that
placing
the
speaker on the same stand
or
sh
elf
as
a
record player
may
result in howling_
• Also
note that
if
there is a
magnet
or
any device generating
magnetic force nearby, interaction
between
this device and the
speakers can cause
the
colors
on the
TV
to
become
blotchy.
•Wf.ld~"Nit
•
Be sure
to
fasten the speaker cables
to
a
wa
l
l.
etc
..
to
prevent
people
from trippi
ng over
the
m or
ot
h
erw
ise
pulling
on
them
accidentally,
causing the speakers
to
fa
iL
•
Be sure
to
check for safety
after
insta
ll
ing
the speakers.
Afterwards, perform
sa
f
ety
inspections at regular intervals
to
be
sure there is no danger that the speakers
w i
ll
fall. DENON w i
ll
not
be liable
for
damages
or
accidents caused by inappropriate choice
of
the
place
of
installation or improper installation
procedures.
O
Cieaning
•
Use a
dry
wiping
cloth
and w ipe
l
ightly
to
r
emove
dirt
from
the
cabinet and operation
panel.
•
When usi
ng
chemi
ca
ll
y
treated cloths.
follow
the precautions
provided for th
em
.
•
Do
not
use benzene, thinners, or other organic solvents or
insecticides on the speakers since they may cause a change
in
quafity or
color.
0
Other
caution
s
•
Raising
the
amp
lifier's
volume
excessively and playing
wi
th
distorted sound
could
damage the
amp
l
if
ier and speakers_ Enjoy
the sound at a reasonable vol
ume
leve
l.
•
Whe
n moving
the
unit, note
that
applying
strong force
to
the
surface
of
the
speaker through the saran
net
could
damage
the
speaker.
Removing
the
Speaker
Net
•
The
net
on
the
front
of
the speakers can be removed.
•
To remove. grasp both sides
of
the
net
and
pull
forward.
•
To mount,
line up
the
projecting pieces in the
four
corners of the
speaker
net
wi
th
the
holes in the
four
corners of the cabinet and
press in.
Acoustic
Sponge
When
installing
on a
desktop
or in the corner
of
your room.
the
bass
may emphasized.
Insert
sound foam
plug
i
n
the
bass·reflex duct at
the back
of
the
SC-M39.
((F
A)
You
can adjust
the
bass sound
with
the
amount
of
sound foam
pl
ug
you i
nsert.
tmD
•
Do
not
insert the foam
plug
too deep. The fo
am
plug could
fa
ll in
and
get
stuck inside.
•If
the foam
plug
cannot be removed
or
falls
inside, stop using
the unit immediately and
consult
your store
of
purchase or your
nearest repair and inquiry center.
How
to
Install
Attach four of the
incl
uded
anti-sl
ip pads
to
the
botto
m of the
un
it.
(125'8)