b. Do you own other specific safety equipment? In certain provinces or states, you may be obliged to use other safety equipment. It is your responsibility to know and respect the safety
rules in effect wherever you ride your bike.
c. Are you familiar with the use of your wheel quick releases? If not, make sure you refer to section 7.1 to understand their functioning. The use of a bike with incorrectly adjusted wheel
quick releases is very dangerous since the wheel could become loose or even unlock and fall, causing damage and/or serious injury that could lead to death.
d. Do you know how to operate toe clips or clipless pedals? If your bike is equipped with one or the other device and you don’t fully understand their functioning please refer to section 7.6
or 7.7. It is very important that you acquire the skills to safely engage and disengage these pedal models. In order to do so, you need to take time in a safe place to practice and learn
how they work, one foot at a time. The technique is tricky at first and there is a risk of falling, which could cause injuries.
e. Is your bike equipped with a front suspension? If so, refer to section 7.8. When braking, a weight transfer tends to compress the front suspension, resulting in a lifting force applied to the
rear of your bike that could throw you over the handlebars. It is important that you learn how to use a bike equipped with suspensions in a safe place before doing a real ride. Consult your
suspension user manual for more information on how to adjust your suspension. Safety mechanical inspection.
It is crucial that you make a rigorous mechanical inspection before using your bike. Refer to section 5.4 to find out precisely what has to be checked.
Congratulations, you are now up for your first ride!
Wearing your helmet, go get acquainted with your new bike. We recommend you do a short ride to familiarize yourself with the operations of all the different components.
Make sure you learn to brake, to shift gears, engage and disengage your toe clips or clipless pedals as well as understanding how your suspension responds and operates. This learning
curve is inevitable and will make you appreciate much more the rides that follow by making them safer at the same time.
Don’t forget to read the manual in its entirety!
5.2 Tuning your bike according to your morphology
It is very important that your bike be the right size for you. A bike that is either too large or too small is likely to be harder to control and less comfortable.
WARNING: If the size of your bike is incorrect, you risk losing control and falling. If the size happens to be incorrect, ask your authorized Devinci dealer to exchange it
before you start using it.
5.2.1 Dimensions
Your authorized Devinci dealer will help you choose the right size of bike according to the information provided. If the bike was purchased by someone else, it is imperative that the main
user confirms that the size is right before using it. If you selected your bike yourself at your dealer, your dealer will indicate what model is best suited for you.
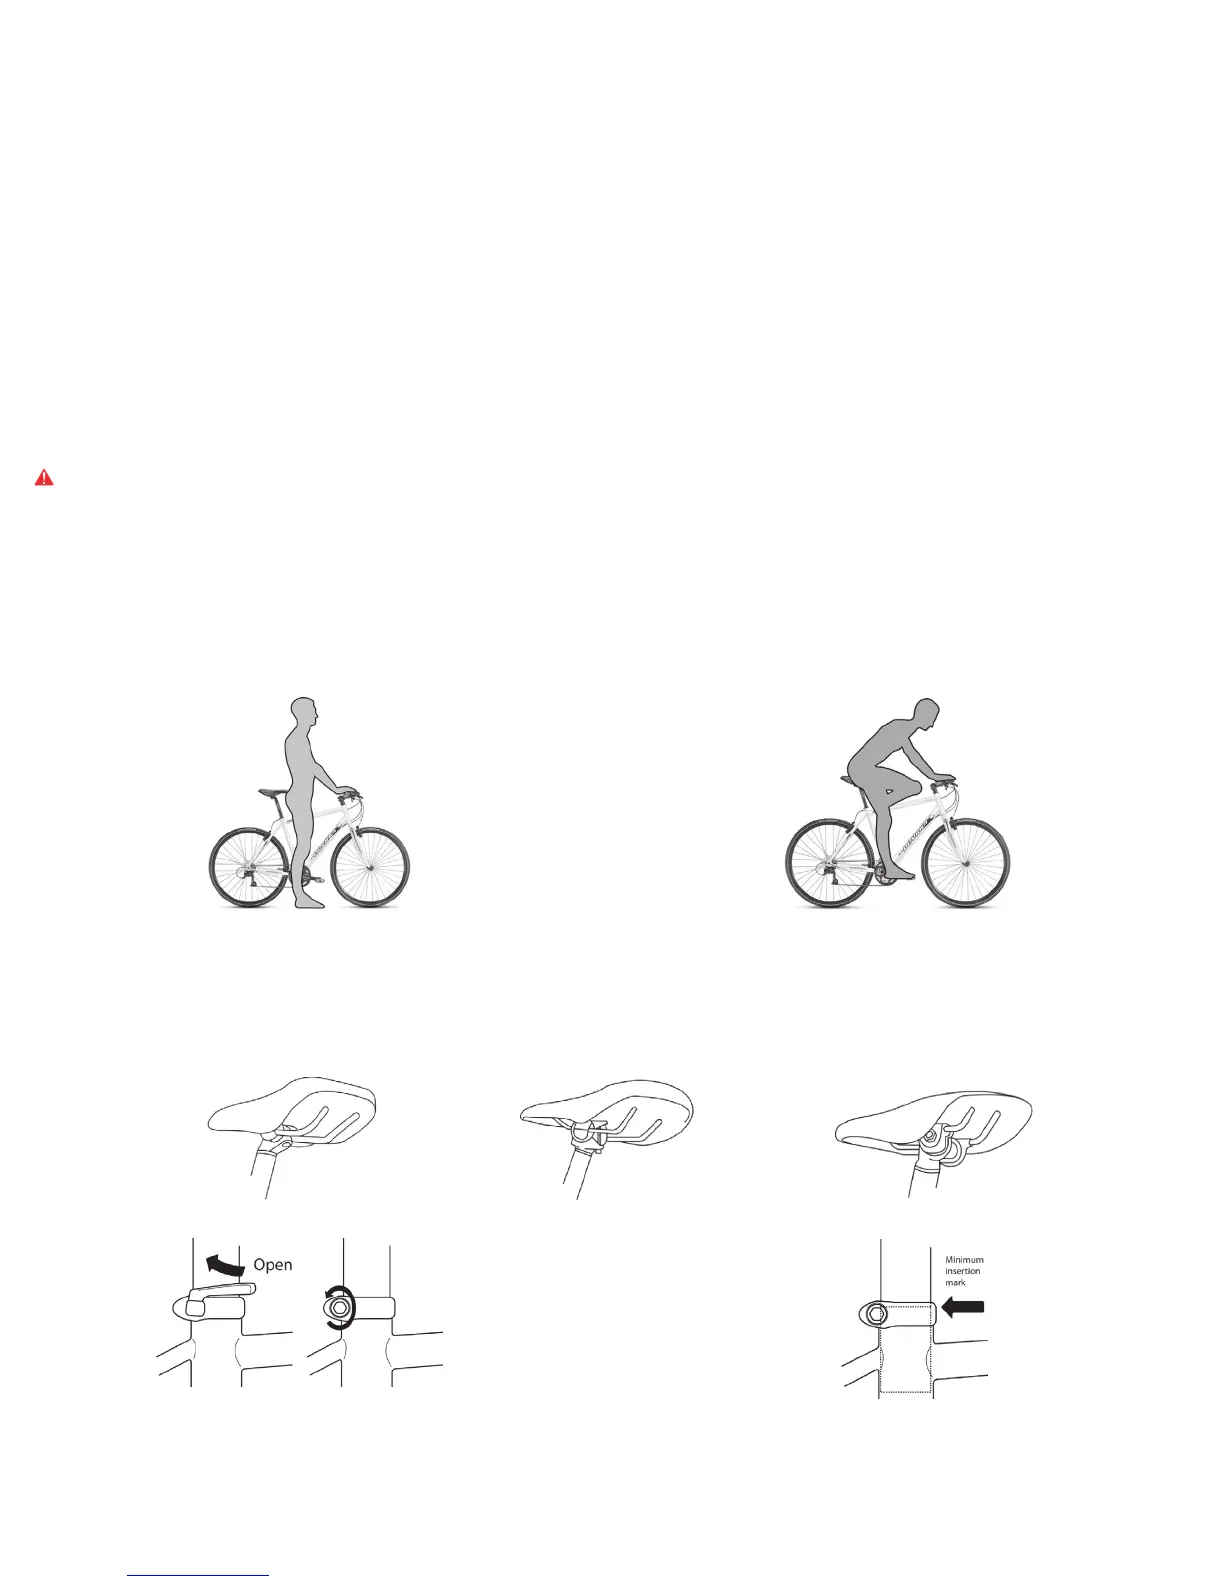
First of all, the simplest way to check your frame size is to check the standover height. This is defined as the distance between your crotch and the top tube of the frame when standing over
the bike with one foot on each side of it. Before you measure it, make sure you wear your bike shoes. Between the saddle and the handlebars as shown on figure 1, place your feet on the
ground and jump on your heels. Has your crotch touched the top tube? If yes, your bike is too big for you.
If you intend to use your bike only on paved surfaces, then aim for a standover height of at least 2.5cm. If you intend to use it on bike paths and on unpaved roads, then aim for at least
7.5cm. Finally, if you expect to do some off-road or mountain biking, then you should aim for a standover height of more than 10cm.
Figure 1 Figure 2
5.2.2 Saddle positioning
In order to achieve greater comfort and optimal performance, the saddle should be positioned and adjusted properly. Your authorized Devinci dealer has already placed the saddle in a
general position that is likely to satisfy most people. However, if you feel like it could be better, then do not hesitate to go back to your authorized Devinci dealer to have it positioned perfectly.
You could also complete the following operations yourself if you have the right tools and necessary skills.
Refer to figures 3, 4 and 5 to determine in which category your saddle falls.
Figure 3 Figure 4 Figure 5
Figure 6 Figure 7
There are three different settings for a saddle:
A. The Height
The height of your saddle depends on the length of your legs. Generally, we assume your saddle is well adjusted when you can barely touch the pedal at its lowest position with your heel,
when seated on the saddle. The procedure goes as follows: sit on your saddle, place your heel on the pedal and extend your leg to position the crank arm parallel to the seat tube. Your
saddle is too low if your leg is bent at the knee while your heel touches the pedal. On the other hand, it is too high if your hip does not remain straight (see figure 2). Your saddle needs to
be adjusted until the ideal position is obtained.
 Loading...