B. Front derailleur shifting
It is the left shifter that activates the front derailleur. The chain move from the smaller chainring for easier pedaling (slower gears) to larger ones for harder pedaling (faster gears).
C. Rear derailleur shifting
It is the right shifter that controls the rear derailleur, making the chain moves on the different sprockets of the freewheel cassette. The larger sprockets produce smaller ratios, which
necessitate less effort, but require more pedaling cycles to achieve a given distance. The smaller sprockets produce greater ratios, which require more effort but necessitate fewer cycles
to achieve the same given distance. When downshifting, you displace the chain from a smaller sprocket to a larger one and upshifting is the other way around.
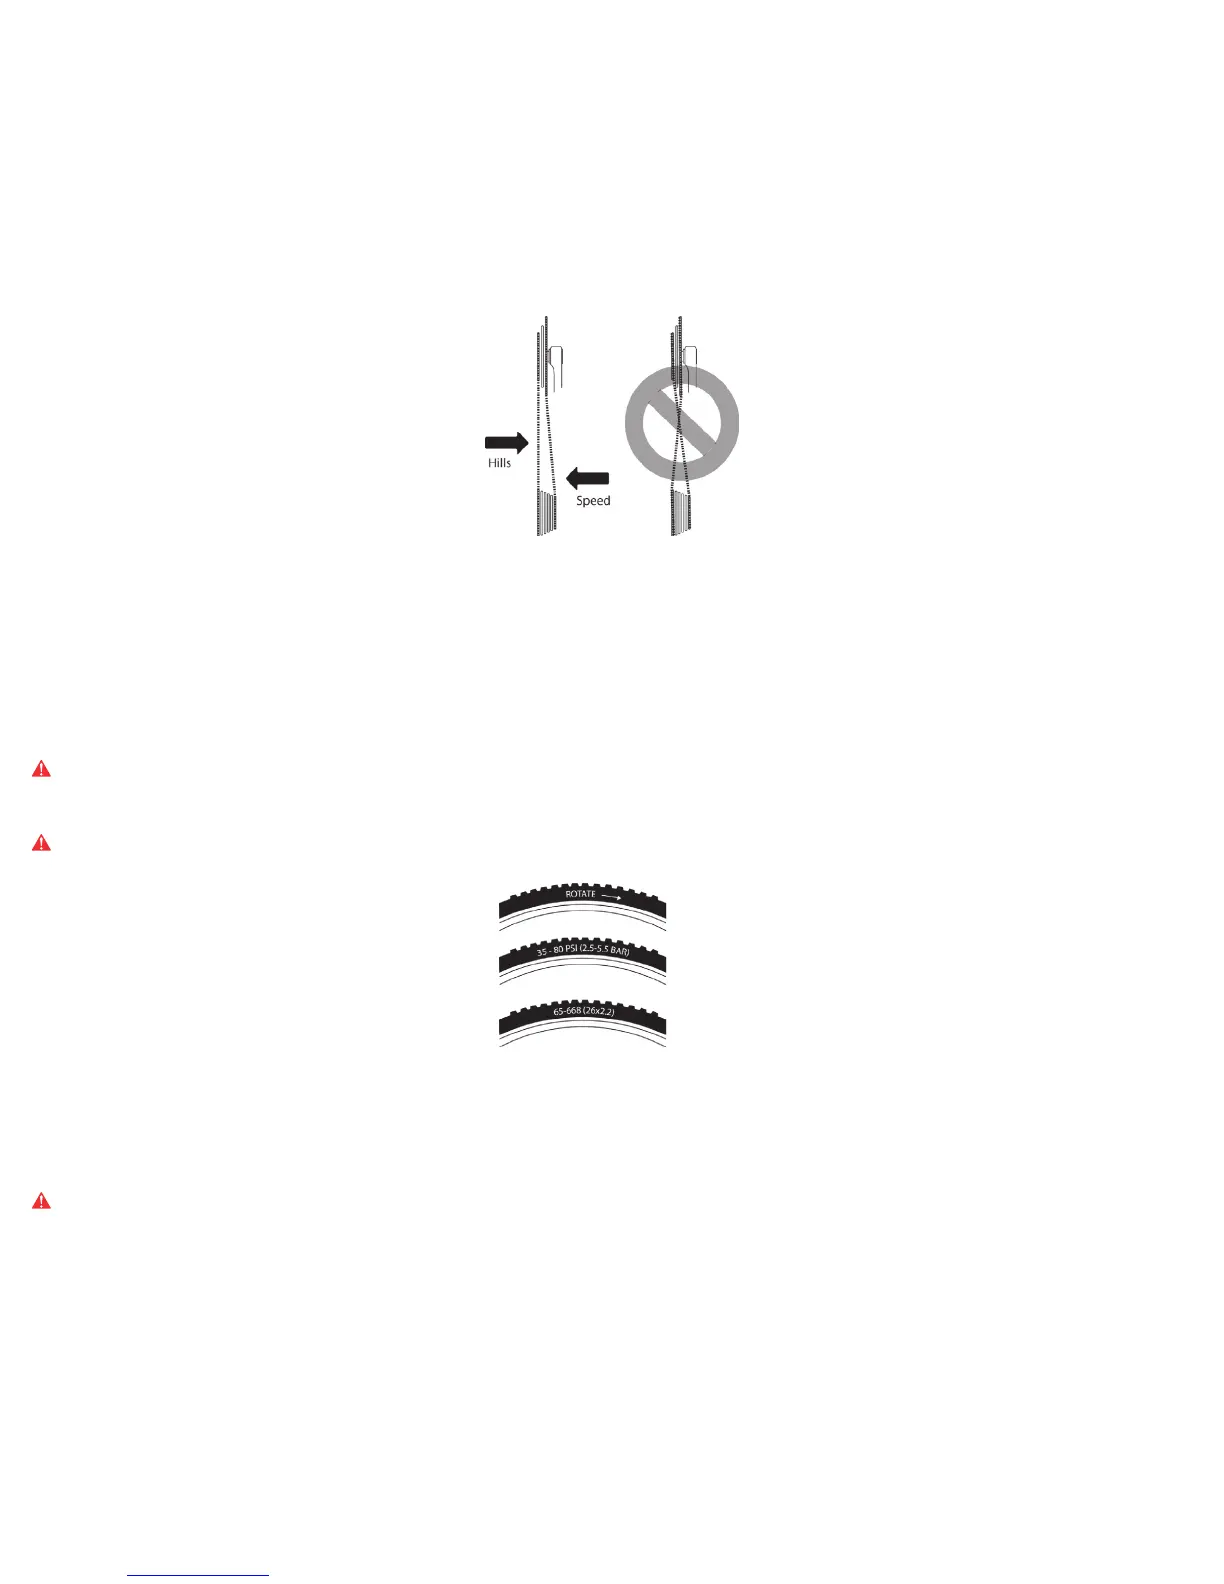
D. Choosing the proper gears
When climbing a hill, choose slower gears that are a combination of the smallest chainring with larger rear sprockets. On the other hand, to increase your speed, combine the largest
chainring with the smallest rear sprockets. Refer to figure 26 for visual support.
At first, choose a combination of gears that is convenient for you. You should target a gear ratio that allows a decent acceleration without requiring destabilizing effort. Practice gear shifting
in a safe place. You should familiarize ytourself with the different possible combinations. Once you will have understood these basic principles, you should be ready to shift gears smoothly
while riding.
Figure 26
7.5 Tires and inner tubes
7.5.1 Tires
Many tire models are available on the market. There are generic tires for versatility and specific ones that are adapted to particular weather or soil. Devinci has carefully selected tires
offering a great quality-to-price ratio to satisfy your specific needs, depending on the biking you do. After a bit of experience, you might want to change your tire types. You could then ask
your authorized Devinci dealer for advice.
Your tire size, the recommended pressure and sometimes details concerning the targeted applications are written on the tire sidewall. The most important information concerns the
pressure (refer to figure 27).
WARNING: Never exceed your tire’s recommended pressure, indicated on its side. Exceeding it can result in your tire bursting or going off the rim. This could cause
damage to your bike, injury or even death.
The optimal way to inflate a tire is to use a manual pump specially designed for bicycles. Ask your authorized Devinci dealer to assist you in the process of choosing a good pump.
CAUTION: Inflating compressor units in gas stations have very high airflows that quickly increase the pressure in your tires. When using these kinds of units, inflate your
tire carefully with quick bursts to prevent it from being damaged.
Figure 27
As mentioned earlier, your tire sidewall indicates an interval of recommended tire pressure. The maneuverability of your bike on different soils largely depends on your tire pressure.
When inflated to the maximal pressure, your tire offers less resistance and friction. However, this damps impacts. Maximum pressure is recommended on a dry and smooth surface. At the
minimum pressure, tires offer better results on smooth or slippery surfaces like compact argyle or light and running soil.
If your tire pressure is insufficient for your weight or riding style, the tire could deform and pinch the inner tube which could result in a tire puncture.
WARNING: The pressure readings from gas station compressor units are often inaccurate and so are many automotive tire gages. Do not rely on these devices, unless
you are confident of their precision. Make sure you always use a quality manometer that provides good and accurate results.
Refer to your authorized Devinci dealer to learn about the tire pressure you should have, according to your riding habits, and inflate your tires accordingly. To check, refer to section 5.4.2.
You will then have a visual benchmark to refer to when inspecting your tire pressure. Make sure you check it frequently since it can change quickly.
Some high-end tires have specific direction of rotation. Indeed, their tread is designed to provide a better adherence in a specific direction. In that case, an arrow on the sidewall indicates
the proper direction. Make sure the wheels are properly mounted to respect the rotating direction as you go forward.
7.5.2 Valves
Valves allow inflating your tires’ inner tubes and keeping their pressure at the same time. Two valve models are available on the market; the Presta and the Schraeder shown on figures 28
and 29. You need a pump that is compatible with the valve model that your tires are equipped with. Adaptors exist to make the Presta valves fit the Schraeder standard.
The Schraeder valve is the same used by the automotive industry. To inflate a Schraeder valve tube, all you need to do is to unscrew its cap and use a bicycle pump or a compressor. To
deflate it partially or completely, just press on the tiny pin in the middle of the valve end with a sharp-pointed object. Always have the valve caps properly hand-tightened before using your
bike.
 Loading...