ENGLISH
7
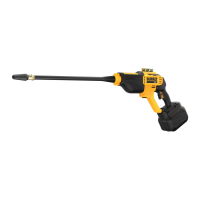
To Attach the Spray Wands, Soap Bottle or other
Attachment (Fig. C)
The spray wand, soap bottle and other attachments (sold
separately) connect to the power cleaner. To connect the
spray wand
8
and soap bottle
11
to the power cleaner
2
:
• Insert the end of the attachment into the opening on
the power cleaner
2
. Push in and turn the attachment
clockwise until it's secured into workingposition.
• To remove the attachment, push in and turn the
attachment counterclockwise and pull from the power
cleaner
2
.
NOTE: Other accessories are available for use with this
power cleaner, refer to the Accessoriessection.
To Attach Nozzle to Spray Wand (Fig. F)
DANGER: Risk of fluid injection. Do not direct discharge
stream toward persons, unprotected skin, eyes or any pets or
animals. Serious injury willoccur.
WARNING: Flying objects could cause risk of
serious injury. DO NOT attempt to change nozzles while
power cleaner is running. Turn power cleaner off before
changingnozzles.
To connect the nozzle
10
,
15
to the spray wand
8
, pull
the quick connect collar
9
toward the spray wand and
insert the appropriate nozzle. Release the quick connect
collar to lock the nozzle inplace.
The label on your tool may include the following symbols. The
symbols and their definitions are asfollows:
BPM .................... beats per minute
V ......................... volts
min ..................... minutes
j
or DC ............direct current
…/min ..............per minute
RPM .................... revolutions per
minute
A ......................... amperes
Hz .......................hertz
W ........................watts
Wh ......................watt hours
n
o
.......................no load speed
n .........................rated speed
c
.....................safety alert symbol
h
..................... wear respiratory
protection
f
..................... wear eye
protection
i
..................... Class II
Construction
(double insulated)
g
..................... wear hearing
protection
a
..................... read all
documentation
n
..................... avoid staring at
light
l
or AC............alternating current
Ah ....................... amp hours
ASSEMBLY AND ADJUSTMENTS
WARNING: To reduce the risk of serious personal
injury, turn unit off and remove the battery pack
before making any adjustments or removing/installing
attachments or accessories. An accidental start‑up can
causeinjury.
SPECIFICATIONS
Maximum Pounds per Square Inch 550
Rated Gallons per Minute 1.0
Battery 20V DC
Inlet Hose 20 ft (6 m)
Pressure of Inlet Water 20‑100 PSI
Inlet Water Cold Tap
Soap Consumption Rate 10% MAX
Attaching Quick Connect Filter (Fig. B)
This power cleaner must be used with the quick connect
adapters. The garden or suction hose can only be attached
when the quick connect filter
7
isinstalled.
1. To connect the quick connect filter
7
to the power
cleaner
2
, place the end of the quick connect filter onto the
water intake
3
. Tighten the quick connect filter byhand.
NOTE: Avoid cross threading when installing the hose.
Cross threading will causeleaks.
To Attach the Garden or Suction Hose (Fig. D, E)
Connecting the garden hose or suction hose will depend on
the job to beperformed.
To Attach Garden Hose (Fig.D)
This power cleaner must be used with the quick
connectadapters.
1. To connect the quick connect garden hose adapter
16
to a garden hose, thread the quick connect garden hose
adapter onto the end of the garden hose. Tighten the
garden hose byhand.
NOTE: Avoid cross threading when installing the hose.
Cross threading will causeleaks.
NOTE: Before connecting the garden hose to the power
cleaner, run water through the garden hose for thirty
seconds to clear any debris from the mouth of thegarden
pressurehose.
2. To connect the quick connect garden hose adapter
16
to the quick connect filter
7
on the power cleaner
2
, push
the quick connect garden hose adapter firmly onto the
quick connectfilter.
NOTE: Before use, gently tug on the garden hose to ensure
the connection issecured. Make sure the quick connect
garden hose adapter is flush with the quick connect filter as
shown in Figure D.
3. Always disconnect the garden hose afterusage. To
disconnect, pull back the collar on the quick connect garden
hose adapter and remove from the quick connectfilter.
To Attach the Suction Hose (Fig.E)
Use the suction hose to pull water from a bucket or other
fresh watersource.
NOTICE: Do not use to suction soap, chemicals, dirty or
corrosive liquids, such as window cleaner, plant food,
fertilizers or bleach. Do not use saltwater.
1. To connect the quick connect hose connector
13
on the
end of the suction hose to the quick connect filter
7
on the
power cleaner
2
, push the quick connect hose connector
firmly onto the quick connectfilter.
NOTE: Before use, gently tug on the suction hose to ensure
the connection issecured. Make sure the quick connect
hose connector on the end of the suction hose is flush with
the quick connect filter as shown in the FigureEinset.
2. Place other end of suction hose with filter on it into
container of fresh water or a fresh water source. Adjust
the float on the suction hose so the filter stays covered in
theliquid.
3. Select the correct nozzle to be used.
4. After the job being performed is complete, place the
suction hose into container of clean water and draw the
clean water through the system torinse.
 Loading...