9
ENGLISH
Fitting a Mains Plug to 115 V Units
(U.K. and Ireland Only)
• The plug fitted should be comply with BS EN 60309 (BS4343),
16 Amps, earthing contact position4h.
WARNING: Always ensure that the cable clamp is
correctly and securely fitted to the sheath of thecable.
Using an Extension Cable
If an extension cable is required, use an approved 3–core
extension cable suitable for the power input of this tool (see
Technical Data).The minimum conductor size is 1.5 mm
2
; the
maximum length is 30m.
When using a cable reel, always unwind the cablecompletely.
Package Contents
The package contains:
1 Toothed Chopsaw
1 Cutting blade
1 Hex key
1 Vertical clamp
1 Instruction manual
• Check for damage to the tool, parts or accessories which may
have occurred duringtransport.
• Take the time to thoroughly read and understand this manual
prior tooperation.
Markings on Tool
The following pictograms are shown on the tool:
Read instruction manual beforeuse.
Wear earprotection.
Wear eyeprotection.
Date Code Position (Fig. A)
The date code
26
, which also includes the year of manufacture,
is printed into thehousing.
Example:
2020 XX XX
Year of Manufacture
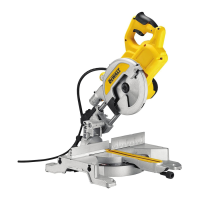
Description (Fig. A)
WARNING: Never modify the power tool or any part of it.
Damage or personal injury couldresult.
1
On/off switch
2
Main handle
3
Carrying handle
4
Guard
5
Spindle lock
6
Material clamp
7
Fence
8
Mounting holes
9
Cutting table
10
Hex key
Intended Use
Your professional DeWALT toothed chopsaw has been designed
for the cutting of variously shaped metal materials: water
and gas pipes, angular iron, U-profiles, T-bars, rods, bolts, etc.
Using the appropriate cutting blade, it can cut hot and cold
rolled carbon steel, construction steels according to DIN 1700
(ST33, ST37–2, ST52–3), non-ferrous metals (i.e. aluminum,
brass, copper), stainless steel and synthetic materials (i.e. PVC).
This tool is not intended to be used in cast-iron, brick, tile or
ceramic materials. The tool is never to be used for cutting
magnesiumworkpieces
DO NOT use under wet conditions or in the presence of
flammable liquids orgases.
These chopsaws are professional powertools.
DO NOT let children come into contact with the tool.
Supervision is required when inexperienced operators use
thistool.
• Young children and the infirm. This appliance is not
intended for use by young children or infirm persons
withoutsupervision.
• This product is not intended for use by persons (includng
children) suffering from diminished physical, sensory or
mental abilities; lack of experience, knowledge or skills
unless they are supervised by a person responsible for their
safety. Children should never be left alone with thisproduct.
ASSEMBLY AND ADJUSTMENTS
WARNING: To reduce the risk of serious personal
injury, turn tool off and disconnect tool from power
source before making any adjustments or removing/
installing attachments or accessories. An accidental
start-up can causeinjury.
Bench Mounting (Fig. A)
Mounting holes
8
have been provided to facilitate
benchmounting.
Removing and Fitting a Cutting Blade
(Fig. A, B1, B2)
1. With the arm in the rest position, use the lip
42
to slide the
guard
4
back. Leave the guard retracted (Fig. B1).
2. Press and hold down the spindle lock
5
(Fig. B2).
3. Rotate the cutting blade until itlocks.
4. Rotate the bolt cover
11
out of the way (Fig. B1).
5. Using the hex key
10
, remove the bolt
12
by turning
counterclockwise and then remove the lock washer
29
, the
flat washer
27
and the retaining flange
28
(Fig.B2).
6. Replace the cutting blade
13
. Make sure that the the
new blade is placed onto the flange
30
in correct
rotationaldirection.
7. Secure the blade with the retaining flange
28
, the flat
washer
27
and lock washer
29
and the bolt
12
.

 Loading...