7
ENGLISH
Mounting and Removing the Cutting Shroud
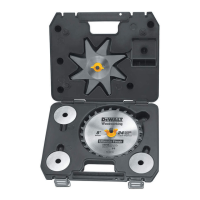
Mounting the DWE46225 125 mm Cutting Shroud
(Fig. A, B–D, F)
WARNING: The protective guard for grinding applications
can't be reinstalled, after the shroud ismounted.
Follow the mounting and removing guard instructions in tool
manual to remove the guard fromgrinder.
1. To the mount DWE46225 cutting shroud on a keyless gear
case, remove guard release lever
16
, guard release lever
screw
17
and screw
18
shown in FigureB.
2. Insert the supplied screws: stop screw
19
and screw
20
as
shown in Figure C. Then mount cuttingshroud.
3. Press the front shroud button
7
and the side shroud
button
8
at the same time to fully open the cuttingshroud
(Fig.F).
4. Loosen the collar screw
2
on the cutting shroud and align
the tabs
21
on the cutting shroud with the slots
22
on the
grinder gearcase.
5. Rotate the shroud into the desired working position. The
shroud should be positioned between the spindle and the
operator to provide optimumefficiency.
ASSEMBLY AND ADJUSTMENTS
WARNING: To reduce the risk of serious personal
injury, turn tool off and disconnect tool from power
source before making any adjustments or removing/
installing attachments or accessories. Be sure the
trigger switch is in the OFF position. An accidental start-up
can causeinjury.
Intended Use
Your cutting shroud has been designed for professional
masonry cutting applications. It is not intended for use with
metal or wood. It may used only be for dry cutting. Using
the appropriate grinder, diamond wheel and dust extractor
vacuum can be used to remove the vast majority of static and
airborne dust which without the use of the cutting shroud
could otherwise contaminate the working environment or
pose an increased health risk to the operator and those in
closeproximity.
Do not use under wet conditions or in the presence of
flammable liquids orgases.
The cutting shroud is a professional tool.
Do not let children come into contact with the tool. Supervision
is required when inexperienced operators use thistool.
• Young children and the infirm. This appliance is not
intended for use by young children or infirm persons
withoutsupervision.
• This product is not intended for use by persons (including
children) suffering from diminished physical, sensory or
mental abilities; lack of experience, knowledge or skills
unless they are supervised by a person responsible for their
safety. Children should never be left alone with thisproduct.
6. Tighten the collar screw
2
to secure the cutting shroud
on the gear case. Do not operate the grinder with a loose
cuttingshroud.
7. To remove the cutting shroud, loosen the collar screw,
rotate the cutting shroud to align the slots and tabs and pull
up on the cuttingshroud.
NOTE: The cutting shroud is pre-adjusted to the
diameter of the gear case hub at the factory. If, after a period
of time, the cutting shroud becomes loose, tighten the collar
screw
2
.
NOTICE: If cutting shroud cannot be secured by
tightening the collar screw, do not use tool. Take the tool
and cutting shroud to a service centre to repair or replace
the cuttingshroud.
Mounting the DWE46127 230 mm Cutting Shroud
(Fig. A, D, F)
Follow the mounting and removing guard instructions in tool
manual to remove the guard fromgrinder.
1. Press the front shroud button
7
and the side shroud
button
8
at the same time to fully open the cuttingshroud
(Fig.F).
2. Loosen the collar screw
2
on the cutting shroud and align
the tabs
21
on the cutting shroud with the slots
22
on the
grinder gearcase.
3. Rotate the shroud into the desired working position. The
shroud should be positioned between the spindle and the
operator to provide optimumefficiency.
4. Tighten the collar screw
2
to secure the cutting shroud
on the gear case. Do not operate the grinder with a loose
cuttingshroud.
5. To remove the cutting shroud, loosen the collar screw,
rotate the cutting shroud to align the slots and tabs and pull
up on the cuttingshroud.
NOTE: The cutting shroud is pre-adjusted to the
diameter of the gear case hub at the factory. If, after a period
of time, the cutting shroud becomes loose, tighten the collar
screw
2
.
NOTICE: If cutting shroud cannot be secured by
tightening the collar screw, do not use tool. Take the tool
and cutting shroud to a service center to repair or replace
the cuttingshroud.
Mounting and Removing a Keyed Guard
(Fig.E)
For 230 mm grinders only
WARNING: To reduce the risk of serious personal
injury, turn tool off and disconnect tool from power
source before making any adjustments or removing/
installing attachments or accessories. Before
reconnecting the tool, depress and release the
trigger switch to ensure that the tool isoff.
CAUTION: Guards must be used with thisgrinder.