14
ENGLISH
Blade guard release lever
Lock/unlock cover at the mainswitch.
Unplug saw before changing blade
Protect the supply cord/plug against humidity and
sharp edges of saw blade
Date Code Position (Fig. A)
The Date Code
51
, which also includes the year of
manufacture, is printed into thehousing.
Example:
2018 XX XX
Year of Manufacture
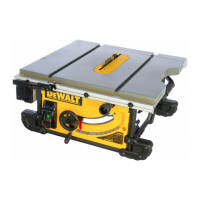
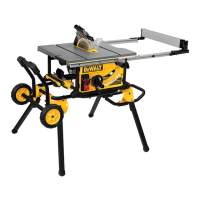
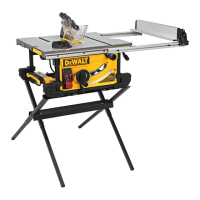
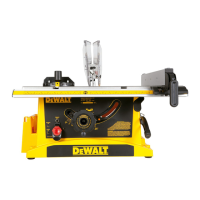
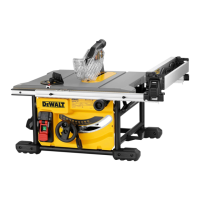
Description (Fig. A, B)
WARNING: Never modify the power tool or any part of it.
Damage or personal injury couldresult.
1
Table
2
Blade
3
Rip scale indicator
4
Fine adjust knob
5
Rail lock lever
6
Blade height adjustment wheel
7
Bevel lock lever
8
ON/OFF switch
9
Mounting holes
10
Mitre gauge
11
Blade guard assembly
12
Blade guard release lever
13
Splitter
14
Dust exhaust port
15
Guard dust exhaust port
16
Throat plate
17
Rip fence
18
Rip fence latch
19
Work support/narrrow rip fence(shown in stored position)
20
Blade wrenches
21
Push stick(shown in stored position)
50
Carrying handles
52
Non-through cutting riving knife
(shown in storage position)
53
Anti kickback assembly
54
anti-kickback mounting slots
55
Stem
Intended Use
DWE7491 table saw is designed for professional ripping, cross-
cutting, mitreing and bevelling with various materials as wood,
wood composite materials andplastics.
DO NOT use under wet conditions or in the presence of
flammable liquids orgases.
DO NOT use for cutting metal, cement board, ormasonry.
DO NOT use shaping cutter heads on thissaw.
DO NOT perform tapered cuts without a tapered jigaccessory.
DO NOT use the saw for plunge or cove cutting.
These table saws are professional powertools.
DO NOT let children come into contact with the tool.
Supervision is required when inexperienced operators use
thistool.
• Young children and the infirm. This appliance is not
intended for use by young children or infirm persons
without supervision. This product is not intended for use
by persons (including children) suffering from diminished
physical, sensory or mental abilities; lack of experience,
knowledge or skills unless they are supervised by a person
responsible for their safety. Children should never be left
alone with thisproduct.
ASSEMBLY
WARNING: To reduce the risk of serious personal
injury, turn tool off and disconnect tool from power
source before making any adjustments or removing/
installing attachments or accessories. An accidental
start-up can causeinjury.
Unpacking
• Remove the saw from the packaging materialcarefully.
• The machine is fully assembled except for the rip fence,
blade guard assembly, mitre gauge, blade wrenches, anti-
kick back assembly and dust extraction reducerport.
• Finalize the assembly following the instructions as
describedbelow.
WARNING: Always keep the push stick in its place when
not inuse.
Mounting the Saw Blade (Fig. A, C)
WARNING: To reduce the risk of injury, turn unit
off and disconnect machine from power source
before installing and removing accessories, before
adjusting or changing set-ups or when making
repairs. An accidental start-up can causeinjury.
WARNING: When mounting the saw blade, wear
protective gloves. The teeth of the saw blades are very
sharp and can bedangerous.
WARNING: The saw blade MUST be replaced as described
in this section. ONLY use saw blades as specified under
Technical Data. We suggest DT4226. NEVER fit other
sawblades.