17
ENGLISH
• Always support long workpieces to preventkickback.
• Do not remove any cut-offs from the blade area while
the blade isrunning.
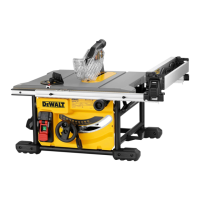
Switching On and Off(Fig.M)
The on/off switch
8
of your saw bench offers
multipleadvantages:
• No-volt release function: should the power be shut off for
any reason, the switch has to be deliberatelyreactivated.
• To switch the machine on, press the green startbutton.
• To switch the machine off, press the red stopbutton.
Lock Off Feature Instructions
A cover above the switch folds down for insertion of a padlock
to lock the saw off. A padlock with a maximum diameter of
6.35mm and minimum clearance of 76.2 mm isrecommended.
Rip Fence Operation(Fig.N–P)
Rail lock lever
The rail lock lever
5
locks the fence in place preventing
movement during cutting. To lock the rail lever, push it down
and toward the rear of the saw. To unlock, pull it up and toward
the front of thesaw.
NOTE: When ripping, always lock the rail locklever.
Work Support Extension /
Narrow Ripping Fence
Your table saw is equipped with a work support extension to
support work that extends beyond the sawtable.
To use the narrow ripping fence in the work support position,
rotate it from its stored position as shown in FigureO, and
slide the pins into the lower sets of slots
27
on both ends of
thefence.
To use the narrow ripping fence in the narrow ripping position,
snap the pins into the upper sets of slots
28
on both ends of
the fence. This feature will allow 51mm of extra clearance to the
blade. Refer to FigureP.
NOTE: Retract the work support extension or adjust to narrow
rip fence position whenever working over thetable.
NOTE: When using the narrow ripping fence, subtract 51mm
from the indicated rip scalereading.
Fine Adjustment Knob
The fine adjustment knob
4
allows smaller adjustments when
setting the fence. Before adjusting, be sure the rail lock lever is in
its up or unlocked,position.
Rip Scale Pointer
The rip scale pointer will need to be adjusted for proper
performance of the rip fence if the user switches between thick
and thin kerf blades. The rip scale pointer only reads correctly
when the fence is installed in position 1 or 2 to the right side
of the blade. When using the narrow ripping fence for narrow
ripping (not in work support position), subtract 51mm from
the indicated rip scale reading. See Adjusting the Rip Scale
underAdjustments.
BASIC SAW CUTS
Through-Cutting Operations
WARNING: Use blade guard assembly for all through-
cutting operations.
Ripping(Fig.A,B, Q, R)
WARNING: Sharpedges.
1. Set the blade to 0°.
2. Install the rip fence and lock the rip fence latch
18
(Fig.A).
3. Raise the blade until it is about 3 mm higher than the top of
the workpiece. Adjust the height of the upper blade guard
asnecessary.
4. Adjust the position of the fence and lock the rail lock
lever
5
, refer to Rip FenceOperation.
5. Hold the workpiece flat on the table and against the fence.
Keep the workpiece away from theblade.
6. Keep both hands away from the path of the blade(Fig.Q).
7. Switch the machine on and allow the blade to reach
fullspeed.
8. Slowly feed the workpiece underneath the guard, keeping
it firmly pressed against the rip fence. Allow the teeth to
cut, and do not force the workpiece through the blade. The
blade speed should be keptconstant.
9. Always use a push stick
21
when working close to the
blade(Fig.R).
10. After completing the cut, switch the machine off, allow the
blade to stop and remove theworkpiece.
WARNING:
• Never push or hold the "free" or cut-off-side of
theworkpiece.
• Do not cut excessively smallworkpieces.
• Always use a push stick when ripping
smallworkpieces.
Bevel Cuts(Fig.A)
1. To set the required bevel angle, rotate the bevel lock
lever
7
by pushing it up and to theright.
2. To set to desired angle, rotate the lever by pushing it down
and to the left to lock inplace.
3. Proceed as forripping.
Cross-Cutting and Bevel Crosscutting (Fig. Q)
1. Remove the rip fence and install the mitre gauge in the
desiredslot.
2. Lock the mitre gauge at 0°.
3. Proceed as forripping.
Mitre Cuts(Fig.A)
1. Set the mitre gauge
10
to the requiredangle.
NOTE: Always hold the workpiece tightly against the face of the
mitregauge.
2. Proceed as forripping.