15
CCC Ducted Installation Instructions
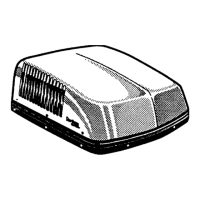
FIG. 16B
579, 590, 591, and 595 Series
Control Box
Three
Screws
Vehicle
Front
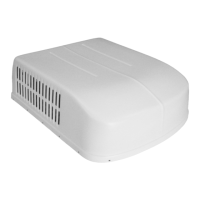
Installing unit with 3105007.XXX or 3105935.XXX Re-
turn Air Cover, continued from page 13, column A.
6. Evenly tighten mounting bolts to compress gasket
to 1/2" this will be a torque of 40 - 50 inch pounds.
See FIG. 15A.
B. INSTALLATION OF DIVIDER PLATE
1. Measure the ceiling to roof thickness:
a. If distance is 2” - 3-3/4”, remove perforated tab
from divider plate.
b. If distance is 3-3/4” - 5-1/2”, remove no tabs.
2. Remove the backing paper from double sided tape
located on ceiling template. See FIG. 16A.
Installing unit with 3105007.XXX or 3105935.XXX Re-
turn Air Cover, continued on page 15, column A.
Installing unit with 3308120.XXX Genesis Air Filtration
System, continued from page 13, column B.
2. Install electronic control box on ceiling template
with blunt self tapping screws. See FIG. 16B for
579, 590, 591, 595, series and Fig. 17B for 520,
530, and 600 series.
FIG. 15A
Installing unit with 3308120.XXX Genesis Air Filtration
System, continued on page 15, column B.
FIG. 16A
If bolts are left loose there may not be ad-
equate roof seal or if over tightened, damage
may occur to the air conditioner base or
ceiling template. Tighten to specications
listed in this manual.
3. Start each mounting bolt through the ceiling tem-
plate and up into the unit base pan by hand. Evenly
tighten mounting bolts to compress gasket to
1/2" this will be a torque of 40 - 50 inch pounds.
If bolts are left loose there may not be adequate
roof seal or if over tightened, damage may
occur to the air conditioner/heat pump base
or ceiling template. Tighten to specications
listed in this manual.
FIG. 17B
520, 530, and 600 Series
Control Box
Two
Screws
Vehicle
Front
Mount Control Box (On
Edge) To The Flange On
Top Of Ceiling Template
Lay Control Box Flat
On Top Of Ceiling Template
 Loading...