10
INSTALLATION INSTRUCTIONS
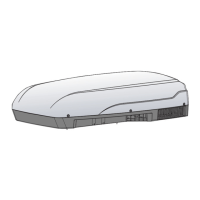
FIG. 13
Gasket
Control
Cable
Electrical
Cord
220-240 Vac
Power Supply
Furnace
Wires
5. Hold the ceiling template up to the roof opening.
Make sure the large plate faces the rear of the
RV. See (FIG. 14).
a. Start each mounting bolt through the ceiling
template and up into the unit base pan by
hand. Install wood screw in each end of the
ceiling template. This ensures a tight t of
the return air cover to ceiling. See (FIG. 14).
FIG. 14
Front Of Vehicle
Tighten To
Compress
Gasket To
13 mm
Roof
Gasket
Screws
b. Tighten mounting bolts to
correct torque specications. Overtighten-
ing could damage unit’s base pan or ceiling
template. Not enough torque will allow an in-
adequate roof seal, and could cause a leak.
Tighten all four (4) mounting bolts EVENLY
within 4.5 to 5.6 NM. See (FIG. 14).
This will compress the roof gasket to
approximately 13 mm.
6. Installation Of Divider Plate
a. Measure the ceiling to roof thickness:
● If distance is 51 mm - 95 mm, remove
perforated tab from divider plate. See
(FIG. 15).
● If distance is 95 mm - 140 mm, remove
no tabs.
b. Remove the backing paper from double-
sided tape located on ceiling template. See
(FIG. 15).
FIG. 15
Paper Backing
51 mm -
95 mm
c. Divider plate MUST be in-
stalled correctly. Incorrect installation could
cause compressor to quick-cycle, and could
result in supply circuit overload and reduced
product performance.
The adhesive on the double-sided
tape is extremely sticky. Make sure
the divider plate is properly positioned
before pressing into place.
Place the divider plate up to bottom of the
unit base pan rmly. The foam tape on the di-
vider plate must seal to bottom of base pan.
See (FIG. 16).
FIG. 16
Push Divider Plate Firmly
Onto Base Pan

 Loading...