98
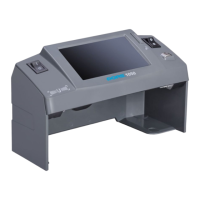
MULTIFUNCTIONAL COUNTERFEIT DETECTOR DORS 1050MULTIFUNCTIONAL COUNTERFEIT DETECTOR DORS 1050
The optimal location of the device is considered to be a position when the operator’s look is
perpendicular to the surface of the screen.
To start the device operation, connect the supplied AC adapter to the power jack of the device and plug
AC adapter to power supply 190-240V, 50-60 Hz. Then switch on the device using the power switch 1
(see Fig. 1). The screen of device shall turn on to show that the device is switched on and ready for
operation.
PREPARING FOR OPERATION
ATTENTION! BEFORE THE DEVICE OPERATION STARTS, MAKE SURE ABOUT THE
INTEGRITY OF ITS BODY AND UV LAMP (Fig.1 item 6).
IT IS PROHIBITED TO CONNECT TO THE POWER SUPPLY THE PRODUCT WITH A
DAMAGED BODY, WITH THE DAMAGED UV LAMP OR WITHOUT IT.
OPERATION
When the device is switched on, the screen of device (Fig.1, item 2) turns on and the UV or white
light mode is activated (UV lamp or white diode is depended on the position of the switch 4 (refer to
Fig.1) – UV/White; using this switch the light mode can be changed during device operation). In both
modes the IR image of the banknote placed in the viewing zone of device (Fig.1, item B) is displayed
on the monitor.
VERIFICATION OF MAGNETIC MARKS
The verification of magnetic marks is active in all operation modes. Pass a part of banknote, which
has a magnetic ink, cross the head of inductive sensor Fig. 1 item 5. Once a magnetic ink is detected,
the diode Fig. 1 item 3 flash green. To improve the quality of magnetic control, for example, for
verification of worn-out banknotes, put the banknote on the magnetic bias area (Fig. 1, item A) for
several seconds.
VERIFICATION OF UV MARKS
IT IS PROHIBITED TO LOOK AT UV LAMP WHEN DEVICE IS WORKING.
Place a banknote or a document in the viewing zone (Fig.1, item B) of device.
Turn the key (Fig. 1, item 4) into position 1
that means the UV mode is activated.
Examine UV images on the surface of a banknote / document.
The simultaneous verification in UV and IR is available.
IR image can be seen on the screen (Fig.1, item 2).
1
VERIFICATION OF IR MARKS
Place a banknote or a document in the viewing zone (Fig.1, item B) of device.
The IR verification is activated once the device is switched on.
Observe the IR images on the screen (Fig.1, item 2).
VERIFICATION IN WHITE LIGHT
Place a banknote or a document in the viewing zone (Fig.1, item B) of device.
Turn the key (Fig. 1, item 4) into position 2
that means the white light mode is activated.
This mode is very convenient for observing the relief of printed elements visible in oblique white
light.
When placing a banknote or a document in front of device, you can verify watermarks.
For the white illumination a point-type LED of high brightness is used, so it is not recommended to
look directly at the source of white light.
2