EasyManua.ls Logo

DR.ÖTEK MT-XE - User Manual

DR.ÖTEK MT-XE
25 pages
Print Icon
To Next Page IconTo Next Page
Loading...
DR.ÖTEK
User Manual
Metal Detector MT-XE
If there are any issues, or you are not 100% satisfied in any way,
please contact us at support@drotekor.com
Question and Answer IconNeed help?

Do you have a question about the DR.ÖTEK MT-XE and is the answer not in the manual?

Summary

Preface

Legal Disclaimers

Specifications

Installation

Battery

Panel Overview

LCD Display

Mode Cursor

Indicates working modes (ALL METAL, PASTURE, PARK, SAND) via LED.

Target ID Cursor

Divided into 6 categories to identify sought metal types.

Normal Cursor

Default state (NORM, ALL-METAL, sens 3, mid volume).

Digital ID and Pinpoint Cursor

Two-digit indication (01-99) and Pinpoint cursor.

Coin Depth Cursor

Four levels indicating approximate depth for 25¢ coins.

Volume Cursor

Indicates volume in three levels (silent, low, high).

Sens Cursor

Indicates sensitivity in four levels.

Battery Power Cursor

Shows battery level, flashes when replacement is needed.

LED Indicators

MODE LED

Displays working mode (ALL METAL, PASTURE, PARK, SAND) with MODE cursor.

P-P Strength LED

Shows signal intensity at level 4 in PINPOINT state.

Keys and Modes

ON-NORM;OFF Key

Powers device on/off and selects NORM state.

DISC;P-P Key

Switches between DISC and PINPOINT modes.

Mode-Vol Key

Cycles through working modes and adjusts volume.

ALL METAL Mode

Common mode with single hum for all metals.

PASTURE Mode

For less scrap metal; prioritizes iron detection.

PARK Mode

For more scrap metal; discriminates various metals.

SAND Mode

Optimized for wet sandy beach detection.

Quick Start

1. Placing the Detector

Place detector on a table, away from interference, remove jewelry.

2. Starting Up

Press POWER, detector chirps, LCD lights up, enters NORMAL state.

3. ALL METAL Mode Test

Test ALL METAL mode with metal samples, check sounds, depth ruler, and cursors.

4. PASTURE Mode Test

Test PASTURE mode with metal samples, check sounds, target cursors, and numbers.

5. PARK Mode Test

Test PARK mode with samples, check sounds, target cursors, and numbers.

6. SAND Mode Test

Test SAND mode; nails are eliminated, iron is excluded.

7. DISC Mode Test

Set DISC mode by pressing DISC/P-P key to exclude metals.

8. PINPOINT Mode Test

Long press DISC/P-P key to enter PINPOINT mode for precise location.

Field Operation

1. Starting Up

Lift detector horizontally, press ON, enters NORMAL state.

2. Setting the Working Mode

Choose working mode (ALL METAL, PASTURE, PARK, SAND) based on environment.

3. Selecting Sensitivity

Adjust sensitivity; high sensitivity may cause interference or false signals.

4. Moving the Search Coil

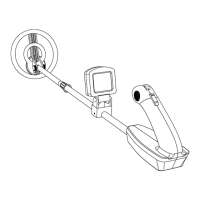
Move search coil parallel to ground, at uniform speed, about one inch above surface.

5. Using Sound for Identification

In PARK mode, use three frequencies (bass, medium, high) to identify metals.

6. Using Digital Cursor for Identification

Use the digital cursor and table for preliminary identification of metals and coins.

7. Deep Indication

Depth indication is more accurate for coin-sized objects in neutral soil.

8. Accurate Positioning (PINPOINT)

Use PINPOINT mode for precise location of buried metals after initial detection.

9. Detection Tips

Tips for mineralized environments, beaches, and areas with interference.

Safety Cautions

General Cautions

Safety advice for busy places, private property, hazardous areas, and excavation.

Troubleshooting Guide

No Power or Boot Sound

Addresses no LCD indication or boot sound by checking battery.

Continuous DI Sound

Resolves continuous sound by checking other detectors or reducing sensitivity.

No Detectable Function

Fixes no detection by checking search coil connection.

Low Detection Sensitivity

Addresses low sensitivity by checking nearby metal or coil placement.

Irregular Sound or Cursor Jump

Solves irregular signals by checking environment or scanning methods.

Unstable Signal or Cursor Changes

Stabilizes signals by adjusting scanning, sensitivity, or discrimination.

PINPOINT Sounds Near Ground

Addresses PINPOINT sounds by checking ground conditions or target proximity.

False Signals and Reasons

Large or Near-Surface Targets

Warranty Information

Overview

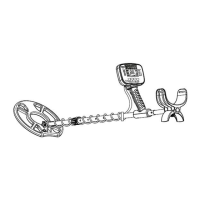
This document serves as the user manual for the DR.ÖTEK MT-XE Metal Detector, a device designed for outdoor metal detection with advanced capabilities. The manual provides comprehensive instructions for assembly, operation, and troubleshooting, ensuring users can effectively utilize the detector's features.

Function Description

The DR.ÖTEK MT-XE Metal Detector is engineered for high sensitivity and discrimination, capable of identifying and displaying six categories of metals. It offers a fine indication of metal material using a two-digit display (01-99). The device defaults to a "NORMAL" state upon startup, which is the most commonly used working mode, aimed at reducing operational errors. Its working mode can be adjusted based on the detection environment. An 8-LED indicator system provides clear visual feedback on the working mode and signal intensity, making it user-friendly, especially for beginners.

The detector operates in several modes:

  • ALL-METAL: This is the most common working mode, providing a single hum for all detected metals. It's suitable for general use where all types of metal are of interest.
  • PASTURE: Designed for areas with less scrap metal, such as fields and pastures. In this mode, iron produces a bass tone, while other metals produce higher pitches.
  • PARK: Ideal for locations with more scrap metal, like parks. It differentiates metals with bass tones for iron, medium tones for nickel, hoops, zinc, and S-CAP, and high tones for copper and silver.
  • SAND: Specifically tailored for sandy beaches, including wet sandy beaches, which are electrically conductive. This mode suppresses some signals and over-pitches others to account for the unique ground conditions.
  • DISC (Discrimination): This mode allows users to exclude specific metal categories from detection. By cycling through options, users can select which metals the detector should ignore, such as iron and nickel coins.
  • PINPOINT: A non-mobile mode used for accurate positioning of detected targets. When activated, it helps narrow down the exact location of a buried metal object, making excavation easier. It provides a slight single-frequency medium tone and indicates depth luminosity, with the signal intensifying as the coil approaches the center of the target.

The device features a digital ID cursor and a P-P cursor, with a two-digit display (01-99) for fine metal indication. When in PINPOINT mode, the P-P character is displayed. A coin depth cursor indicates the approximate depth of 25 silver coins in neutral soil, divided into four levels. The volume cursor offers three levels: silent, low, and high. The sensitivity cursor has four levels, with all LEDs lit indicating the highest sensitivity.

Usage Features

The DR.ÖTEK MT-XE is designed for ease of use, with a clear LCD display and intuitive controls.

  • Installation: The manual provides step-by-step instructions for assembling the detector, including attaching the lower stem to the search coil, inserting the control box into the middle stem grip, adjusting the stem length for comfortable use, and fitting the support arm. The cable from the search coil should be circled around the aluminum bar and plugged securely into the socket, then attached with nylon tape to prevent shaking.
  • Power On/Off: A short press of the "ON-NORM/OFF" key powers on the device, entering the "NORM" state (ALL-METAL mode, sensitivity level 3, mid-range volume). A long press (about 2 seconds) will shut off the detector.
  • Mode Selection: The "Mode-Vol" key allows cycling through working modes: ALL-METAL, PASTURE, PARK, and SAND. The "DISC/P-P" key is used to enter and cycle through the DISC mode for metal exclusion, and a long press activates the PINPOINT mode.
  • Sensitivity Adjustment: The "SENS/Back Light" key allows users to change the sensitivity level (1-2-3-4). Higher sensitivity increases detection range but can also lead to unstable false signals in areas with electromagnetic interference or mineralization.
  • Volume Control: A long press of the "Mode-Vol" key cycles through volume levels: low, high, and mute.
  • Backlight: A long press of the "SENS/Back Light" key illuminates the LCD backlight for approximately 10 minutes before automatically extinguishing.
  • Target Identification: The detector uses sound frequencies and a digital cursor to help identify targets. In PARK mode, three different frequencies indicate different metals. The digital ID cursor provides a numerical range (01-99) corresponding to various metals, aiding in preliminary identification.
  • Field Operation: For optimal results, the detector should be used outdoors, away from electrical appliances and areas with high metal content. The search coil should be moved at a uniform speed, parallel to the ground, about an inch above the surface, avoiding pendulum-like swings. Slowing down the probe over a target can yield more repetitive and stable signals.
  • PINPOINT for Accurate Location: After identifying a region with buried metal in motion mode, the PINPOINT mode helps pinpoint the exact location. Users move the coil slowly over the area, listening for the loudest sound and observing the signal strength LEDs and depth cursor to center the target under the coil.

Maintenance Features

The manual includes important guidelines for battery usage and troubleshooting to ensure the longevity and proper functioning of the device.

  • Battery Installation: The detector requires a single alkaline 6LR61 battery. Users should open the battery cover and install the battery according to the polarity indicator.
  • Battery Removal: If the detector will not be used for an extended period, the battery should be removed from the battery case to prevent leakage or damage.
  • Battery Power Indication: The device features a two-level battery power cursor. A flashing battery pattern indicates that the battery should be replaced.
  • Auto Shut-off: To conserve battery life, the detector automatically shuts off after approximately 15 minutes of inactivity (no key operations).
  • Troubleshooting Guide: A detailed troubleshooting section addresses common issues such as no power, continuous "DI" sound, no detectable function, low detection sensitivity, irregular sound/cursor jump, unstable signal, and PINPOINT sounds near the ground. Solutions range from checking battery installation and connections to adjusting sensitivity, scanning angle, or reducing ground magnetization.
  • Cautionary Notes: The manual advises against using headphones in busy traffic, trespassing on private property, detecting near buried power lines or flammable materials, and searching in military areas. It also emphasizes using reasonable excavation methods and restoring the original surface state after digging. It reminds operators that soil composition, size, shape, and oxidation of underground metals can affect discrimination and depth displays, urging them to consider these factors before excluding potentially valuable metals.

The DR.ÖTEK MT-XE is a robust and versatile metal detector, offering a blend of advanced features and user-friendly design for both novice and experienced treasure hunters.

DR.ÖTEK MT-XE Specifications

General IconGeneral
Adjustable StemYes
Headphone JackYes
DiscriminationYes
Weight2.31 lbs
Battery LifeUp to 20 hours
Battery TypeAA
Display TypeLCD
Target IdentificationYes
Sensitivity AdjustmentYes
Ground BalanceManual
Search Coil Size10 inches
WaterproofSearch coil only
Detection DepthUp to 8 inches

Related product manuals