Do you have a question about the Dr.Prepare DCIC1 and is the answer not in the manual?
Covers supervision, water immersion, cold storage, modifications, intended use, and cord safety.
Discusses placement, ventilation, and environmental conditions for safe setup.
Covers initial stabilization, cleaning, water type, and drain tube connection.
Details operation practices, ice production, cleaning, and storage precautions.
Details risks associated with combustible refrigerant and handling precautions.
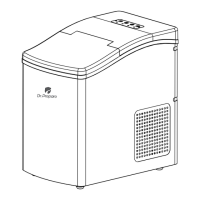
Lists and describes the included accessories like ice scoop, bin, viewing window, air vents, and drain tube.
Instructions for unpacking, cleaning, and placing the unit for proper air circulation.
Explains standby, ON/OFF, ice full, add water, and cleaning status indicators on the control panel.
Emphasizes proper grounding and using a suitable outlet for safe operation.
Step-by-step guide to preparing and starting the ice maker for the first time.
Details on monitoring water levels, ice full indicators, and water replacement.
Explains the self-cleaning function and initial cleaning procedures for the ice maker.
Instructions for draining the unit for cleaning or storage purposes.
Procedures for cleaning the unit's interior, exterior, ice bin, and reservoir.
Recommendations for regular self-cleaning to ensure ice quality and remove scale.
Details the 12-month warranty coverage, terms, and conditions for exclusions.
Steps for making a warranty claim and requirements for service.
This document describes the Dr.Prepare Countertop Nugget Ice Maker (model DCIC1), an appliance designed to produce nugget ice for household and similar applications.
The Dr.Prepare Countertop Nugget Ice Maker is an essential appliance for making nugget ice. It operates by freezing water to create small, chewable ice nuggets. The unit features a control panel with indicators for "ON/OFF," "CLEAN," "FULL," and "Add Water," allowing users to monitor and control its operation.
When powered on, the appliance enters standby mode, indicated by a steady red "ON/OFF" light. Tapping the "ON/OFF" button turns the ice maker on, and the indicator turns blue. Tapping it again shuts the unit off, and the indicator returns to red. The compressor, pump, ventilating fan, and extrusion motor stop in sequence after the unit is turned off.
The ice maker includes an "Ice Full" protection program. If an infrared probe continuously detects ice particles or other objects blocking its path for more than 5 minutes, the "Ice Full" indicator turns red, and the unit pauses ice production. Once no obstruction is detected for 30 seconds, the program unlocks, the indicator turns off, and ice production resumes automatically.
The "Add Water" indicator lights up when the water reservoir is low. In this state, the ice maker automatically turns off. Users must refill the reservoir with water (preferably purified or distilled) up to the MAX fill line and then tap the power button twice to restart ice production.
A self-cleaning function is integrated into the appliance. In standby mode, tapping the "CLEAN" button initiates a 5-minute self-cleaning cycle, indicated by a blue light. This cycle can be stopped manually by tapping the "CLEAN" button again, returning the unit to standby mode. It is recommended to allow the self-cleaning process to run for at least 30 seconds.
The ice maker is designed for countertop use and includes an ice scoop and a removable ice bin for serving and storing ice. A viewing window allows users to monitor ice production without opening the lid, which helps prevent warm air from entering. Air vents located on the back and sides of the appliance help prevent overheating. A water drain tube at the rear facilitates easy emptying of the reservoir.
The appliance uses isobutane refrigerant (R600A), a natural gas with high environmental compatibility, which is combustible. Therefore, care must be taken to avoid damage to the refrigerant tubing during handling, installation, and operation. Service should only be performed by authorized personnel using manufacturer-authorized service parts.
To get started, users must open the top cover, remove the ice bin, and fill the reservoir with purified or distilled water up to the MAX fill line. Using purified or distilled water is strongly recommended to prevent scale accumulation. After filling, the ice bin is placed back, the cover is closed, and the unit is plugged in. Tapping the "ON/OFF" button starts the ice maker. The unit performs a two-cycle self-cleaning process lasting 2-3 minutes upon initial power-on to ensure smooth ice production.
During operation, users should periodically check the "Add Water" indicator. If it lights up, water needs to be refilled. The ice maker automatically stops when the ice bin is full, and the "Ice Full" indicator lights up. It will resume ice production once the ice level drops.
For hygiene, it is recommended to replace the water in the reservoir every 24 hours. If the appliance is not used for several days, all water should be drained from the reservoir and refilled before use.
The appliance should be installed upright on a flat, level surface capable of supporting its total weight when full of water. A minimum of six inches (6") clearance around the side and back walls is required for proper air circulation. The ice maker should not be placed near heat sources, in direct sunlight, or in areas with excessive dust. It should be used in a well-ventilated area with an ambient temperature below 90 °F.
For safety, the appliance must be properly grounded and plugged into an appropriate 120V AC outlet. Users should avoid touching interior parts while the machine is producing ice and keep the lid closed. If any problem occurs, usage should be stopped immediately. When unplugging, hold the plug head, not the power cord, and avoid plugging/unplugging with wet hands.
Regular cleaning and maintenance are crucial for optimal performance and hygiene. Before any interior or exterior cleaning or servicing, the appliance must be unplugged. Flammable or corrosive vapors or liquids should not be used for cleaning to avoid fire or explosion hazards. Users should not attempt to dismantle, modify, or repair the appliance themselves. Accumulated dust from the plug should be removed regularly.
For the first use, or if the appliance has not been used for a long time, it is recommended to clean it with an ice cleaner, citric acid, or vinegar to prevent dirt or odors in the ice cubes. While initial ice production might contain dirt or odor if not cleaned, this typically disappears after several cycles and is not a product defect.
The self-cleaning function is highly recommended for regular cleaning, especially before first use and at least once per week, to prevent scale build-up from tap or drinking water.
To drain water, unhook the top of the drain tube from the back of the ice maker, lay it down into a sink or bucket below the ice maker's level, and remove the plug. Once water stops flowing, re-insert the plug. Draining is recommended when storing the unit, relocating it, or turning it off for several days.
For interior and exterior cleaning, unplug the ice maker, remove the ice bin, and clean the interior with a soft cloth dampened with ice machine cleaner and warm water. The outer housing should also be cleaned regularly with a soft cloth dampened with ice machine cleaner and warm water. The interior and exterior should be dried with a soft cloth. The drain tube should be put back in place. Soap should not be used to clean the reservoir; instead, use a soft cloth moistened with ice machine cleaning water.
The ice bin should be removed and cleaned with a soft cloth dampened with ice machine cleaner and warm water, rinsed thoroughly, and dried. Solvents or chemicals should not be used. The water reservoir should be wiped dry to prevent deposits.
The appliance should not be stored or used near flammable vapors or liquids. Nothing should be placed in the ice bin when the appliance is not in use, as it is not designed for storage. If the appliance will not be used for a long period, disconnect the power supply and drain all remaining water from the rear drain tube.
| Ice Storage Capacity | 1.5 lbs |
|---|---|
| Cycle Time | 6-8 minutes |
| Frequency | 60Hz |
| Ice Production Capacity | 26 lbs per day |
| Water Reservoir Capacity | 2.2 L |
| Ice Cube Size | 3 sizes |