

T
theresastevensonSep 23, 2025
What to do if Dräger Security Sensors display error 355?
- SSherry McneilSep 23, 2025
If error code 355 appears, it indicates that the temperature is too low. Operate the instrument within the allowed temperature range.
What to do if Dräger Security Sensors display error 355?
If error code 355 appears, it indicates that the temperature is too low. Operate the instrument within the allowed temperature range.
What to do if Dräger X-am 5100 database is full?
If error code 154 appears, it indicates that the database is full. To resolve this, read the database and clear the memory.
What to do if Dräger X-am 5100 Security Sensors database is 90% full?
If error code 153 appears, it indicates that the database is 90% full. To resolve this, read the database soon and then clear the memory.
Why Dräger X-am 5100 display '– –'?
The display showing '– –' on your Dräger Security Sensors indicates that the measuring range may be calibrated incorrectly. Recalibrate the measuring range. If the issue persists, the electronics or sensors could be defective, requiring repair by DrägerService.
What to do if Dräger X-am 5100 bump test interval has elapsed?
If error code 155 appears, it indicates that the interval for the bump test has elapsed. Perform the bump test.
What to do if Dräger Security Sensors display error 304?
If error code 304 appears, it indicates that the Dräger Sensor XS EC1 is not inserted or is defective. Check DrägerSensor XS EC1.
What does error 301 mean on Dräger Security Sensors?
Error code 301 indicates no valid zero point adjustment of the Dräger Sensor XS EC1. Perform a fresh air calibration.
What does error 302 mean on Dräger X-am 5100?
Error code 302 indicates no valid sensitivity adjustment of the Dräger Sensor XS EC1. Perform sensitivity adjustment or fresh air adjustment.
How to fix error 305 on Dräger X-am 5100?
Error code 305 indicates an error during the bump test of Dräger Sensor XS EC1. Repeat the bump test. If necessary, adjust or replace the Dräger Sensor XS EC1.
What does error 159 mean on Dräger X-am 5100 Security Sensors?
Error 159 means adjustment is not possible because a message is preventing the function (e.g., sensors in warm-up phase). Identify the message code via the info menu and switch off the device, if necessary.
Explains the meaning of warning, caution, and notice icons used in the document.
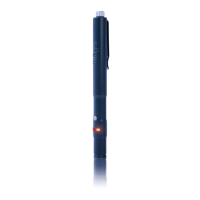
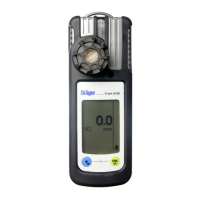
Identifies and describes the components of the Dräger X-am 5100 device.
Specifies the portable gas detection instrument's intended application and monitoring capabilities.
Details the intended operating environments and conditions, including hazardous area classifications.
Provides instructions and warnings for charging the instrument's rechargeable batteries.
Details the procedure and precautions for replacing batteries in the instrument.
Explains the steps to power on the Dräger X-am 5100 device.
Outlines the procedure for powering down the Dräger X-am 5100 device.
Lists essential checks and warnings before using the instrument in a work environment.
Describes how to connect the instrument to a PC for configuration using Dräger CC-Vision software.
Step-by-step guide on how to perform a bump test on the instrument.
Explains how to perform a bump test and document the results within the instrument's memory.
Provides operational guidance and notes on how to use the instrument correctly.
Explains how different alarms are indicated and acknowledged on the instrument.
Describes the indications and acknowledgment of a concentration pre-alarm (A1).
Details the indications and acknowledgment of a concentration main alarm (A2).
Explains the STEL/TWA exposure alarms and their handling.
Describes the battery pre-alarm indication and its implications.
Describes the indications and automatic shutdown for the battery main alarm.
Explains the 'Instrument alarm' indication and the need for maintenance.
Describes how to access the Info Mode to view warning/fault messages and exposure values.
Explains how to view gas, unit, and range limit values in Info-Off Mode.
Lists functions accessible via the Quick Menu, such as bump test and fresh air adjustment.
Describes how to access the Info Mode to view warning/fault messages and exposure values.
Explains how to view gas, unit, and range limit values in Info-Off Mode.
Lists functions accessible via the Quick Menu, such as bump test and fresh air adjustment.
Guides on calibrating the instrument to fresh air to set the sensor's zero point.
Explains how to perform a standard sensitivity calibration using test gas.
Specifies the recommended annual inspection and maintenance intervals for the instrument.
Provides instructions and warnings regarding the cleaning of the instrument.
Details the various markings and certifications applied to the instrument.
| Measurement Range (H2S) | 0 - 100 ppm |
|---|---|
| Measurement Range (Ex) | 0 - 100 % LEL |
| Measurement Principle | Electrochemical (O2, CO, H2S), Catalytic (Ex) |
| Display | LCD |
| Resolution (O2) | 0.1 % vol |
| Resolution (CO) | 1 ppm |
| Resolution (H2S) | 0.1 ppm |
| Resolution (Ex) | 1 % LEL |
| Accuracy (Ex) | ± 5 % LEL |
| Gas Detection | O2, CO, H2S, Ex (combustible gases) |
| Operating Temperature | -20 to +50 °C |
| Operating Humidity | 10 - 95% RH (non-condensing) |
| Power Supply | Rechargeable Li-ion battery |
| Alarm | Visual, audible, and vibration alarms |
| Data Logger | Yes |
| Accuracy (CO) | ± 5 ppm |
| Certifications | ATEX, IECEx, UL |
| Measurement Range (O2) | 0 to 25 vol.% |