

J
jonesdeannaSep 9, 2025
What to do if Dräger X-am 5100 display error 353?
- MMaria GarciaSep 9, 2025
If error code 353 appears, it indicates that the EC1 concentration has drifted into the negative range. Perform a fresh air calibration.
What to do if Dräger X-am 5100 display error 353?
If error code 353 appears, it indicates that the EC1 concentration has drifted into the negative range. Perform a fresh air calibration.
How to fix error 102 on Dräger X-am 5100 Security Sensors?
Error code 102 indicates that the customer's service life counter has elapsed. Reset the service life counter using Dräger CC Vision.
What does error 152 mean on Dräger X-am 5100 Security Sensors?
Error code 152 indicates that the customer's service life counter is about to elapse. Reset the service life counter using Dräger CC Vision.
How to fix Dräger X-am 5100 Security Sensors not switching on?
If your Dräger Security Sensors won't switch on, it might be due to a discharged power pack. In this case, charge the power pack. Alternatively, if the alkaline batteries are discharged, insert new alkaline batteries.
How to fix error 305 on Dräger X-am 5100?
Error code 305 indicates an error during the bump test of Dräger Sensor XS EC1. Repeat the bump test. If necessary, adjust or replace the Dräger Sensor XS EC1.
What does error 109 mean on Dräger Security Sensors?
Error 109 means that the menu function cannot be carried out because of an error. Identify the error code via the info menu and switch off, if necessary.
What does error 159 mean on Dräger X-am 5100 Security Sensors?
Error 159 means adjustment is not possible because a message is preventing the function (e.g., sensors in warm-up phase). Identify the message code via the info menu and switch off the device, if necessary.
How to fix error 356 on Dräger X-am 5100 Security Sensors?
Error code 356 indicates that the calibration interval for DrägerSensor XS EC1 has elapsed. Perform a sensitivity adjustment for DrägerSensor XS EC1.
What to do if Dräger Security Sensors show error 107?
Error 107 on Dräger Security Sensors indicates a bump test error. Perform a bump test, or a sensitivity adjustment.
How to fix error 106 on Dräger X-am 5100?
Error code 106 indicates that the calibration interval has elapsed. To resolve this, perform a sensitivity adjustment.
| Measurement Range (H2S) | 0 - 100 ppm |
|---|---|
| Measurement Range (Ex) | 0 - 100 % LEL |
| Measurement Principle | Electrochemical (O2, CO, H2S), Catalytic (Ex) |
| Display | LCD |
| Resolution (O2) | 0.1 % vol |
| Resolution (CO) | 1 ppm |
| Resolution (H2S) | 0.1 ppm |
| Resolution (Ex) | 1 % LEL |
| Accuracy (Ex) | ± 5 % LEL |
| Gas Detection | O2, CO, H2S, Ex (combustible gases) |
| Operating Temperature | -20 to +50 °C |
| Operating Humidity | 10 - 95% RH (non-condensing) |
| Power Supply | Rechargeable Li-ion battery |
| Alarm | Visual, audible, and vibration alarms |
| Data Logger | Yes |
| Accuracy (CO) | ± 5 ppm |
| Certifications | ATEX, IECEx, UL |
| Measurement Range (O2) | 0 to 25 vol.% |
Explains the meaning of warning, caution, and notice icons used in the document.
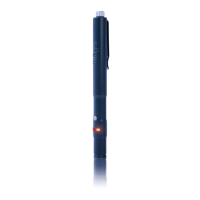
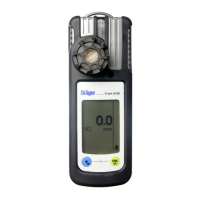
Identifies and describes the components of the Dräger X-am 5100 device.
Specifies the portable gas detection instrument's intended application and monitoring capabilities.
Details the intended operating environments and conditions, including hazardous area classifications.
Provides instructions and warnings for charging the instrument's rechargeable batteries.
Details the procedure and precautions for replacing batteries in the instrument.
Explains the steps to power on the Dräger X-am 5100 device.
Outlines the procedure for powering down the Dräger X-am 5100 device.
Lists essential checks and warnings before using the instrument in a work environment.
Describes how to connect the instrument to a PC for configuration using Dräger CC-Vision software.
Step-by-step guide on how to perform a bump test on the instrument.
Explains how to perform a bump test and document the results within the instrument's memory.
Provides operational guidance and notes on how to use the instrument correctly.
Explains how different alarms are indicated and acknowledged on the instrument.
Describes the indications and acknowledgment of a concentration pre-alarm (A1).
Details the indications and acknowledgment of a concentration main alarm (A2).
Explains the STEL/TWA exposure alarms and their handling.
Describes the battery pre-alarm indication and its implications.
Describes the indications and automatic shutdown for the battery main alarm.
Explains the 'Instrument alarm' indication and the need for maintenance.
Describes how to access the Info Mode to view warning/fault messages and exposure values.
Explains how to view gas, unit, and range limit values in Info-Off Mode.
Lists functions accessible via the Quick Menu, such as bump test and fresh air adjustment.
Describes how to access the Info Mode to view warning/fault messages and exposure values.
Explains how to view gas, unit, and range limit values in Info-Off Mode.
Lists functions accessible via the Quick Menu, such as bump test and fresh air adjustment.
Guides on calibrating the instrument to fresh air to set the sensor's zero point.
Explains how to perform a standard sensitivity calibration using test gas.
Specifies the recommended annual inspection and maintenance intervals for the instrument.
Provides instructions and warnings regarding the cleaning of the instrument.
Details the various markings and certifications applied to the instrument.