;;
The_d"'YPo..""",,,,,,,,,,,in_" -
,
s being thrown into
~
the eyes, which can resuh in severe eye damage. Always wear safety glasses
Z
I'
..
or eye shields before commencing power tool operation. We recommend
,
I' WIde VIsIon Safety Mask for use over,spectacles or standard safety glasses.
Whenever you hold the tool, be careful not
to cover the air vents with your hand. This
blocks the air flow and causes the motor
to overheat.
'
ALWAYS UNPLUG MOTO-TOOL BEFORE
CHANGING ACCESSORIES, CHANGING
COLLETS OR SERVICING YOUR MOTO TOOL
l.-=-.J
~
~
~
TO LOOSEN COLLET
COLLET - Consists of a collet nut and collet.
To loosen, first press shaft Irick and rotate the
shaft by hand until the lock engages the shaft
preventing further rotation.
~
Do not engage lock while
~ the Moto-Toolls running.
With the lock engaged use the collet wrench to
loosen the collet nut. Change accessories
inserting the new one into the collet as far as
possible to minimize runout and unbalance.
With the lock engaged, tighten the collet nut
with the wrench until the accessory shank is
gripped by the collet. Avoid excessive tighten-
ing of the collet nut. This means of securing
accessories is best when using the same bit for
extended periods or during heavy material
removal applications.
COLLETS - Four different size collets (see
illustration), to accommodate different shank
sizes, are available for your Moto-Tool. To
install a different collet, remove the collet nut
and remove the old collet. Insert the unslotted
end ofthe collet in the hole in the end of the tool
shaft. Replace collet nut on the shaft. Always
use the collet which matches the shank size of
the accessory you plan to use. Never force a
larger diameter shank into a collet.
KEYLESS CHUCK - Remove collet and the
keyless chuck can be threaded on the end ofthe
shaft by engaging the shaft lock button. You
need only use hand tightening to secure an
accessory. Use the keyless chuck when there
is a need to change bits frequently, for light
duty jobs.
SELF.ADJUSTING
KEYlESS CHUCK
(AVAILABLE AS ACCESSORY)
I
0\)-
~-
@~~
COLLET
4821/16" 4831132"
COLLET COLLET
BALANCING ACCESSORIES - For precision
work, it is important that all accessories be in
good balance (much the same as the tires on
your automobile). To true up or balance an
accessory, slightly loosen collet nut and give
the accessory or collet a 1/4" turn. Retighten
collet nut and run the Moto- Tool. You should be
able to tell by the sound and feel if your
accessory is running in balance. Continue
adjusting in this fashion until best balance is
achieved. To maintain balance on abrasive
wheel points, before each use, with the wheel
point secured in the collet, turn on the Moto- Tool
and run the 415 Dressing Stone lightly against
the revolving wheel point. This removes high
spots and trues up the wheel point for good
balance.
WHEEL DIAMETER - Other than the No. 426
cutoff wheel, do not use grinding wheels
over 1"ln diameter. Moto-TooI's high speed
can cause larger wheels to fly apart and could
cause injury.
SAFETY - Protect your eyes when grinding or
routing with the Moto-Tool... always wear an
approved type of safety glasses.
Remember, your new Dremel Moto- Tools the
finest power tool of its kind. But its pertor-
--mance is only as good as the accessories with
which it is used. We recommend only Dremel
accessories be used. Use of any other acces-
so~es may create a hazard. We hope you'll
Il'"Joy
many years of trouble free pleasure from
your Dremel Moto-Tool.
Page
6
Operating
Speeds &Accessories
Set the speed Indicator to fit the Job; to
achieve the best Job results when working
with different materials, the speed of the
Moto. Tool should be regulated. Only a full
wave output speed control such as the
Dremel Models 219 and 221 should be used
with the Model 275. Models 285 and 395
Moto. Tool have an Integral speed control
and an external speed control should never
be used with these tools.
Toselect the right speed for each job, use a
practice piece of material. Vary speed to
find the best speed for the accessory you
are using and the job to be done.
There are three basic types of Moto- Tools:
single speed, two-speed and variable speed
models. On the single speed model, there is an
ON-OFF switch. When the switch is on, the tool
runs at 28,000 RPM. On the two-speed model,
there Is a LO and HI switch. When the switch
indicator is on the low setting, the tool runs at
about 15,000 RPM. When the switch indicator
is on the high setting the tool runs about 28,000
RPM. On the variable speed model, there is a
switch indicator with a white line on it. Slide to
the number on the housing to select the operat-
ing speed needed from 5,000 - 30,000 R.P.M.
You can refer to the charts on page 9 and 10 to
determine the proper speed, based on the
material being worked and the type of cutter or
other accessory being used. These charts enable
you to select both the correct accessory and the
optimum speed at a glance.
If you have a single speed or two-speed model,
you wil be able to use many accessories to do a
wide assortment of jobs. For the majority of
applications, all models of the Moto- Tool should
be used at top speed.
Needs for Slower Speeds
Certain materials, however, (some plastics, for
example) require a relatively slow speed
because at high speed the friction of the tool
generates heat and causes the plastic to melt.
Slow speeds (15,000 RPM or less) usually are
best for polishing operations employing the felt
polishing accessories. They may also be best
for working on delicate projects as "eggery"
work, delicate wood carving, and fragile model
parts. You should always do polishing with
wire brush accessories at slower speeds and
never higher than 15,000 RPM.
higher speeds are better for carving, cutting,
rOl,lting, shaping, cutting dadoes or rabbets.in
wood. ..'
Hardwoods, metals, and glass require high
speed operation, and drilling should also be
done at high speeds.
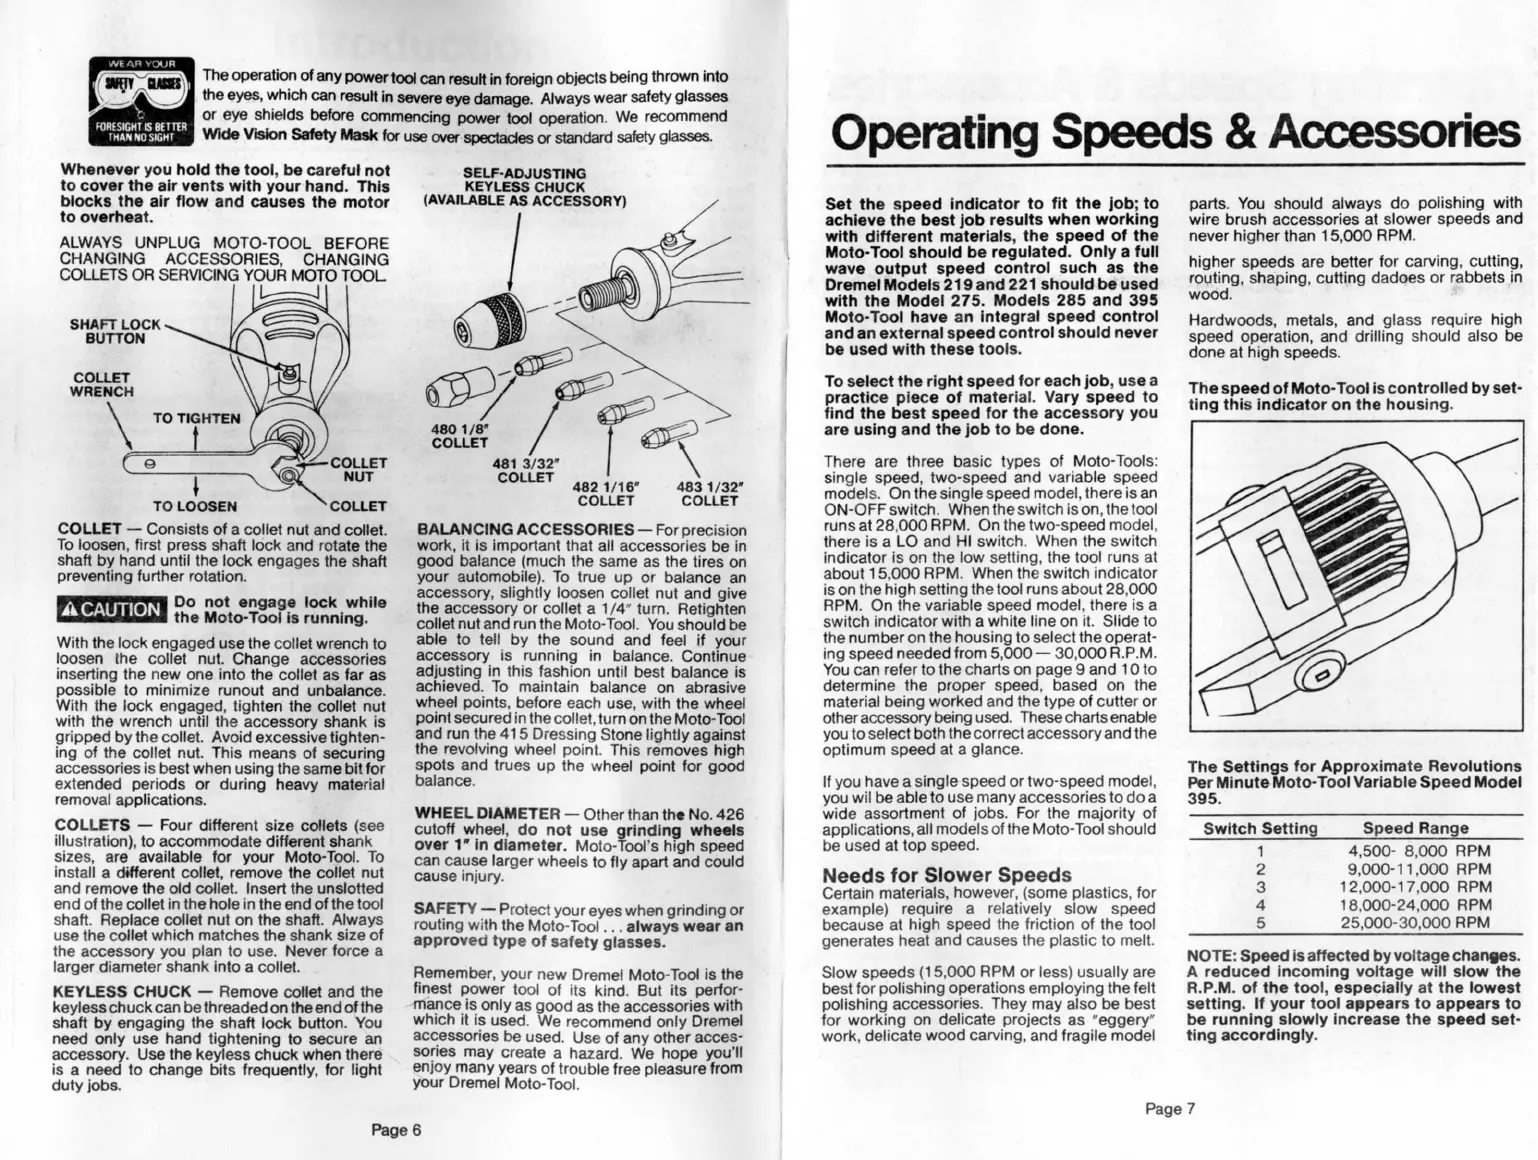
The speed of Moto- Tool Is controlled by set.
ting this Indicator on the housing.
The Settings for Approximate Revolutions
Per Minute Moto- Tool Variable Speed Model
395.
Switch Setting
1
2
3
4
5
Speed Range
4,500- 8,000 RPM
9.000-11,000 RPM
12.000-17,000 RPM
18,000-24,000 RPM
25,000-30,000 RPM
NOTE: Speed Isaffected by voltage chantl8s.
A reduced Incoming voltage will slow the
R.P.M. of the tool, especially at the lowest
setting. If your tool al'pears to appears to
be running slowly Increase the speed set.
tlng accordingly.
Page 7
 Loading...