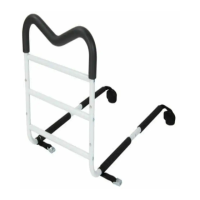
M-Rail installation instructions
2
Preparing the M-Rail for assembly:
1. Openthecartonandremoveallparts.Removetheplasticcoveringsanddisposeofsafelyawayfromchildrenandinfants.
2. TheM-Railcanbeusedwitheithertwo(2)CrossBarsorthree(3)CrossBars.Bychoosingeitherthetwo(2)orthree(3)CrossBar
optionyoucanadjusttheM-Railheightrelativetotheoorandtosuittheuser’spreference.Forthickmattresseswerecommendthat
youuse3CrossBars.Ifyouchoosetouse2CrossBars,discardpartD(HBar).
Assembling the M-Rail:
3. Snap-lockpartAintopartB.Repeat
onotherside
4.ScrewpartContopartsB.Leave
screwsloose.
5. IfyouareusingpartD(HBar),
snap-lockpartDontopartB.
6. Lastly,snap-lockpartEontoeitherpartDorpartB.MakesurethatalltheSnap-Lock
SpringButtonsareinplace.
7. AdjustmentsmaybeneededtotightenorloosenpartD(HBar)forpropert.YouarereadytoinstalltheM-Railontoyourbed.
Installer quick tip: ifusingpartDandyou
experienceanydifcultywhenyousnap-lockpartEinto
placeontopartD,loosenthescrews121onpartDusing
theallenkeyprovided.
A
A
A
A
A
C
C
A
B
B
B
B
B
B
A
A
C
B
B
E
E
A
A
C
B
B
D
M-Rail
Low Profile
with 2 bars
M-Rail
High Profile
with 3 bars